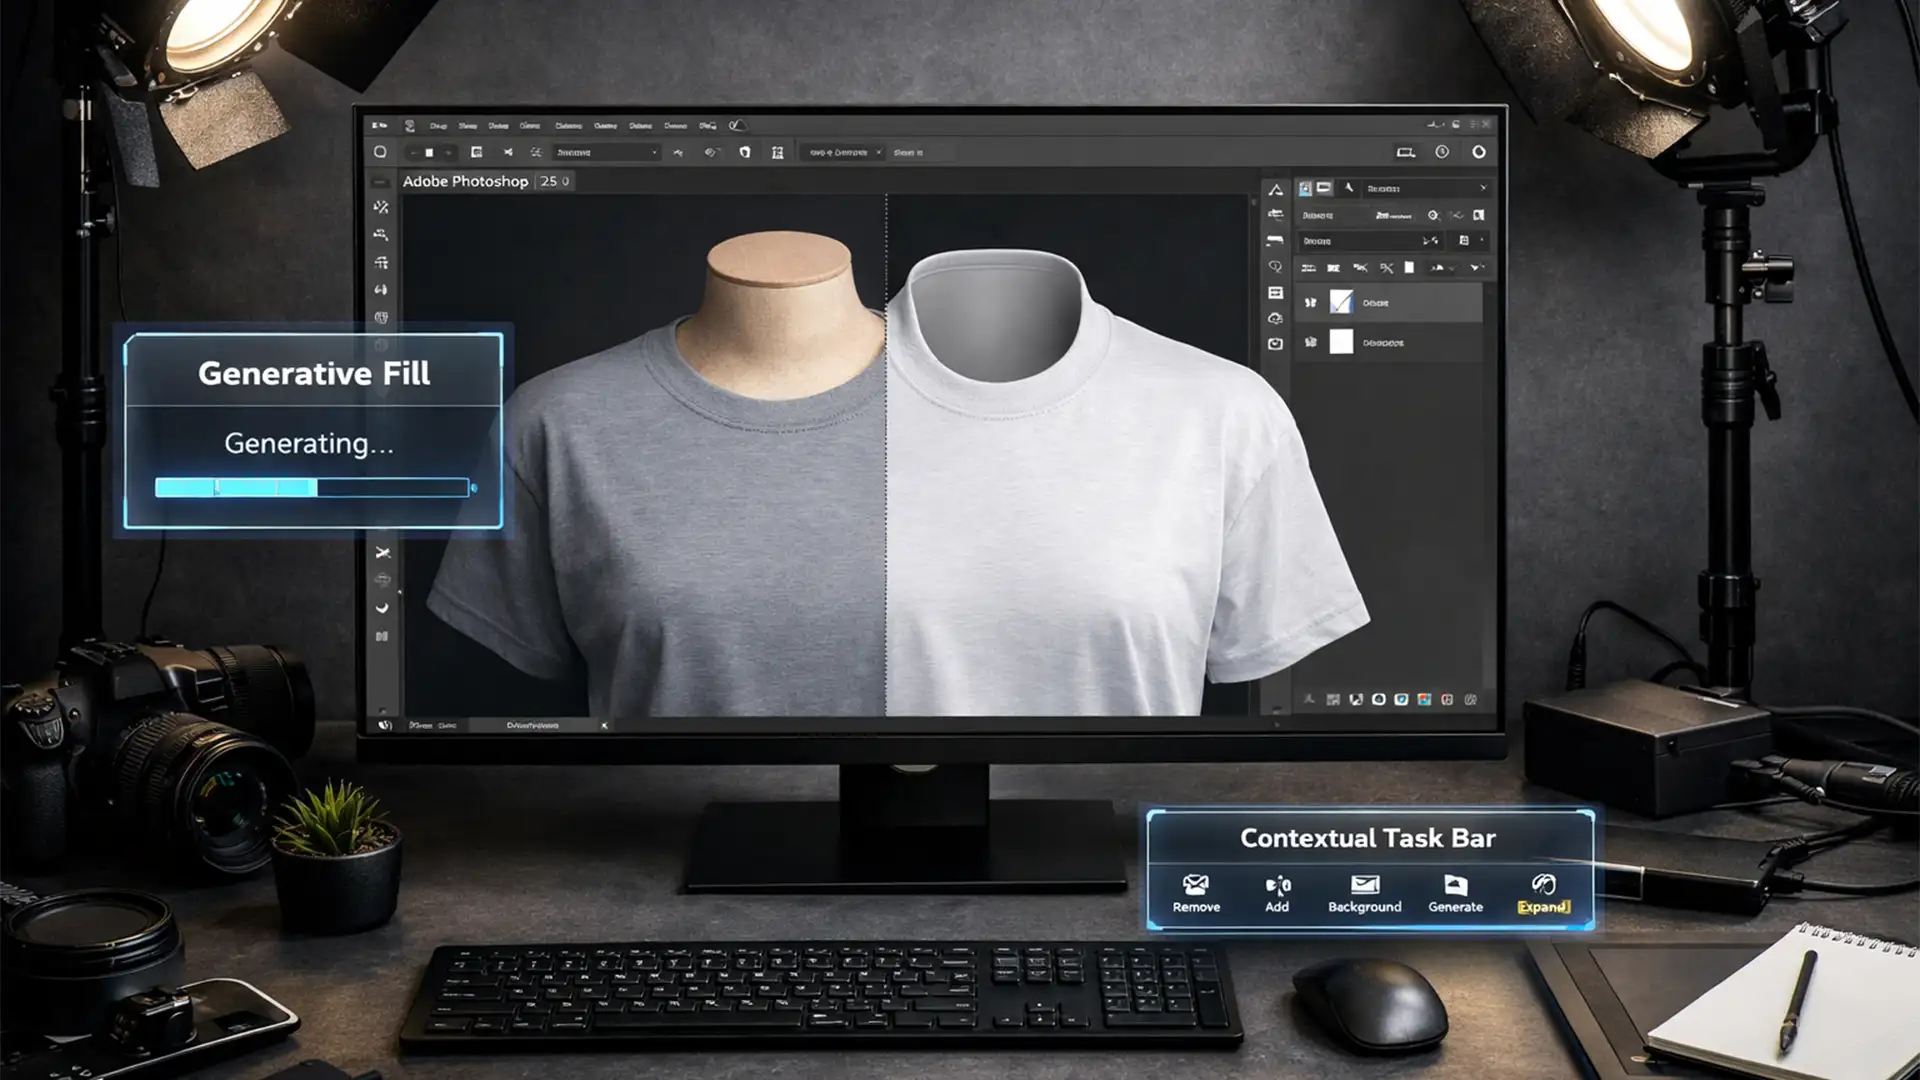
Shooting e-commerce apparel traditionally requires a tedious two-shot process: capturing the front of the garment on a dummy, then shooting an inside-out “neck joint” to composite later. It doubles your studio time and bogs down post-production.
While Adobe’s latest AI updates promise a quick fix, simply clicking “generate” to remove the dummy often leaves you with flat lighting, mismatched fabric textures, and an unrealistic perspective.
To achieve studio-quality results, you need a hybrid approach. In this guide, we will break down the professional AI Ghost Mannequin workflow using Photoshop Generative Fill, showing you exactly how to combine AI speed with high-end retouching techniques to produce flawless, hollow apparel imagery.
Why the Standard AI Ghost Mannequin Workflow Fails
When executing e-commerce retouching, realism is everything. Buyers need to see the exact texture, drape, and depth of the garment.
If you solely rely on Generative Fill to replace a mannequin’s neck and chest, Photoshop v25.0 (and later) struggles in three key areas:
- Lack of Depth: AI often generates a flat inner collar, ignoring the natural drop-shadow cast by the front of the shirt.
- Texture Mismatch: Generative Fill creates low-frequency, smoothed-out pixels that clash with the high-frequency weave of real cotton, wool, or silk.
- Perspective Errors: The AI frequently misunderstands the curve of the back collar, resulting in a distorted neck joint.
To fix this, we must guide the AI using precise prompt engineering and finish the image using advanced layer masking and compositing techniques.
The Ultimate AI Ghost Mannequin Workflow in Photoshop
Depending on your volume and quality requirements, you can approach the Ghost Mannequin effect in three ways.
Method 1: The Quick Fix (For Fast E-commerce Turnarounds)
If you are processing hundreds of basic garments for a fast-fashion catalog, you can optimize the AI generation process to minimize manual correction.
- Open your mannequin shot in Photoshop.
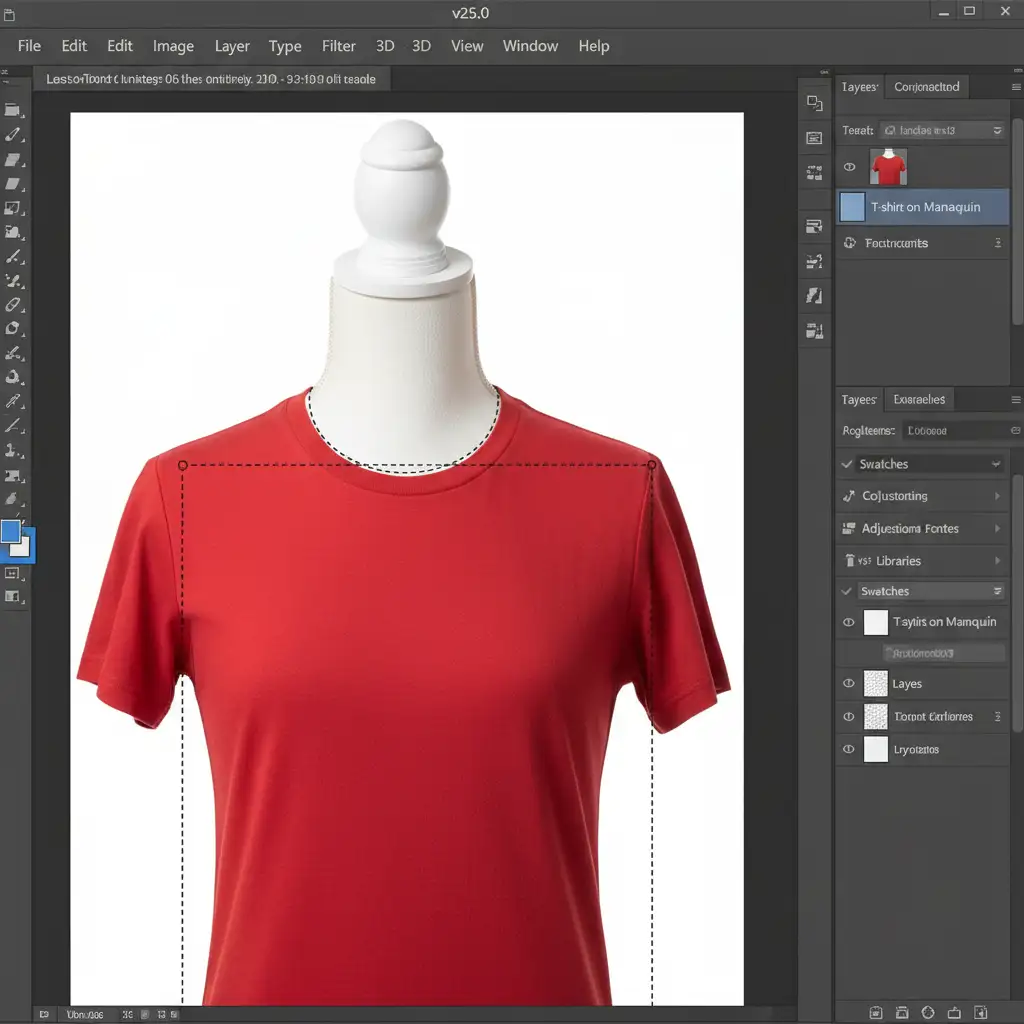
- Select the Lasso Tool (L) and draw a loose selection around the visible mannequin neck and inner collar area. Include a small portion of the actual fabric so the AI has a reference point.
- Locate the Contextual Task Bar.
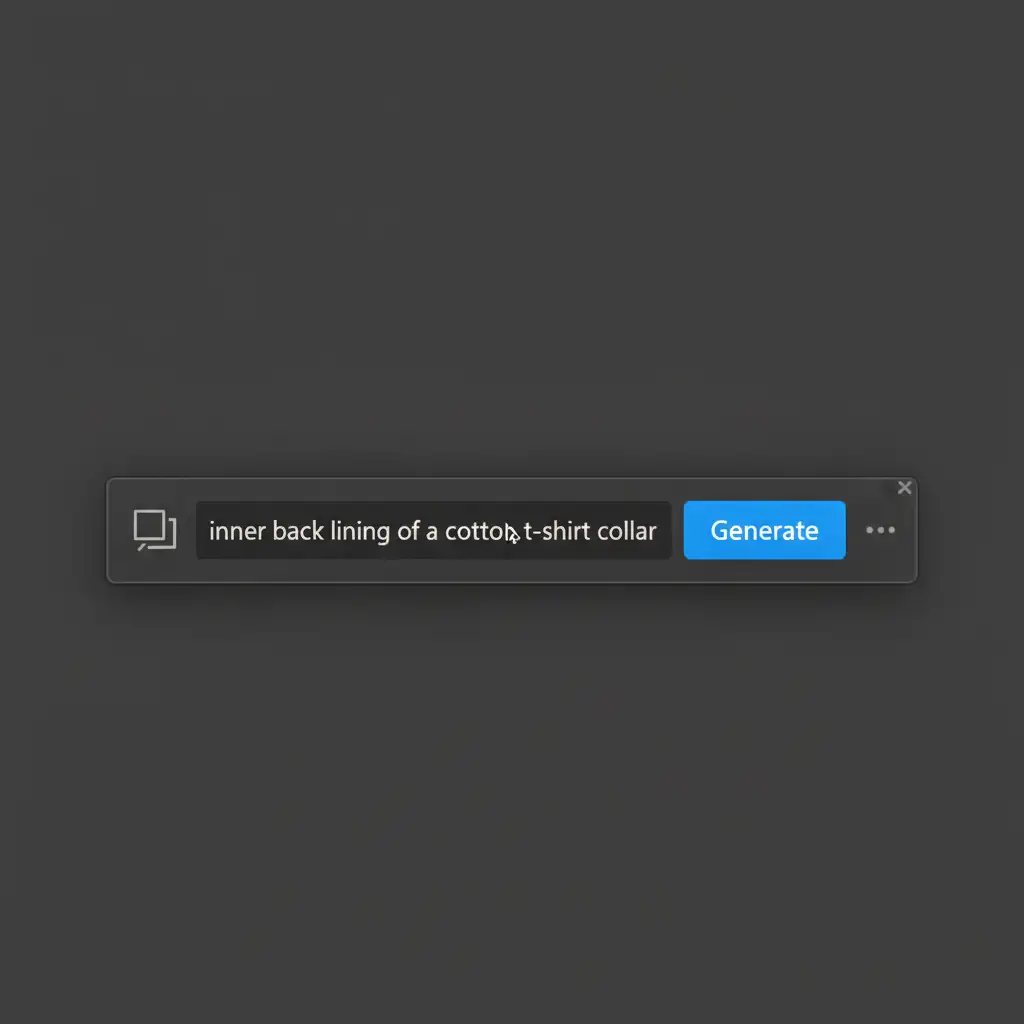
- Instead of leaving the prompt blank, use precise prompt engineering. Type: ‘inner back lining of a cotton t-shirt collar, dark shadow, realistic fabric’.
- Click Generate and cycle through the three variations to find the best structural fit.
Method 2: The Pro Workaround (Adding Realistic Depth)
For premium brands, the quick fix isn’t enough. The inner collar needs realistic 3D depth to look authentic.
- Isolate the Garment: Create a precise Clipping Path around the outer edge of the garment using the Pen Tool (P). Mask out the background and the exterior mannequin parts.
- Generate the Neck Joint: Use Generative Fill specifically on the missing inner neck gap, just as in Method 1.
- Add Depth: The AI-generated collar will likely look flat. Create a new layer above your Generative Fill layer. Right-click and choose Create Clipping Mask.
- Paint the Shadow: Select a soft-edged Brush Tool (B), sample a dark color from the garment, and gently paint a drop shadow directly beneath the front collar edge. Alternatively, apply an Inner Shadow layer style to the front garment layer, adjusting the angle to match your studio lighting.

Method 3: The Technical Deep-Dive (Fixing AI Textures)
When dealing with complex fabrics like ribbed knit, corduroy, or heathered cotton, Generative Fill will almost always fail to match the texture. To fix this, we combine AI structure with manual Frequency Separation.
- Generate the Base: Use Generative Fill to create the structural shape and color of the missing neck joint.
- Isolate AI Lighting: If the AI created weird, blotchy shadows, use a Luminosity Mask to select only the dark pixels of the generated area and gently curve them to match the physical garment’s contrast.
- Run Frequency Separation: Duplicate your entire merged image twice. Blur the lower layer (Low Frequency/Color) and apply Image > Apply Image to the top layer (High Frequency/Texture).
- Clone the Real Texture: Select the High-Frequency layer. Use the Clone Stamp Tool (S) to sample the actual weave from the front of the garment, and carefully brush it over the AI-generated inner collar.
This ensures the AI provides the correct geometric shape and color, while your manual retouching provides the photorealistic fabric texture.
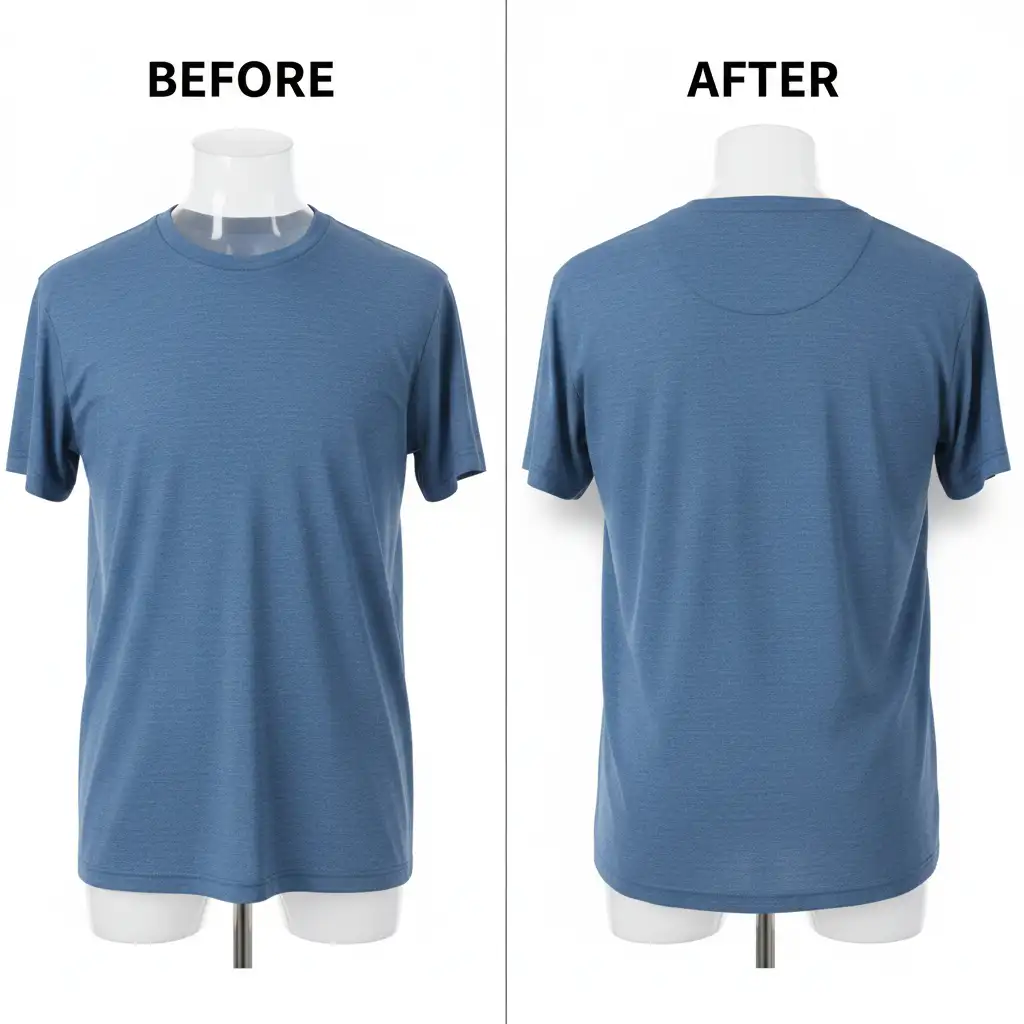
Before and After: The Power of a Hybrid AI Workflow
Relying entirely on AI yields amateur results. Relying entirely on manual compositing wastes time. By integrating Generative Fill into a structured, professional workflow, you can cut your per-image editing time in half while maintaining top-tier quality.
Scale Your E-Commerce Retouching with Image Work India
Mastering the AI Ghost Mannequin workflow using Photoshop Generative Fill is a game-changer for individual images, but executing this flawlessly across thousands of SKUs requires a dedicated team.
If your studio is overwhelmed by high-volume post-production, you don’t have to spend hours fixing mismatched AI textures and flat lighting.
At Image Work India and Cloud Retouch, our team of professional retouchers specializes in high-end, high-volume e-commerce editing. We combine cutting-edge AI tools with expert manual techniques-like clipping paths and frequency separation-to deliver flawless ghost mannequin edits at scale.
Stop wrestling with AI artifacts. Focus on shooting great products, and let us handle the retouching. Contact Image Work India today to streamline your e-commerce workflow and get your products online faster.