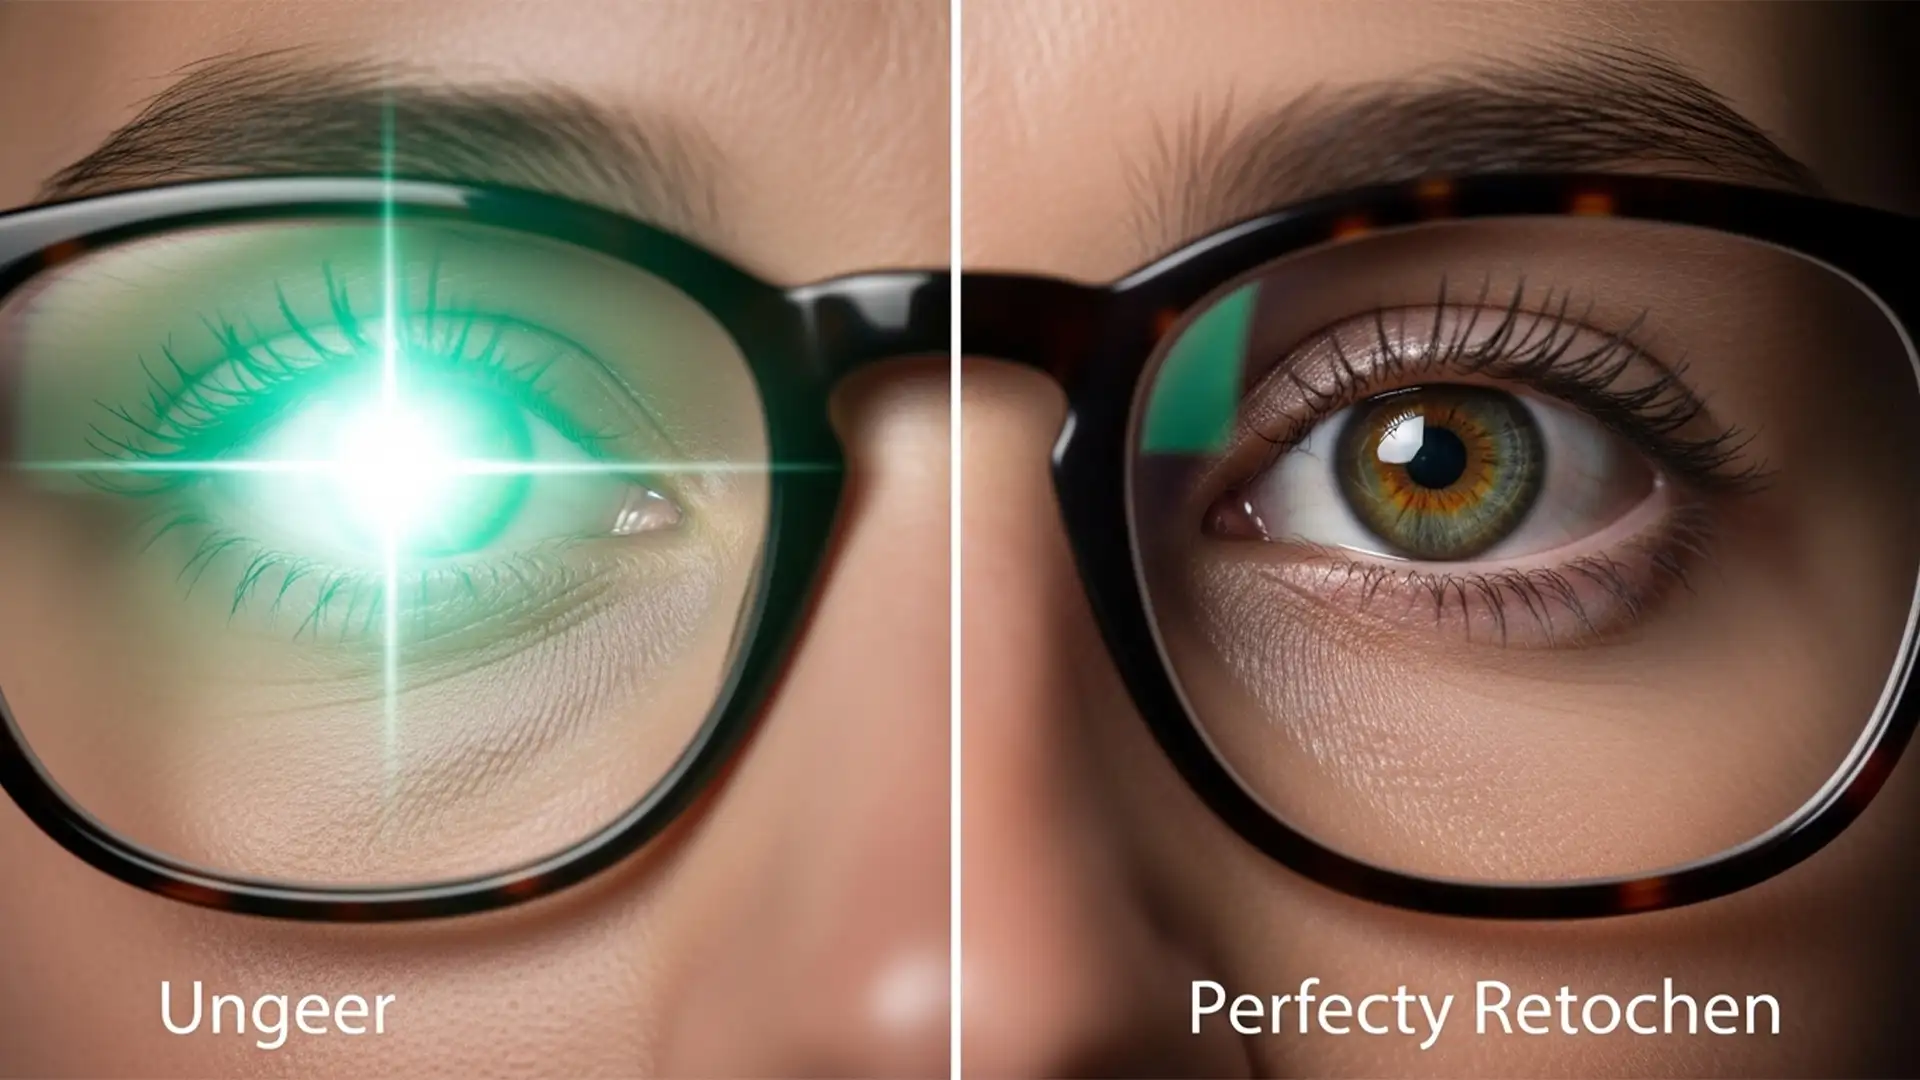
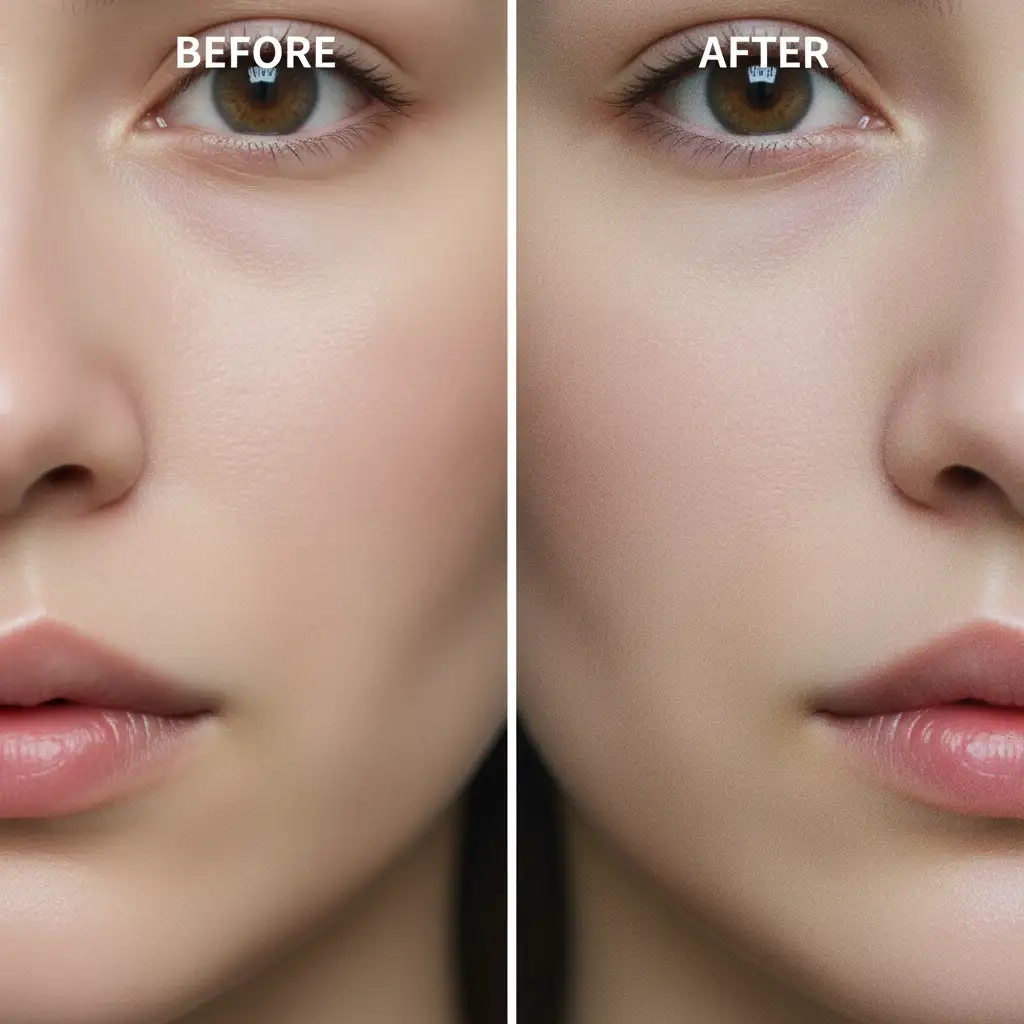
You just generated a stunning corporate portrait using Midjourney v6 or a specialized AI avatar app. At first glance, it looks perfect. But zoom in, and the illusion shatters. You notice asymmetrical pupils, fused teeth, and an overly smooth, plastic skin texture that screams “fake.” Welcome to the Uncanny Valley.
While AI generation has revolutionized digital imagery, these micro-artifacts are the dead giveaways that ruin professional credibility. Fixing AI headshot artifacts requires more than just basic editing; it demands a strategic, non-destructive workflow. In this guide, we will walk you through the exact Adobe Photoshop v25.0+ techniques needed to transform flawed AI generations into flawless, human-grade portraits.
The Anatomy of an AI Headshot Failure
Before diving into the solutions, it is crucial to understand what goes wrong during AI rendering. Even the most advanced models struggle with highly specific human anatomical details. Common rendering errors include:
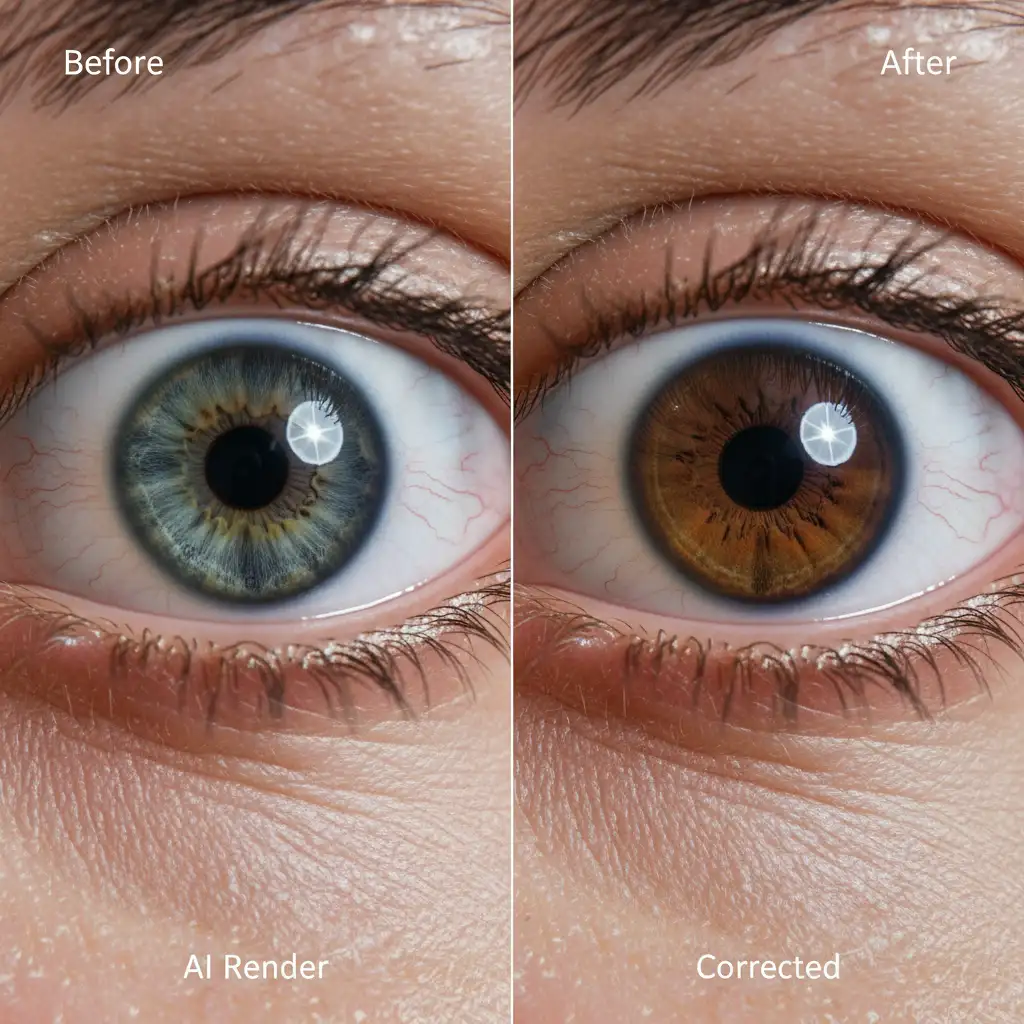
- Ocular Asymmetry: Pupils that point in slightly different directions or feature warped irises.
- Dental Anomalies: Extra teeth, fused incisors, or jagged gum lines.
- The “Plastic” Effect: A complete lack of natural pores, resulting in a waxy, artificial complexion.
- Hair Blending Errors: Strands of hair that melt into clothing or background elements.
Here is how you can systematically eliminate these issues.
5 Pro Techniques to Fix AI Headshot Artifacts in Photoshop
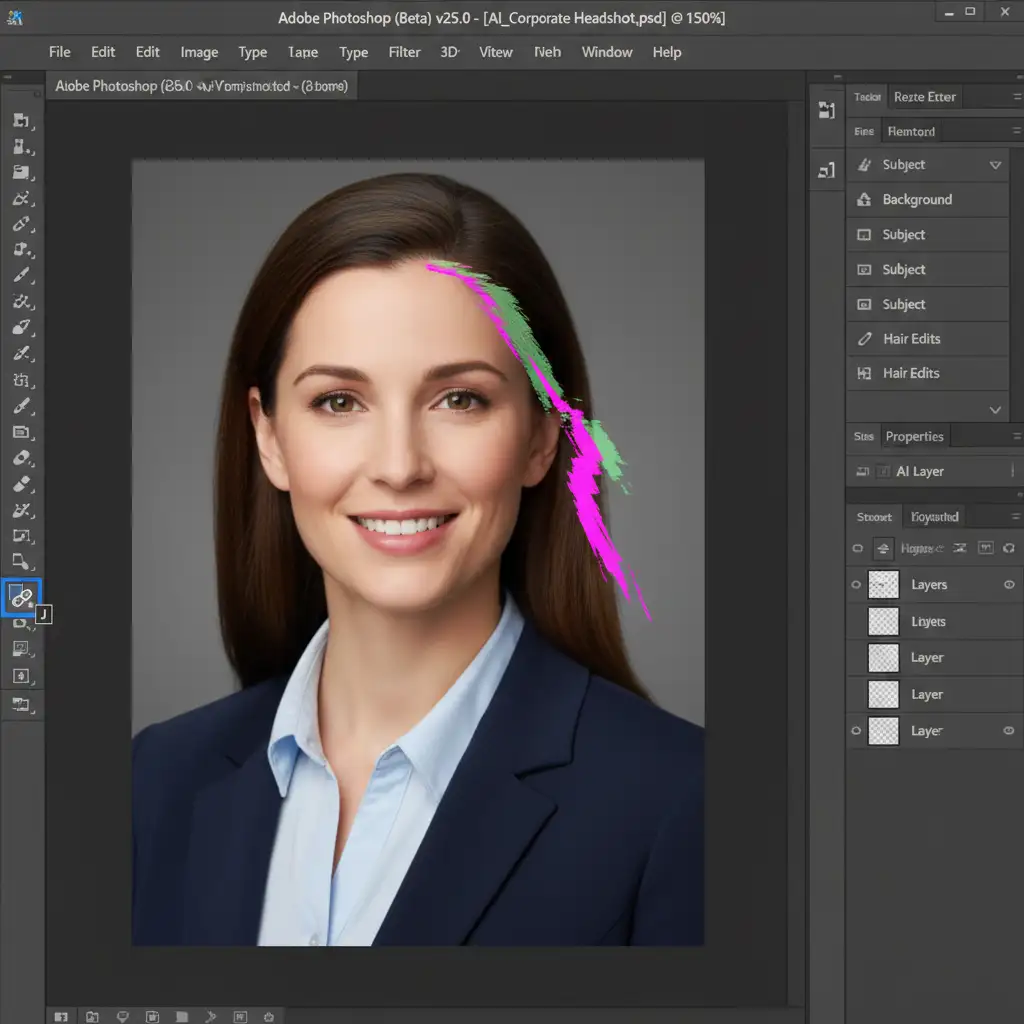
1. The Quick Fix: Eliminating Stray Hairs and Blemishes
AI often generates random digital blemishes or hair strands that defy physics. For these surface-level anomalies, Photoshop’s AI-powered removal tools are your first line of defense.
Select the Remove Tool (Shortcut: J) to paint over stray AI hairs or background merging errors. Unlike traditional cloning, the Remove Tool analyzes the surrounding pixels to seamlessly rebuild the background. For minor spots, the Spot Healing Brush works perfectly to instantly zap away digital artifacts without destroying the underlying texture.
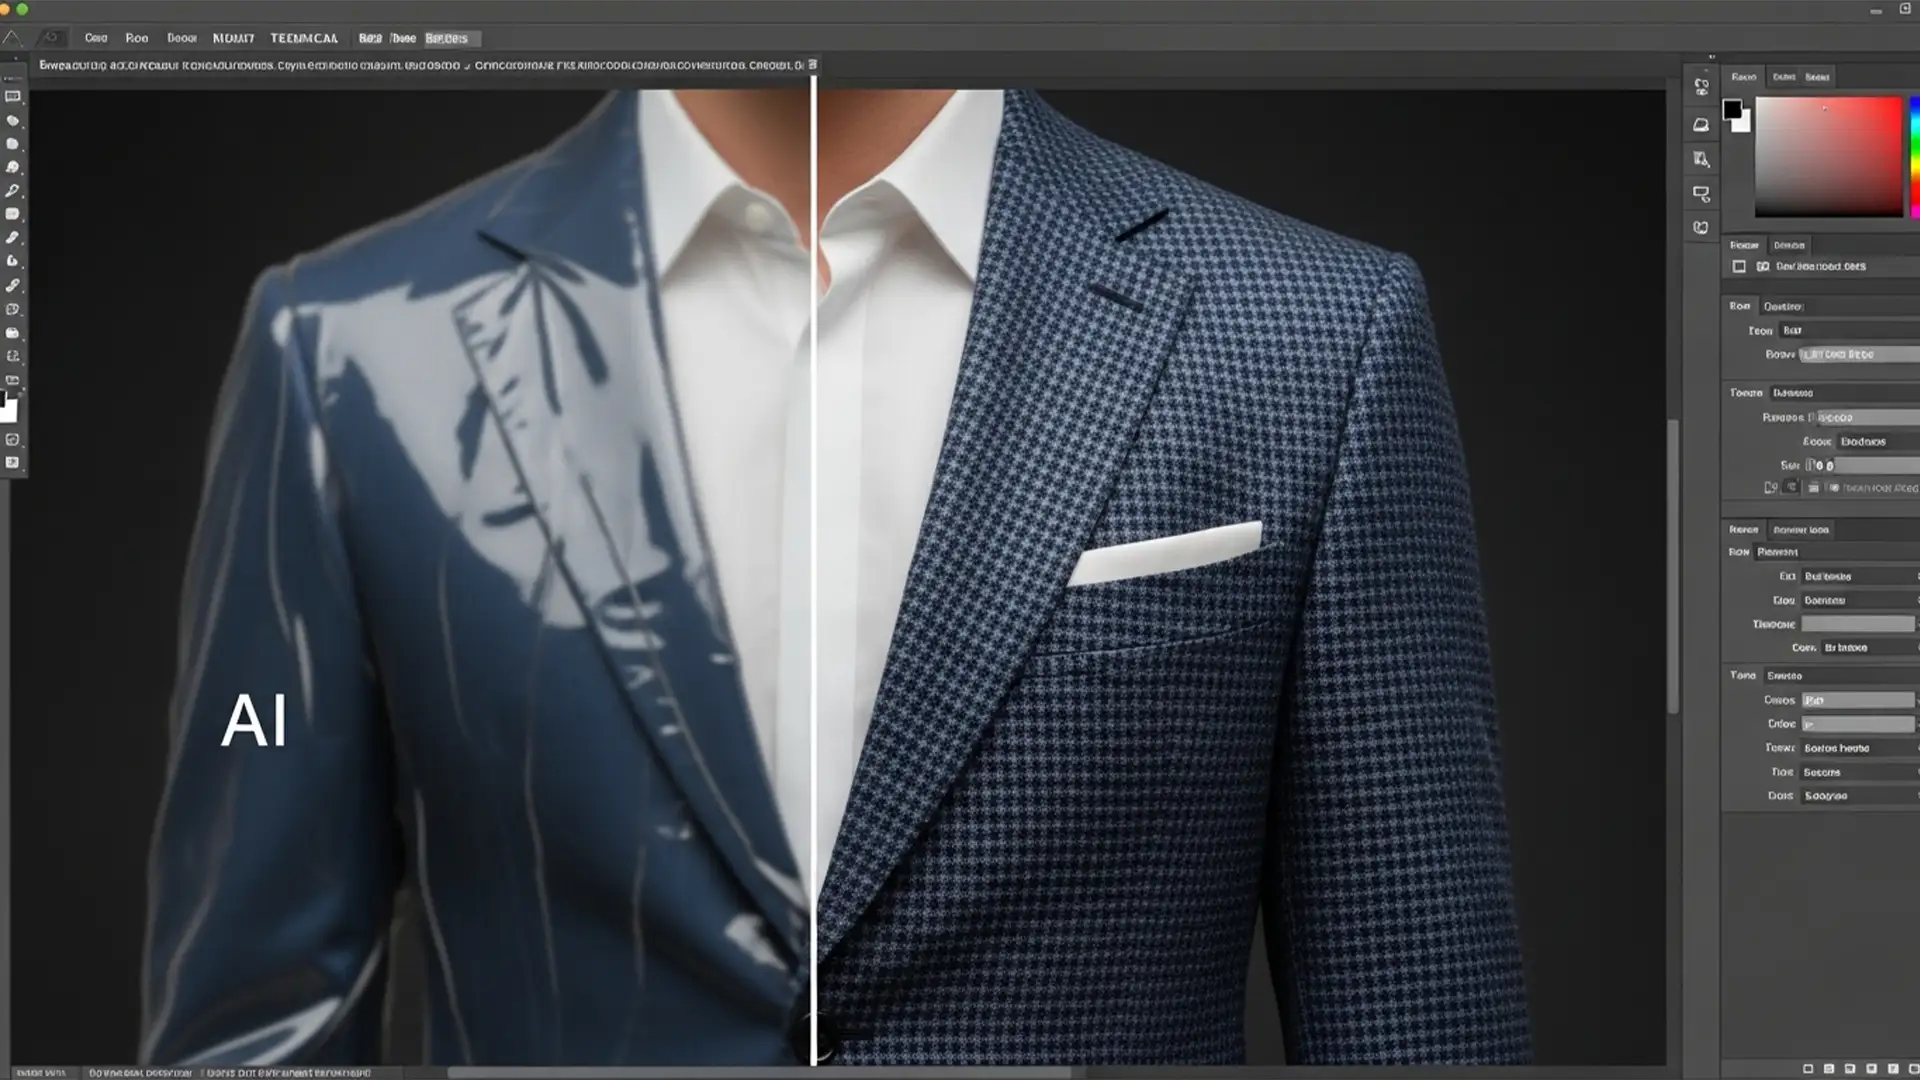
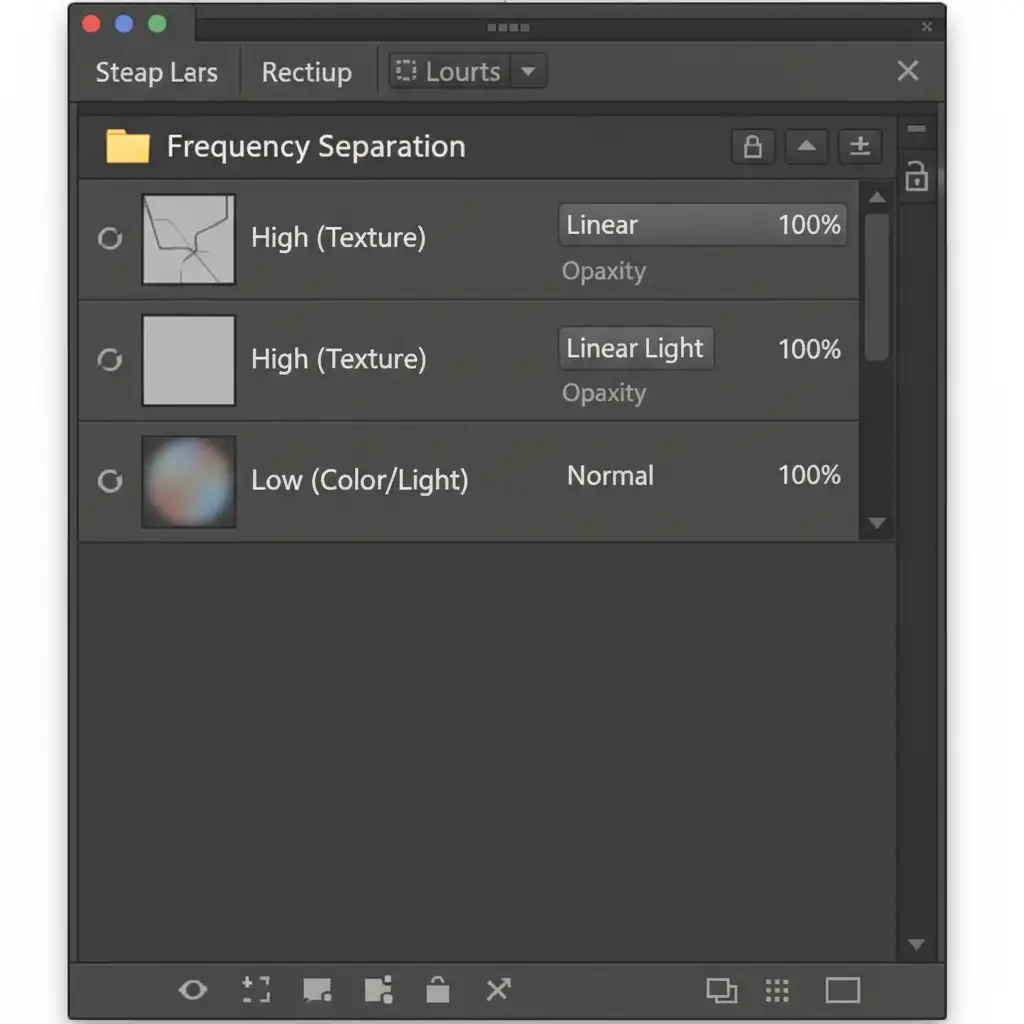
2. The Pro Workaround: Restoring Realistic Skin via Frequency Separation
The most common giveaway of an AI headshot is overly smoothed, plastic skin. To fix this without ruining the AI-generated lighting, you must use Frequency Separation.
This technique involves splitting your image into two distinct layers:
- Low Frequency Layer: Contains the color, shadows, and light transitions.
- High Frequency Layer: Contains the fine details and textures.
By applying a High-pass Filter to the High layer, you isolate the texture. You can then source real skin pores from a stock photo, rasterize the layer, and clone those natural pores directly onto your High layer. This replaces the waxy AI skin with human realism while keeping the original lighting intact.
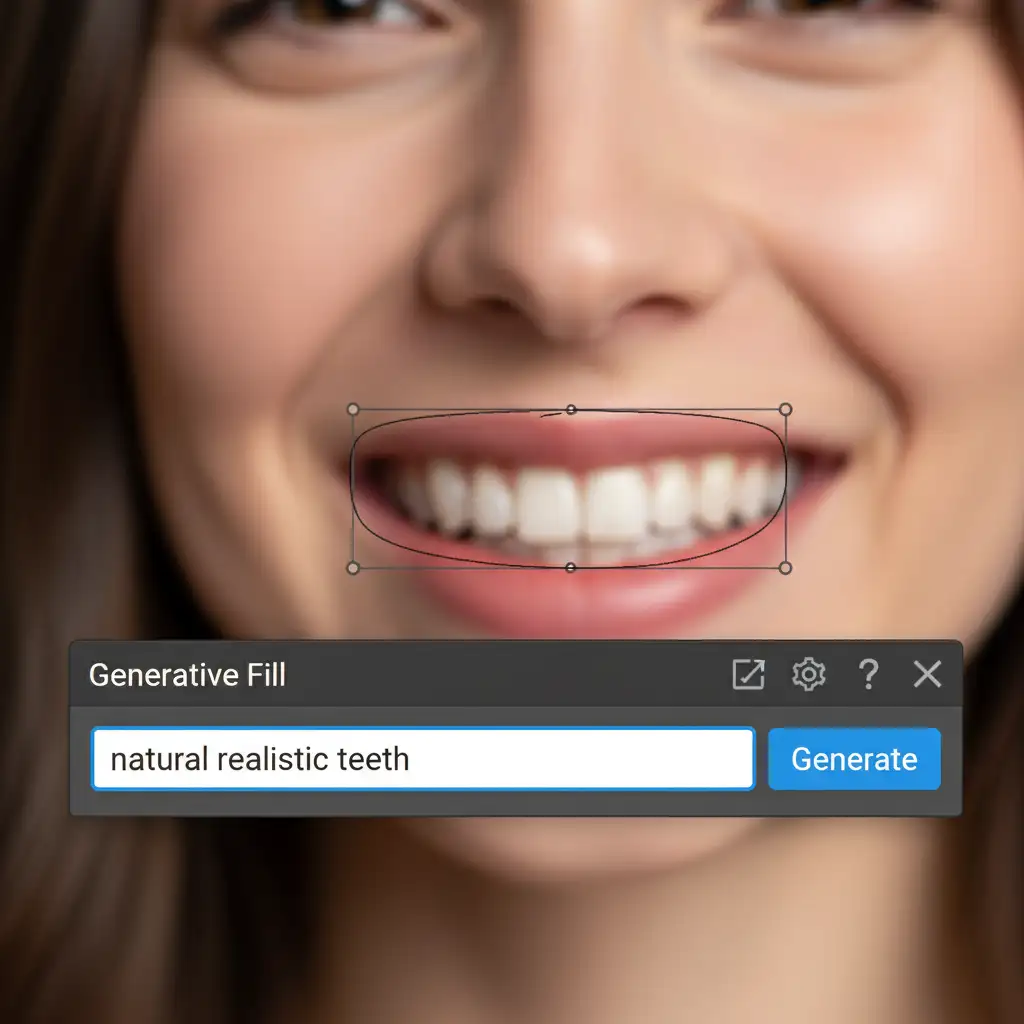
3. The Technical Deep-Dive: Rebuilding Structural Errors with Generative Fill
When dealing with structural nightmares-like fused AI teeth or warped eyes-traditional cloning falls short. This is where Adobe Firefly’s Generative Fill excels.
Use the Lasso Tool to make a precise selection around the flawed area (e.g., asymmetrical eyes). In the Generative Fill prompt bar, type a simple, descriptive command like “symmetrical realistic human eyes” or “natural realistic teeth”. Photoshop will generate three variations that perfectly match the lighting and perspective of your headshot.
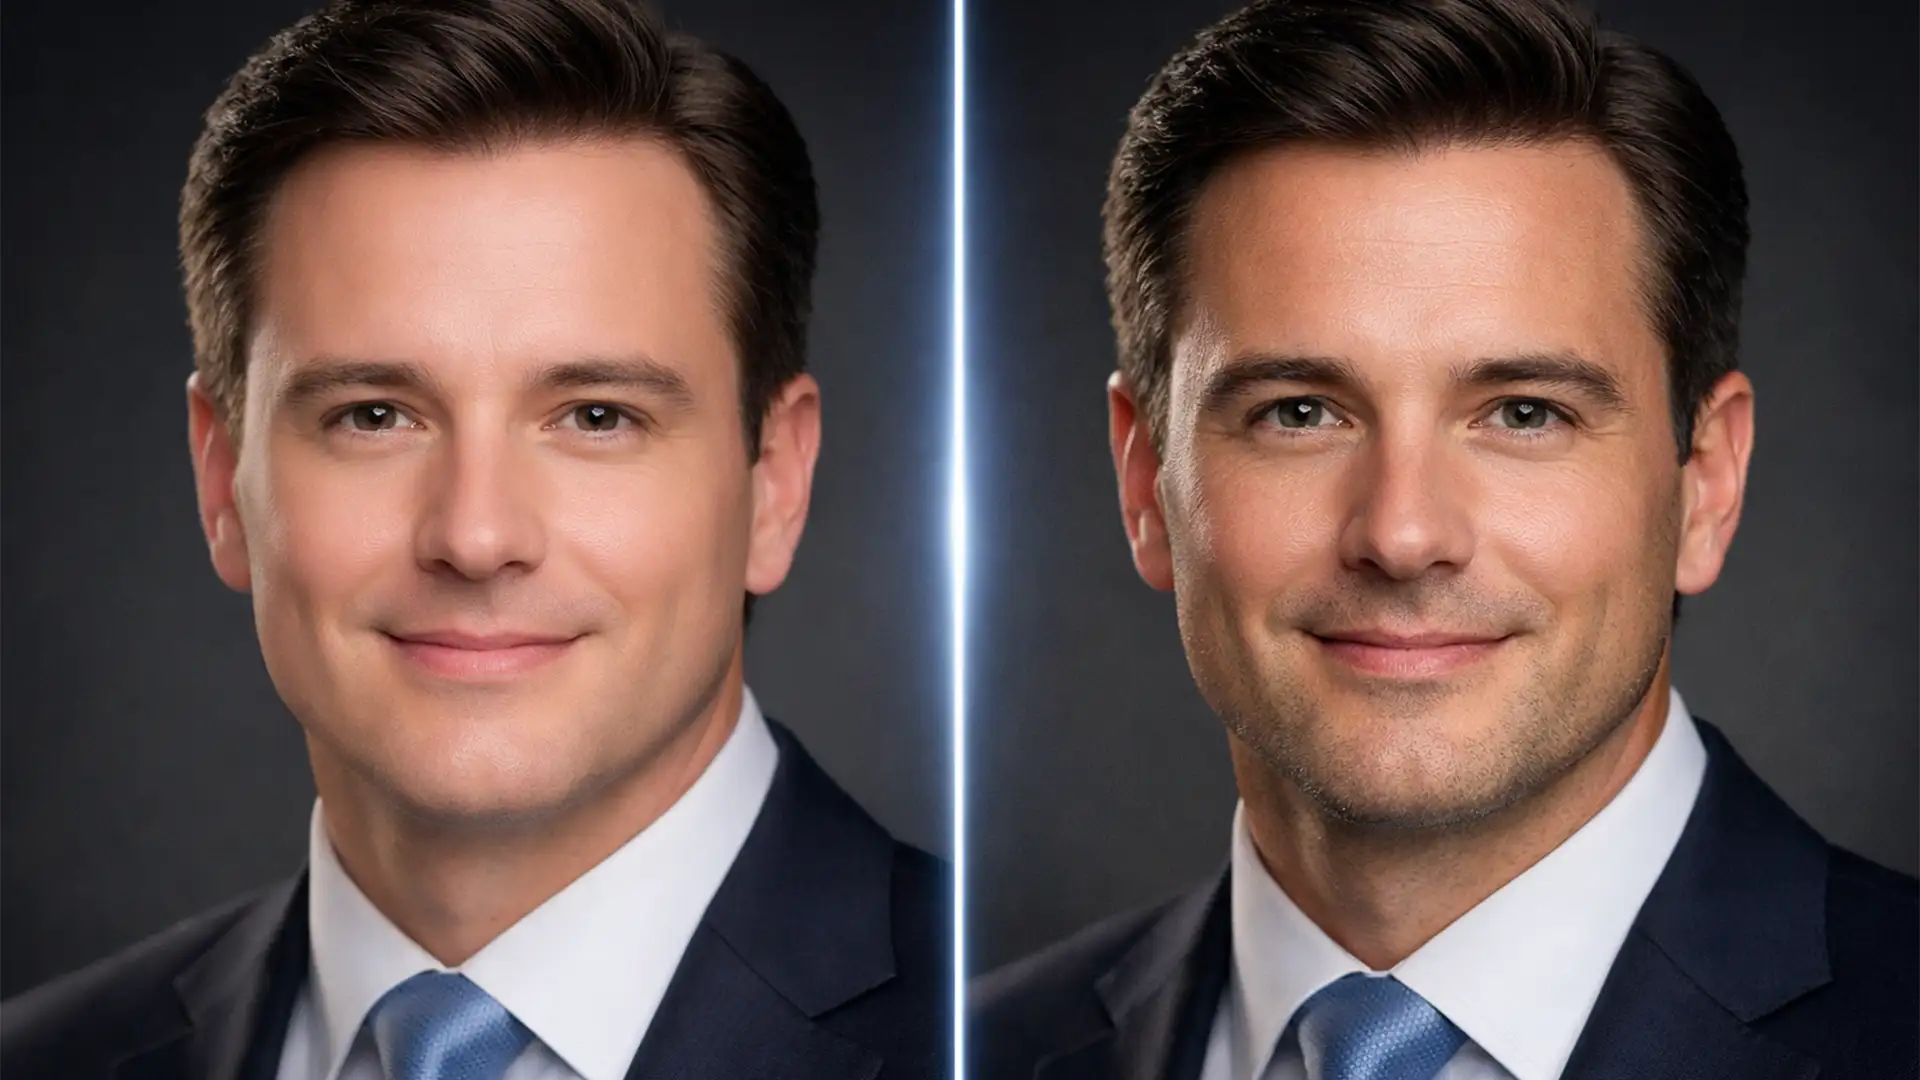
4. Breaking the Digital Smoothness with Gaussian Noise
Even after fixing the structure and texture, AI images often have an unnervingly clean, digital sterility. To tie the whole image together and break the Uncanny Valley effect, add a unified layer of grain.
Create a new layer, fill it with 50% gray, and set the blending mode to Overlay. Go to Filter > Noise > Add Noise, and apply a 1-2% Gaussian Noise (Monochromatic). This simulates the natural film grain of a real camera sensor, tricking the human eye into perceiving the image as an authentic photograph.
5. Advanced Refinement: Neural Filters and Masking
For the final polish, utilize Layer Masking to ensure your corrections blend perfectly with the original image. Paint with a soft black brush on your masks to hide any harsh edges from your Generative Fill layers. Additionally, explore Photoshop’s built-in Neural Filters to make subtle adjustments to the subject’s expression or gaze, ensuring the headshot conveys the exact professional tone you need.
Stop Settling for “Almost Perfect” AI Headshots
Fixing AI headshot artifacts requires a deep understanding of human anatomy, advanced Photoshop techniques like Frequency Separation, and a meticulous eye for detail. While AI can do 90% of the work in seconds, that final 10%-the crucial step that moves an image out of the Uncanny Valley-takes professional expertise.
Don’t have the time to manually fix every AI glitch? Let the experts handle it.
At Image Work India and Cloud Retouch, our team of professional retouchers specializes in AI image post-processing. We take your raw, slightly flawed AI generations and apply industry-leading techniques to deliver flawless, artifact-free corporate portraits that your clients will trust.
Struggling to make your AI-generated corporate headshots look completely human? Contact Image Work India today and outsource your AI fine-tuning to the pros.