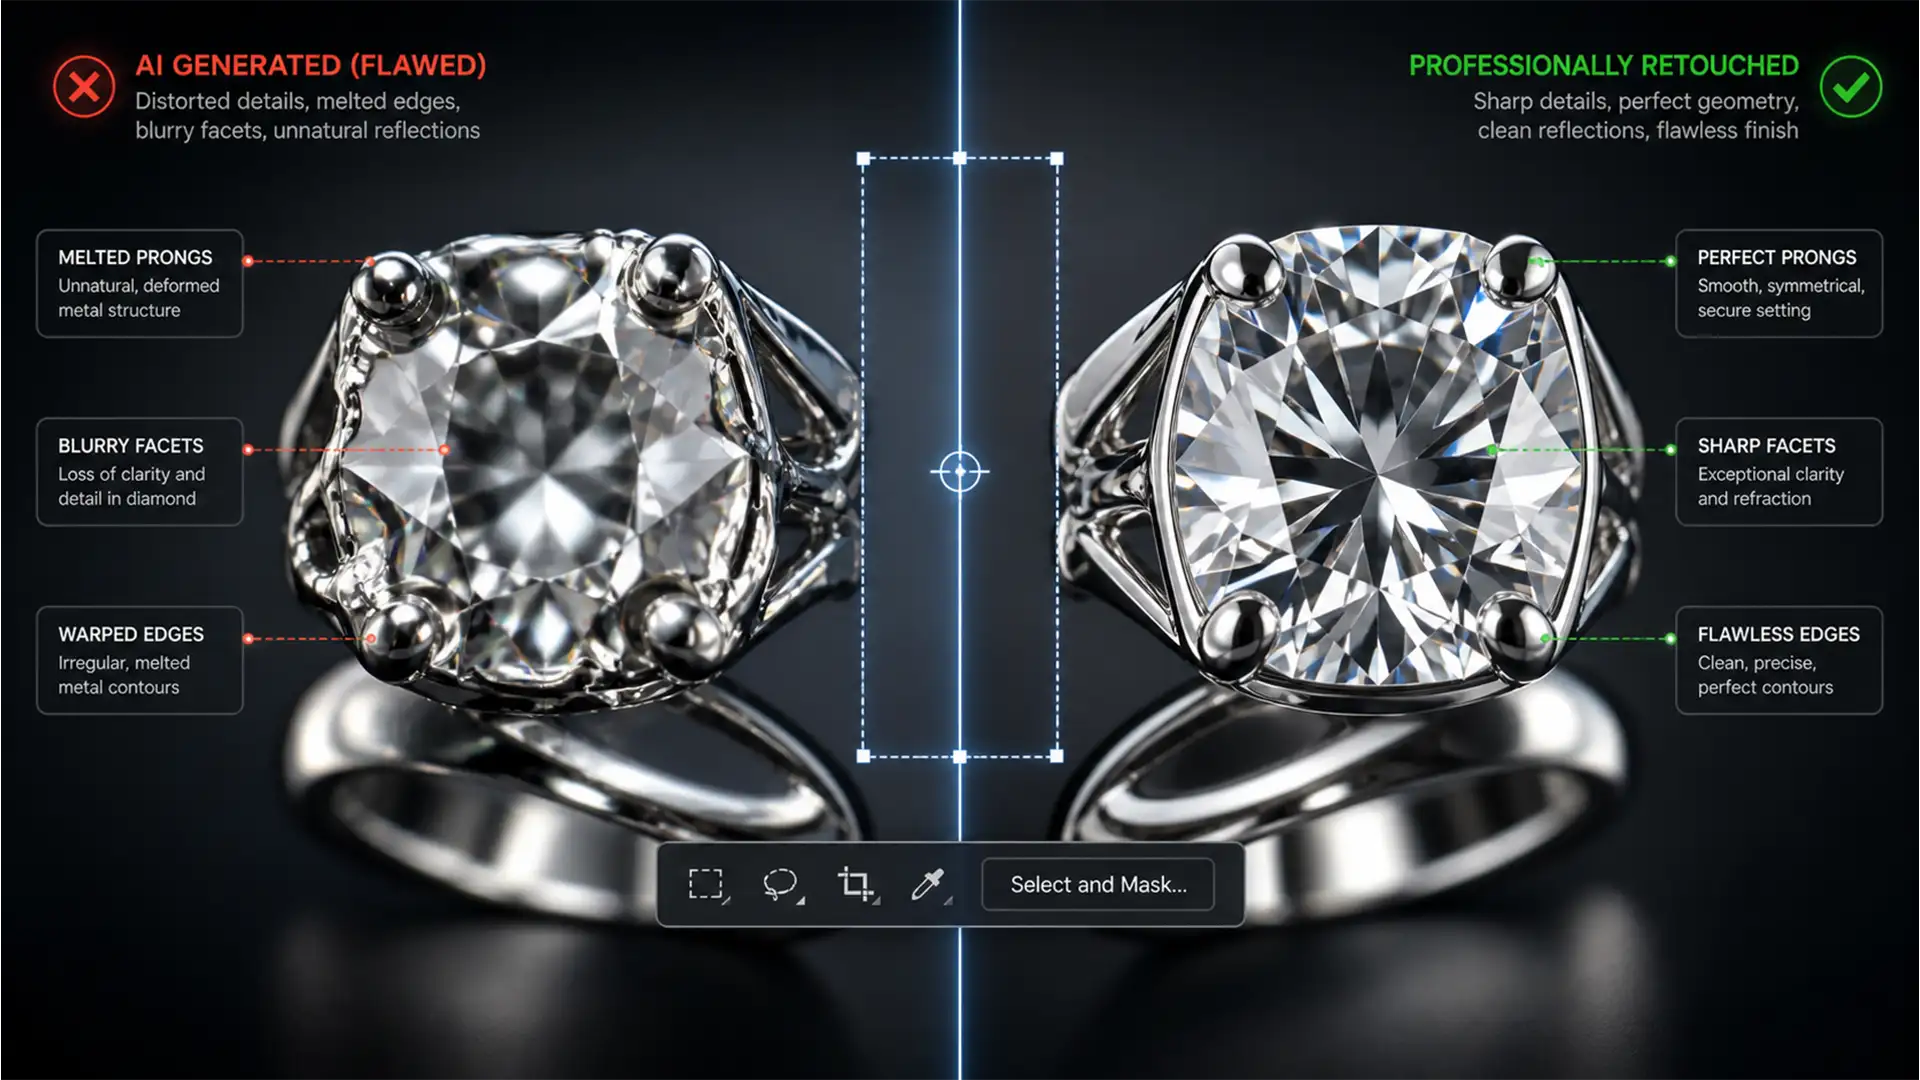
You carefully outline a complex prop removal in Photoshop, hit “Generate,” and wait for the magic. But instead of a pristine background, your $10,000 diamond ring now looks like a melted Dali painting.
If you shoot commercial products, fixing generative fill jewelry artifacts is likely your newest, most frustrating bottleneck. In Adobe Photoshop v25.x and v26.x, the Firefly-powered Generative Fill frequently destroys the structural integrity of gemstones, prongs, and bands.
Why does this happen? The AI’s diffusion model lacks the geometric awareness necessary to accurately render faceted light refraction. It interpolates complex metallic surfaces as organic shapes, resulting in warped edges, mismatched lighting gradients, and obliterated specular highlights.
Fortunately, you don’t have to abandon AI entirely. Here is the definitive guide to preserving your high-frequency textures while utilizing Generative Fill for commercial jewelry retouching.
Why Photoshop’s Diffusion Model Fails at Jewelry
Generative AI understands context, but it struggles with physics. Jewelry photography relies heavily on hard, geometric light behavior. When you ask Photoshop to fill an area near a ring or necklace, the AI attempts to blend the surrounding pixels. Because it cannot calculate actual light refraction, the resulting interpolation creates what retouchers call “the melt”—soft, organic blobs where sharp metallic edges should be.
To fix this, we have to isolate the AI’s ambient color generation from the original structural detail of the jewelry.
3 Professional Methods for Fixing Generative Fill Jewelry Artifacts
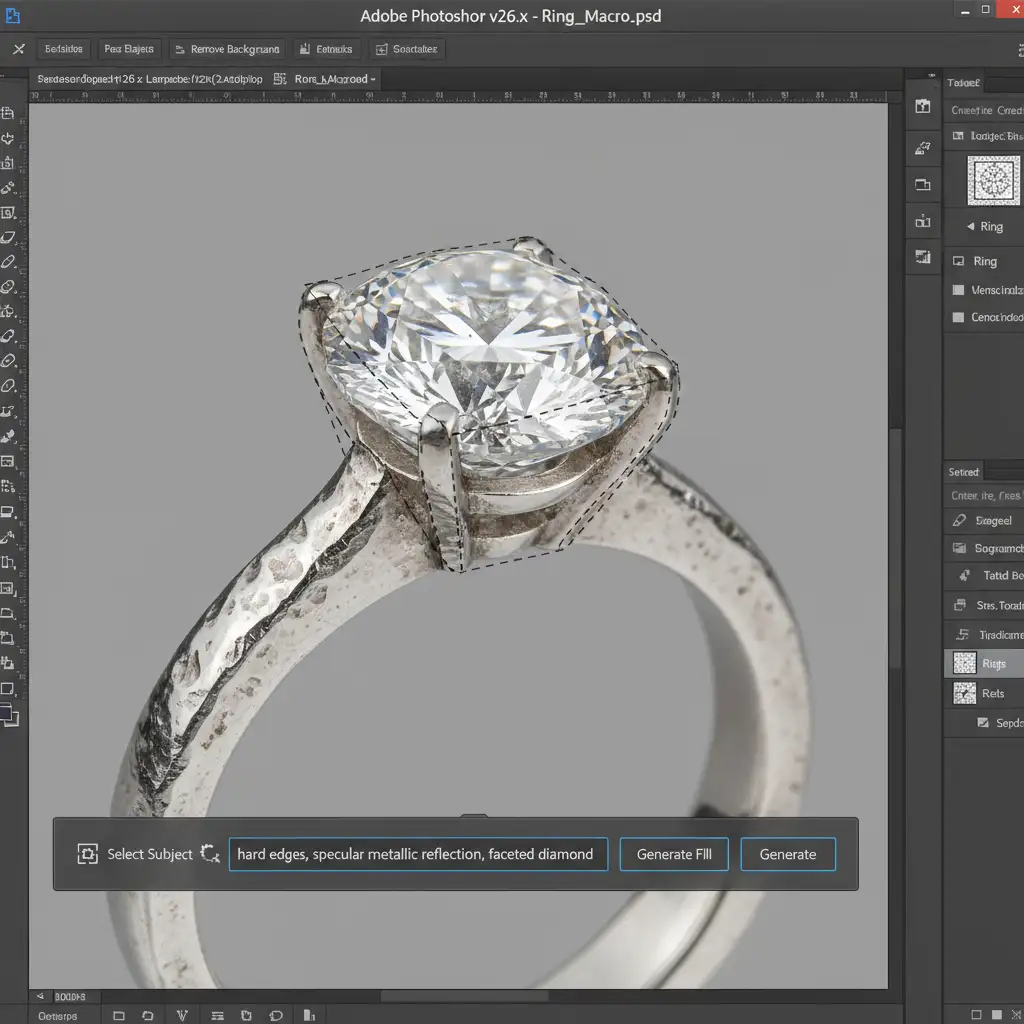
Method 1: The Quick Fix (Advanced Prompt Selection)
Before diving into complex masking techniques, you can often guide the contextual task bar to better results by changing how you select the area and what you type.
Instead of using the standard Lasso tool, switch to the Polygonal Lasso tool. AI diffusion models interpret soft or organic selection edges as an instruction to generate organic shapes. By using rigid, geometric selections around the jewelry, you force the AI to respect hard boundaries.
Next, utilize strict prompt engineering:
- Positive Prompts: “hard edges, specular metallic reflection, faceted diamond, sharp geometric metal”
- Negative Prompts: “no warped metal, no melted edges, no organic shapes, no soft gradients”
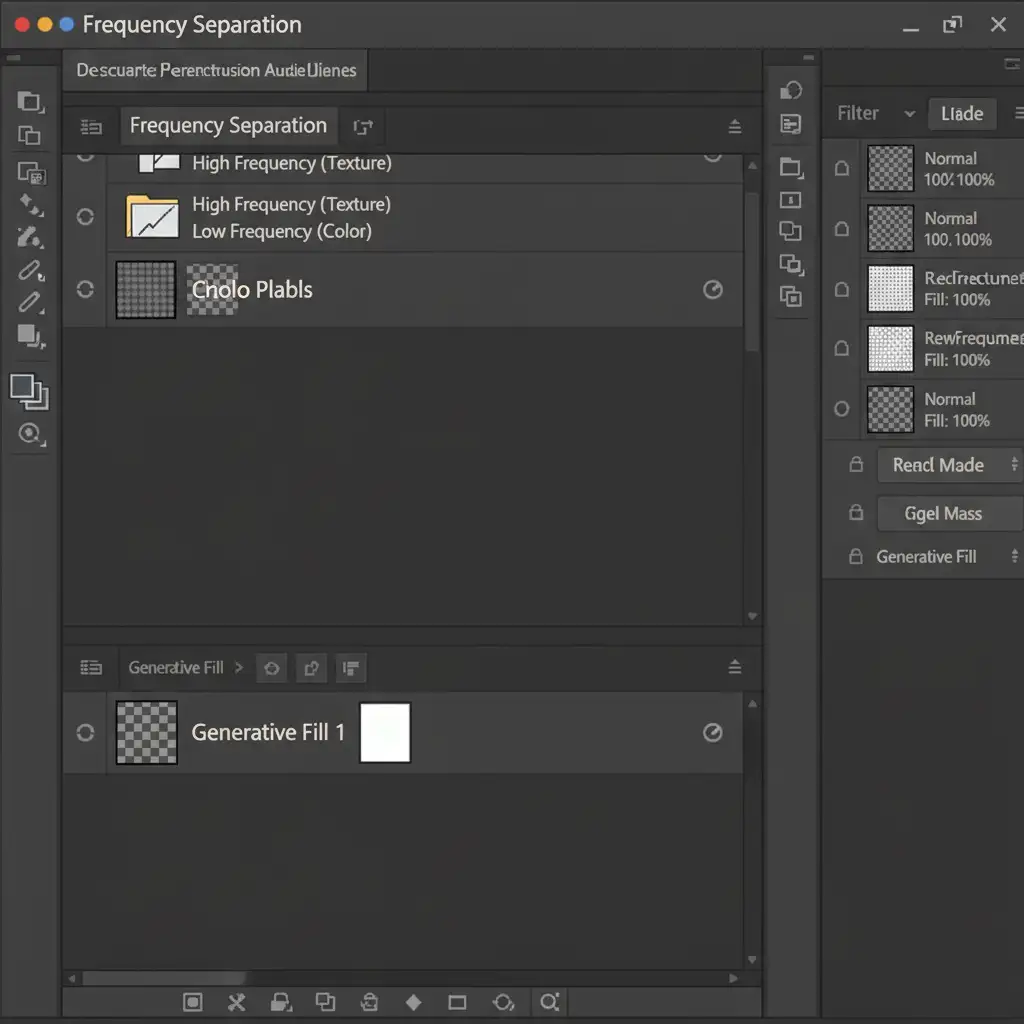
Method 2: The Pro Workaround (Frequency Separation & Masking)
When prompt engineering isn’t enough, we rely on Frequency Separation. This technique splits your image into two layers: color/tone (low-frequency) and texture/detail (high-frequency). We can use this to keep the AI’s background generation while restoring the jewelry’s original physical structure.
- Duplicate and Generate: Run your Generative Fill on a duplicate layer to fix the background or remove the prop. Let the jewelry melt—we are only looking for the ambient background fill.
- Run Frequency Separation: Apply your standard Frequency Separation action to the document.
- Blend the Frequencies: Place the AI-generated layer underneath your Frequency Separation group.
- Masking Techniques: Use the low-frequency layer to retain the AI-generated lighting and color gradients in the background. Then, carefully mask in the original high-frequency texture layer directly over the jewelry.
This restores the sharp metallic edges, prongs, and gemstone facets from your original exposure, completely hiding the melted AI artifacts beneath it.
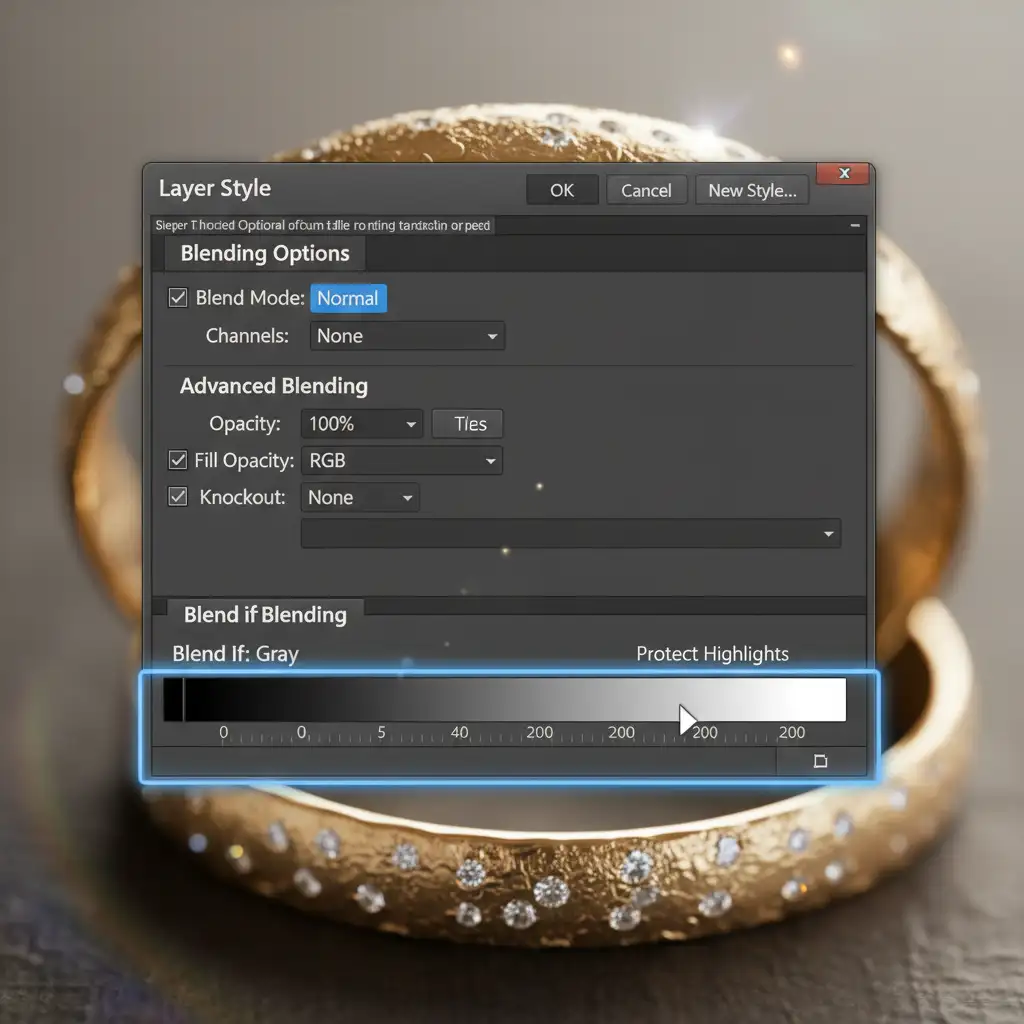
Method 3: The Technical Deep-Dive (Smart Object Blending)
For the most complex reflections, you need granular control over pixel luminosity. This method uses Smart Objects and Blend If sliders to protect the brightest whites and darkest blacks of your jewelry from being overwritten by AI.
- Isolate as a Smart Object: Convert your original, pristine jewelry element into a Smart Object.
- Generate the Background: Execute your Generative Fill on the background layer beneath the Smart Object.
- Protect the Highlights: Double-click the Smart Object to open the Layer Style dialog box. Navigate to the ‘Blend If’ section at the bottom.
- Adjust the Sliders: Alt-click (or Option-click) the underlying layer sliders to split them. Drag the white slider to protect the brightest specular highlights (the sharp flashes of light on the metal). Drag the black slider to protect the deep contrast lines that give the metal its shape.
This hybrid approach allows the AI to handle the ambient fill around the jewelry seamlessly, while the Smart Object mechanically forces the original structural integrity to punch through the AI layer.
Stop Fighting AI—Let the Experts Handle Your Jewelry Retouching
Fixing generative fill jewelry artifacts requires a deep understanding of light behavior, advanced masking techniques, and meticulous attention to detail. While these methods are highly effective, they are also incredibly time-consuming—especially when you are processing a catalog of hundreds of high-end pieces.
You shouldn’t have to spend hours repairing melted metal and warped diamonds.
At Image Work India and Cloud Retouch, our team of expert retouchers specializes in pixel-perfect commercial jewelry editing. We combine industry-leading manual retouching techniques with advanced software workflows to ensure your specular highlights are sharp, your diamonds are flawless, and your backgrounds are pristine.
Stop wrestling with AI artifacts. Let us deliver the high-end, commercial-grade imagery your brand deserves. Contact Image Work India and Cloud Retouch today for a free trial, and see the difference professional retouching makes.


