Adding shadows to photos is a great way to bring images to life. A well-placed shadow can make a photo look more realistic, professional, and visually appealing. Whether you’re editing product photos, portraits, or creative artwork, knowing how to add shadow to photo can make a big difference. In this article, you’ll learn what shadows can do for your pictures, how to add them effectively, and why professionals use this technique in many types of photography.
Let’s explore everything you need to know about how and why to add shadow to photo for the best results.
Why Shadows Matter in Photo Editing
Shadows are not just dark areas in an image. They help create a sense of space, depth, and realism. When you add shadow to photo, you give the image a more three-dimensional feel. Without shadows, pictures can look flat and unnatural.
Imagine a product photo with no shadow—it seems to float in the air, disconnected from the background. But once you add shadow to photo, the object looks grounded, like it’s actually sitting on a surface. This is why online stores and professional photographers often rely on shadows to enhance product images.
Shadows also influence the mood of a photo. Soft shadows create a calm and natural feel, while hard shadows add drama and contrast. Understanding how different shadows work helps you decide what kind of shadow you should use for each image.

Types of Shadows You Can Add
There are many kinds of shadows you can apply to a photo. Knowing which type to use depends on the photo’s purpose and style.
One of the most common types is the drop shadow. This shadow appears behind an object and gives the impression that it is lifted off the background. Drop shadows are frequently used in graphic design and product photography. When you add shadow to photo with a drop shadow, you can adjust the distance, direction, and blur to match the lighting.
Another useful shadow type is the natural shadow. This type looks more realistic because it mimics how light falls in real life. If you take a picture of shoes or furniture, for example, adding a natural shadow makes them appear as if they were taken on the ground with soft lighting. Editors often recreate this kind of shadow by studying how sunlight or artificial light affects objects.
You can also use reflection shadows, which are great for adding a modern and stylish look. These shadows appear as a reflection under the object, like it’s placed on a shiny surface. Reflection shadows are commonly used for cosmetics, electronics, or luxury items.

Tools You Can Use to Add Shadows
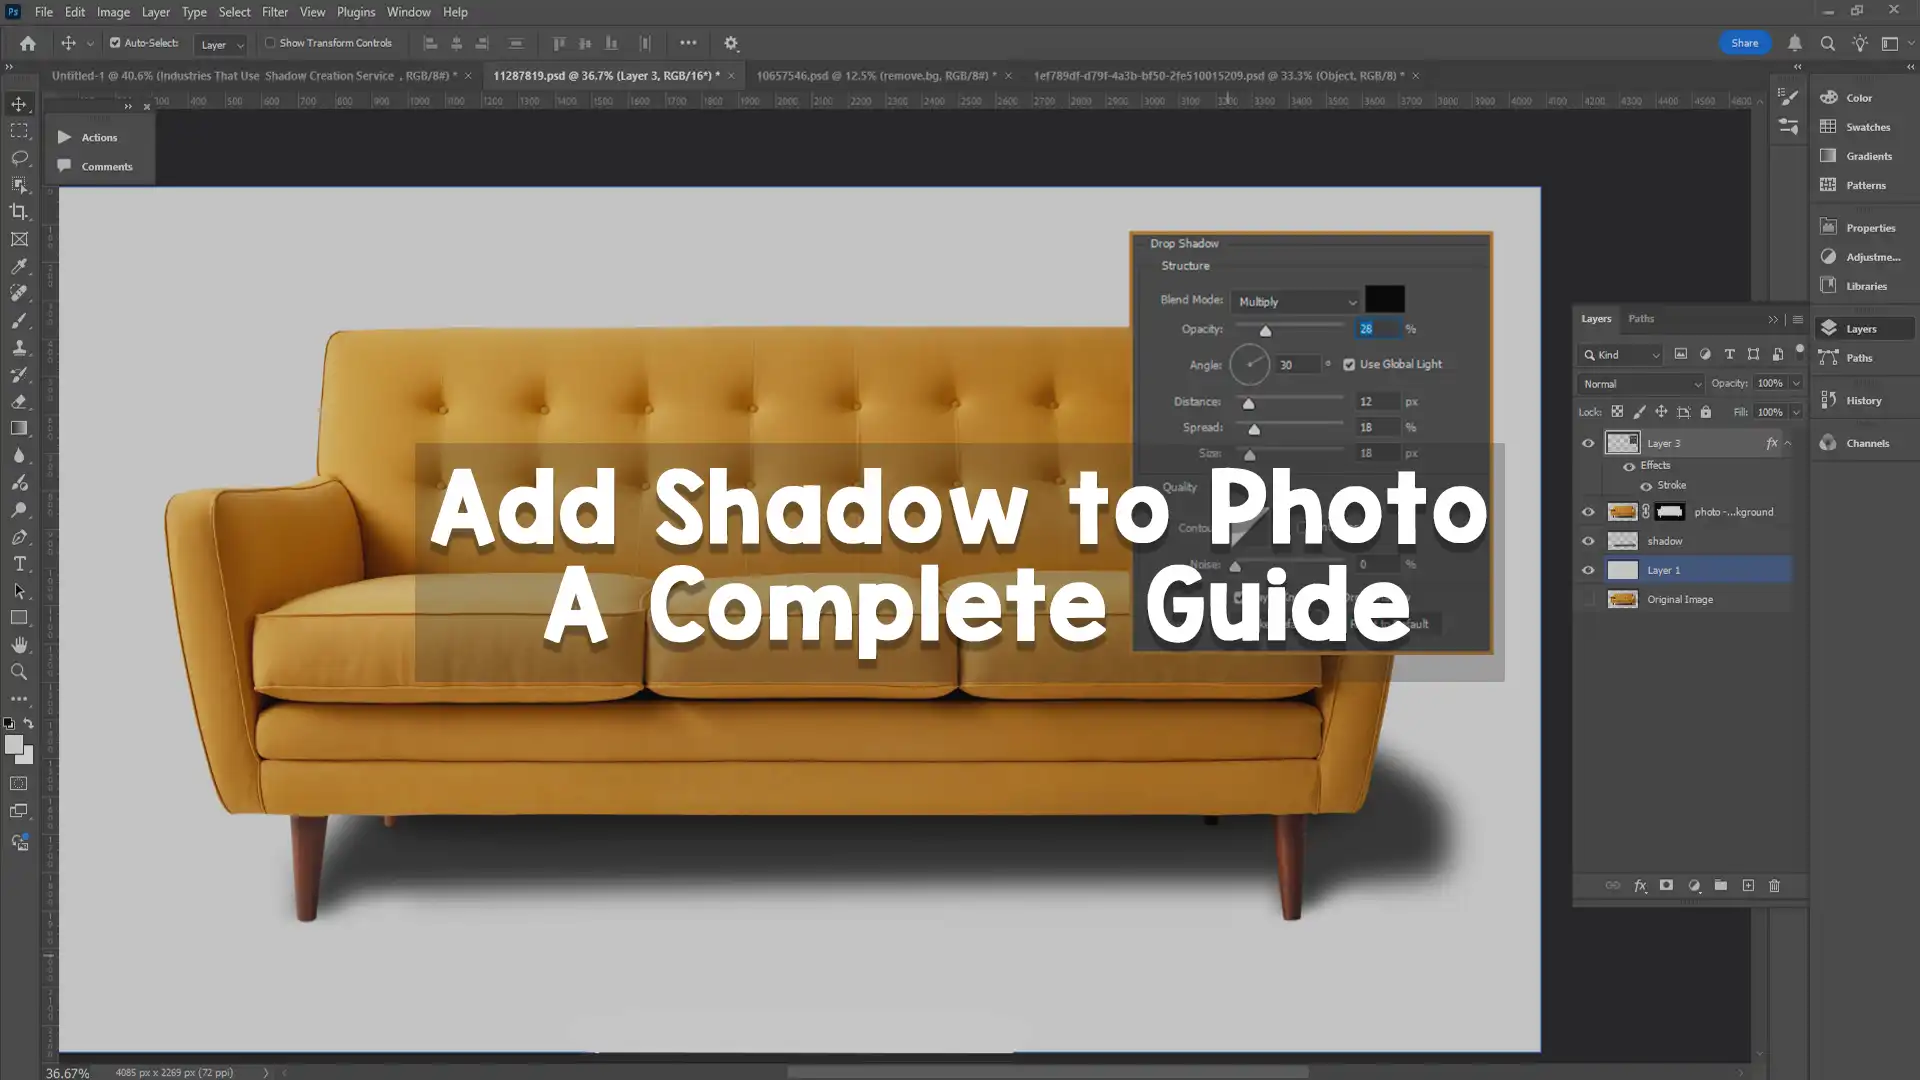
There are many software tools you can use to add shadow to photo. Adobe Photoshop is one of the most powerful tools for shadow editing. It allows you to create custom shadows, control their shape and angle, and blend them naturally with the background.
In Photoshop, you can use the Layer Style panel to quickly create drop shadows. You can change the distance, size, spread, and opacity to make the shadow look more realistic. If you’re more advanced, you can also create a new layer, paint the shadow manually using a soft brush, and blur it to match the light source.
If you don’t have Photoshop, there are other online tools like Canva, Pixlr, or Fotor that offer easy ways to add shadow to photo. These tools may have fewer features but are good for beginners or for quick edits. Mobile apps like Snapseed or Lightroom Mobile also have some shadow editing options.
Some tools even use AI to help you add shadow to photo automatically. These tools can detect the object and lighting, then suggest shadow types that match the image style.

How to Add Shadow to Photo for Products
If you’re editing product photos, adding a shadow can make your product look more attractive and trustworthy. Shoppers often prefer images that look clean and natural. When you add shadow to photo, you help customers visualize the product in a real-life setting.
To do this, you can start with a white background and then apply a soft, natural shadow below the product. Make sure the shadow follows the direction of light in the photo. If the light comes from the top right, the shadow should fall to the bottom left.
Adjust the shadow’s opacity so it doesn’t look too strong. A shadow that is too dark can distract the viewer, while a shadow that is too light might be invisible. Finding the right balance helps the product stand out.
In e-commerce, shadows are essential for creating a professional look. Most online marketplaces recommend using natural-looking shadows instead of harsh or artificial ones. That’s why many businesses hire professionals to add shadow to photo for their product catalogs.

How to Add Shadow to Portraits
Portrait editing also benefits from well-placed shadows. Whether it’s a fashion shoot, a business headshot, or a personal photo, shadows can highlight facial features and add depth to the image.
When you add shadow to photo in a portrait, consider the original lighting in the scene. If the photo was taken in natural sunlight, the shadows should be soft and angled. You can enhance the cheekbones, jawline, or even add a shadow behind the person to make them pop out from the background.
Use feathered brushes or layer masks to blend the shadows smoothly. Avoid using hard edges unless you want a stylized effect. Soft shadows help the portrait look more flattering and elegant.
If you are working with black and white portraits, shadows become even more important. Since there is no color to work with, the contrast between light and shadow creates the structure of the image. When you add shadow to photo, it becomes a powerful tool for creating mood and emotion.

Tips to Make Shadows Look Real
Realistic shadows follow certain rules. If your goal is to make the image look natural, here are some tips you should remember while you add shadow to photo.
First, observe the light source. Shadows always fall in the opposite direction of the light. If the light is above, the shadow falls below. If it’s to the right, the shadow falls to the left. Matching the direction is key.
Next, think about the object’s shape. A round object creates a different shadow than a flat object. If you’re working with a shoe, for example, the shadow might be uneven and soft. Study reference photos to understand how light interacts with different forms.
The shadow’s edge also matters. A soft light creates a blurred shadow, while a strong light creates a sharp edge. You can use blur filters in editing software to soften the shadow and make it blend better with the background.
Lastly, don’t forget the color of the shadow. Shadows aren’t always black. Depending on the lighting, they might have a blue, gray, or brown tone. Using the correct color helps your photo look more natural.
Mistakes to Avoid When Adding Shadows
While learning to add shadow to photo, it’s easy to make some mistakes. One of the most common is using the wrong direction for the shadow. If the lighting and shadow don’t match, the photo will look fake.
Another mistake is using shadows that are too dark or too light. Overpowering shadows can take attention away from the main subject. On the other hand, shadows that are too light may not add any value. Always adjust the opacity and contrast to keep a balanced look.
Also, avoid copying and pasting shadows from other images. This often results in mismatched shapes and lighting. Instead, try to create custom shadows for each image based on its lighting and background.
When you work on professional projects, it’s always a good idea to double-check your shadow placement. Get feedback or compare it with real-life photos to make sure your edits look convincing.

Why Professionals Choose to Add Shadows
Professional photographers, editors, and designers understand the value of shadows. Whether it’s for fashion, real estate, food, or advertising, shadows help enhance the image quality. A simple decision to add shadow to photo can take an image from average to amazing.
Clients often expect a clean and polished look. Without proper shadows, even the best-captured photo can appear unfinished. Shadows are part of the editing process that shows attention to detail.
That’s why many businesses outsource shadow editing to post-production companies. It saves time and ensures high-quality results. If you’re handling a large batch of images, professional editors can apply consistent shadows to maintain a uniform look.

Image Work India: Your Partner in Shadow Editing
At Image Work India, we specialize in high-quality image post-production services, including advanced shadow creation. Whether you need to add shadow to photo for your e-commerce products, portraits, or creative projects, our team is ready to deliver professional results.
Our expert editors understand how to create natural drop shadows, realistic reflections, and custom shadow effects that match your brand and lighting. We use industry-standard tools and techniques to make sure your photos look authentic and visually stunning.
Our services include background removal, clipping path, image retouching, color correction, and of course, custom shadow creation. We’ve worked with photographers, brands, and online stores around the world who rely on us for fast turnaround and perfect image quality.
If you’re looking to add shadow to photo with precision and style, Image Work India is here to help. Reach out to us today and give your images the professional touch they deserve.

Conclusion
Shadows are more than just dark spots in a photo—they are a key part of creating realistic, appealing, and professional images. Learning how to add shadow to photo helps you improve your editing skills, attract more attention to your visuals, and enhance the overall quality of your work.
Whether you’re doing it yourself or hiring a professional service like Image Work India, always remember to match the lighting, adjust the opacity, and choose the right shadow type for each image. With practice and care, shadows can turn your simple photos into stunning works of art.