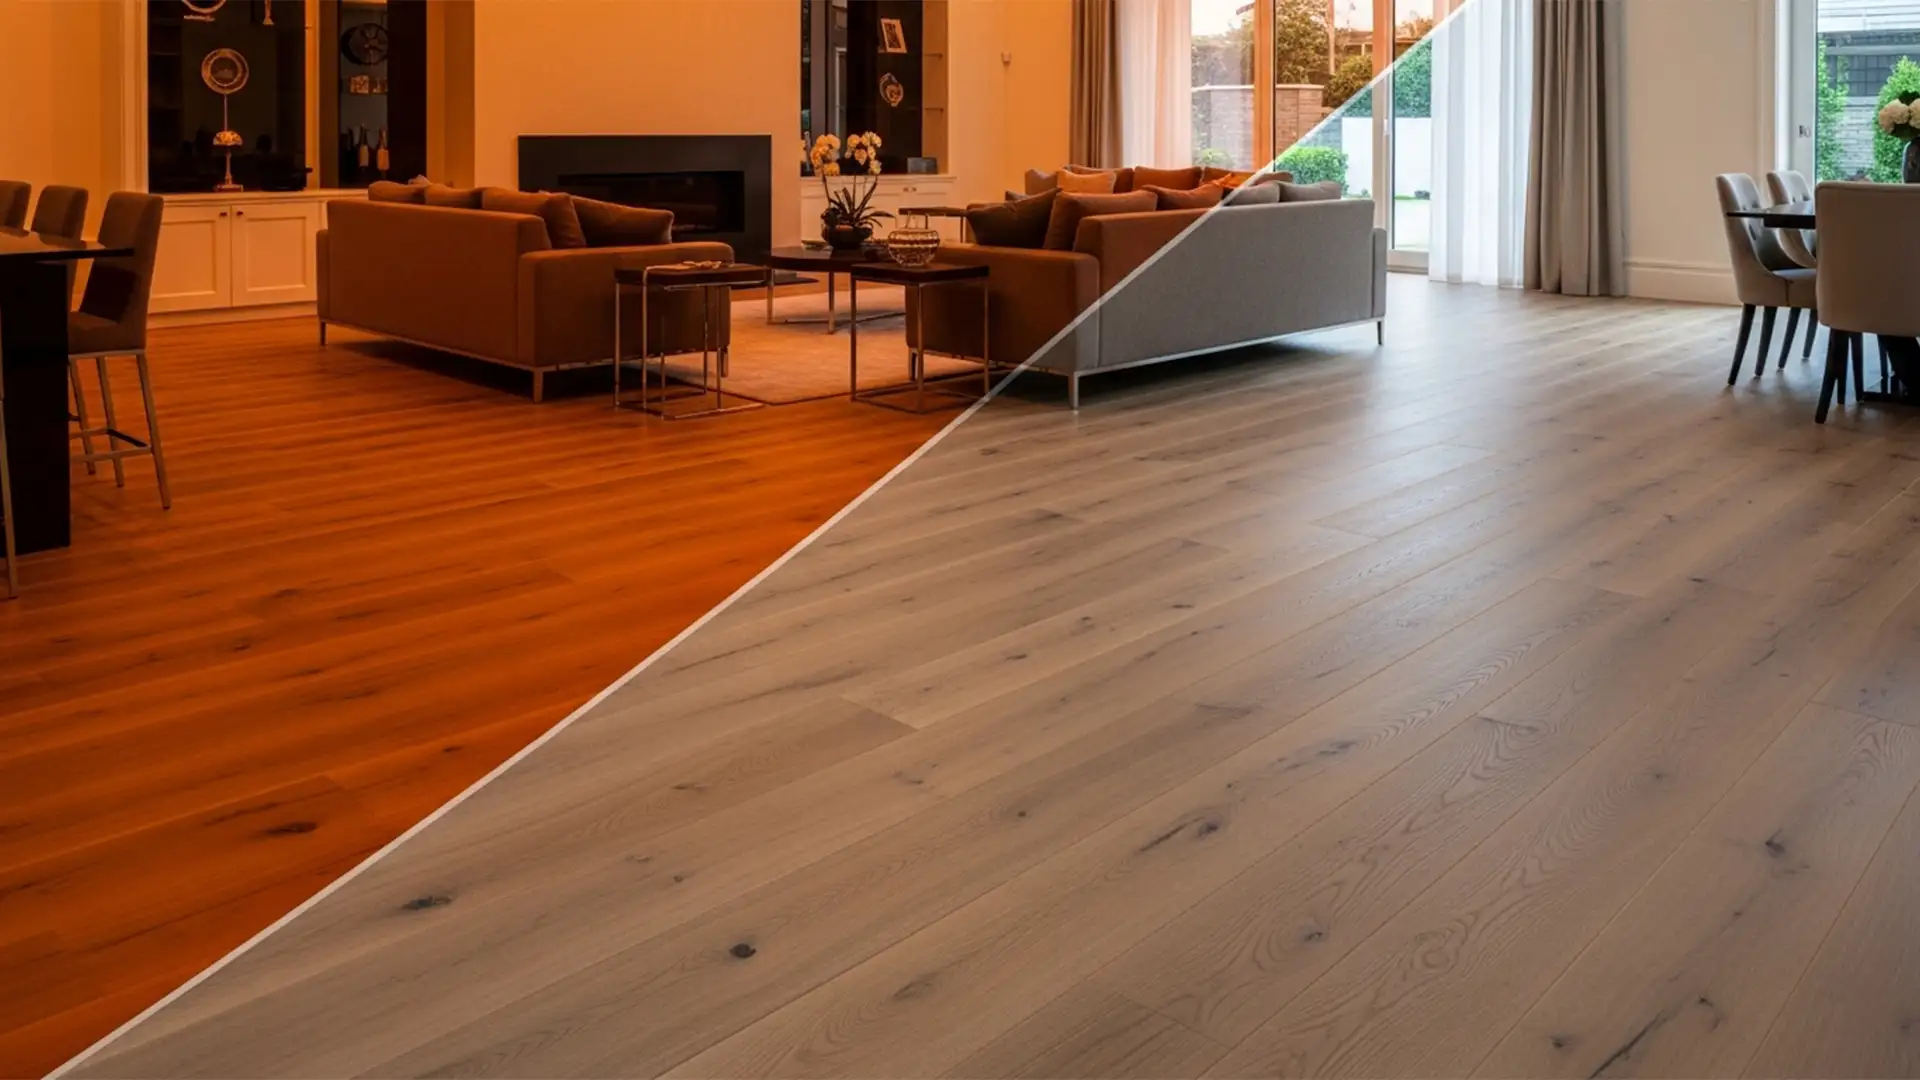
Imagine a buyer walking into a property they fell in love with online, only to realize the rich, dark oak floors they saw in the listing are actually a bright, orange-tinted maple. This isn’t just an aesthetic mistake; misrepresenting a physical property can lead to lost sales, severe buyer disappointment, and even legal issues for the realtor. In real estate photography, mixed lighting—like warm indoor bulbs clashing with cool window daylight—often causes severe color casts on reflective surfaces. Achieving perfect hardwood floor color accuracy in Photoshop real estate editing is absolutely essential. In this technical guide, we will show you exactly how to fix unnatural floor tones using industry-standard techniques.
The Problem: Mixed Lighting and Unnatural Color Casts
When shooting property interiors, photographers rarely have the luxury of perfectly controlled studio lighting. The combination of daylight spilling through windows and interior fixtures creates a dreaded tungsten lighting cast. This mixed lighting disproportionately affects highly reflective surfaces, particularly hardwood floors, causing them to absorb unnatural yellow, orange, or even magenta hues.
To maintain the integrity of the listing, editors must neutralize these casts while preserving the natural wood grain, stain, and luminance. Here are three proven methods to restore the true color of hardwood floors in Photoshop CC (v24.x – v27.x).
3 Methods for Perfect Hardwood Floor Color Accuracy
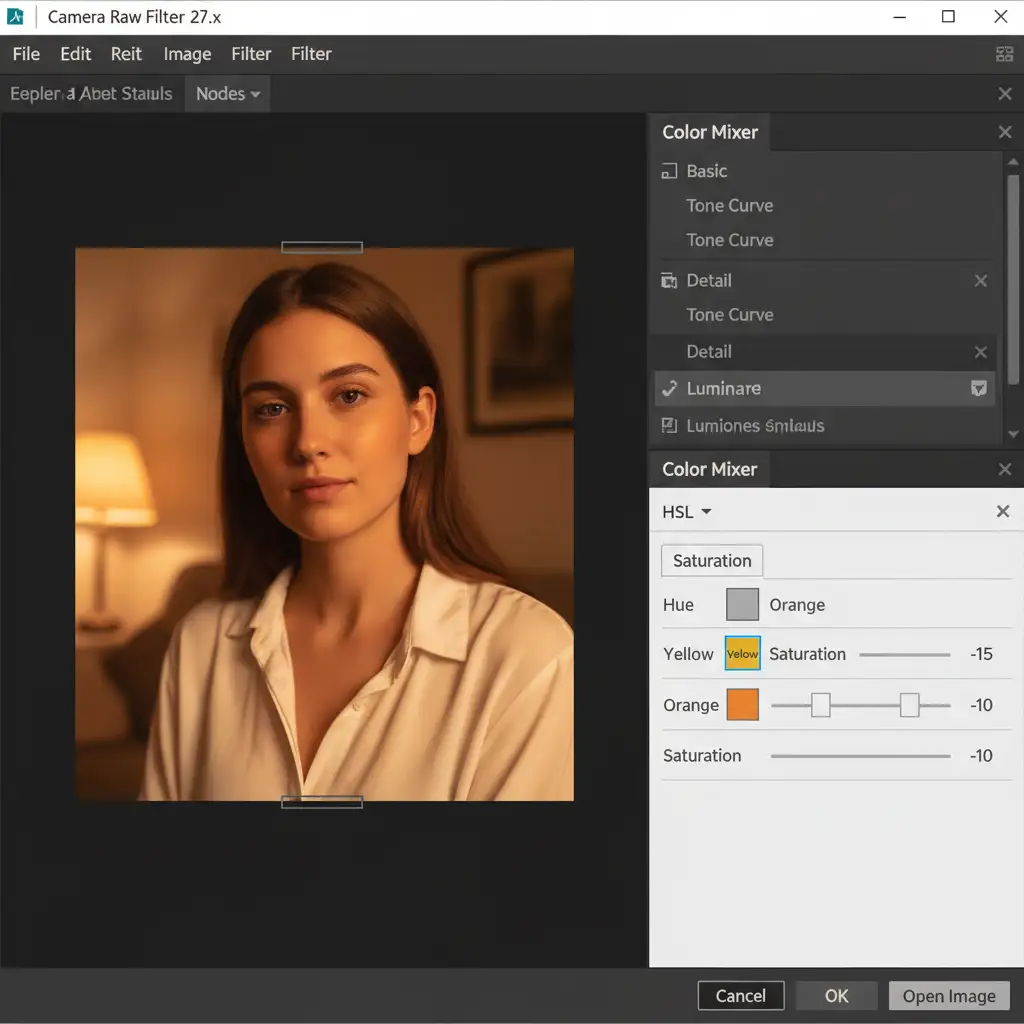
Method 1: The Quick Fix Using the Camera Raw Filter
If you need to process a batch of images quickly, the Camera Raw Filter is your most efficient tool.
- Duplicate your background layer and open the Camera Raw Filter (Shift+Ctrl+A).
- Grab the White Balance Tool (I) and click on a naturally neutral area in the room, such as a white baseboard or gray wall. This instantly corrects the global temperature.
- Navigate to the Color Mixer (formerly the HSL Panel).
- Select the Saturation tab and slightly desaturate the Orange and Yellow channels until the floor resembles its physical counterpart. Be careful not to pull the saturation down too far, or the wood will look gray and lifeless.
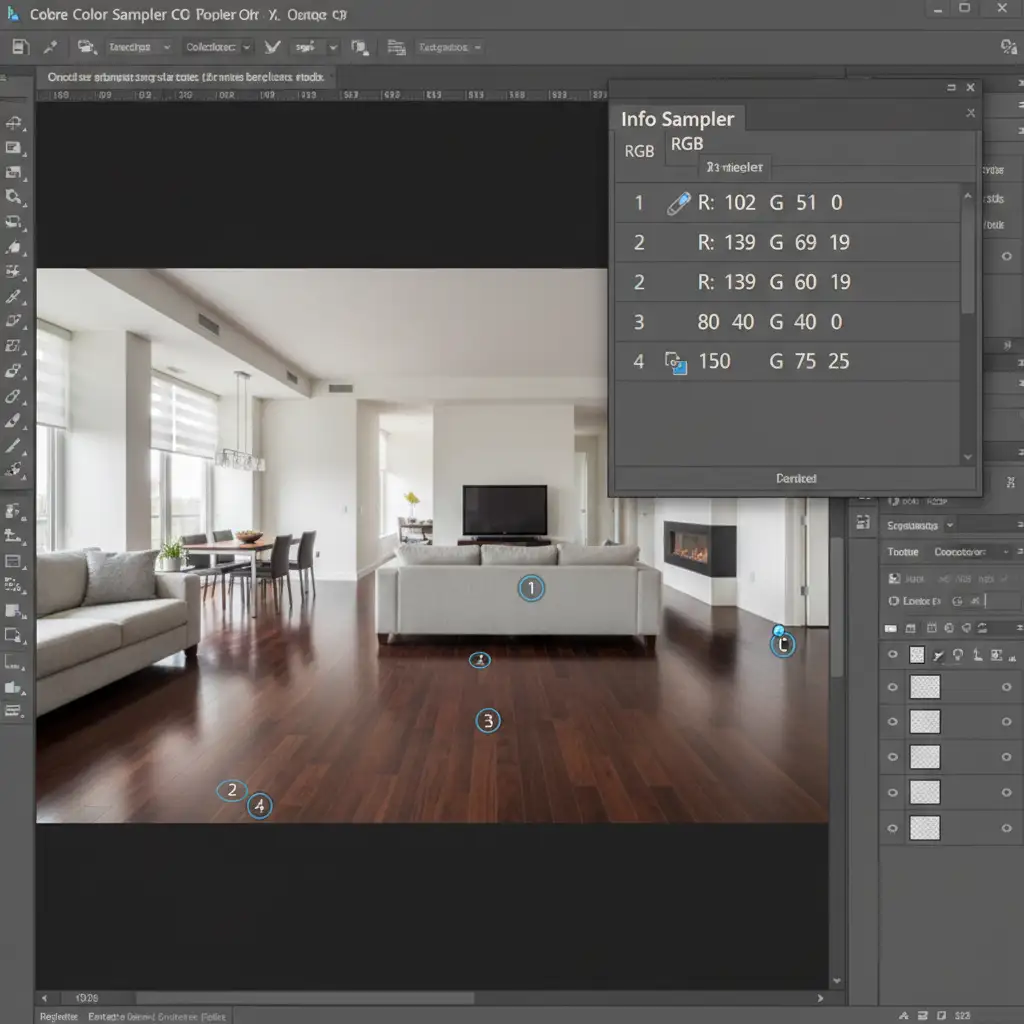
Method 2: The Pro Workaround with the Color Sampler Tool
For stubborn stains or floors reflecting multiple light sources, you need precise data. Relying solely on your monitor’s calibration can be risky, which is where the Color Sampler Tool comes in.
- Select the Color Sampler Tool (Shift+I) and drop 1-3 points directly onto the hardwood floor.
- Open your Info Panel to monitor the exact RGB values. If the Red channel is significantly higher than Green and Blue, you have a heavy warm cast.
- Add a Curves Adjustment Layer. Select the Gray Point eyedropper from the properties panel and click a naturally neutral area in the room to balance the midtones.
- Next, add a Hue/Saturation adjustment layer. Select the targeted adjustment hand tool, click directly on the exact wood tone on the floor, and gently tweak the lightness and saturation until your RGB values align with a natural wood tone.
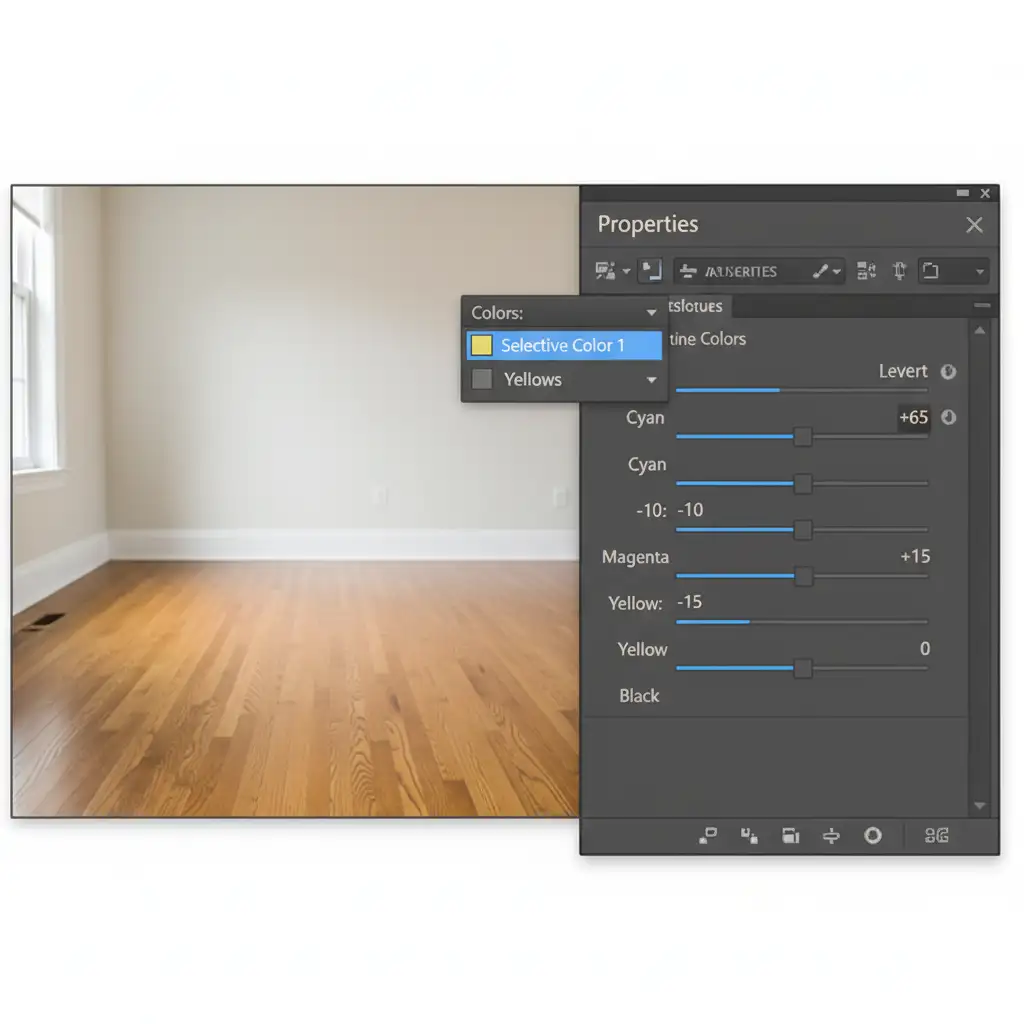
Method 3: The Technical Deep-Dive Using Selective Color
When you need surgical precision—such as removing a yellow cast without affecting the red tones of a cherry wood floor—a Selective Color Adjustment layer is the ultimate solution.
- Add a Selective Color Adjustment Layer from the layers panel.
- In the properties dropdown, target the ‘Yellows’ and ‘Neutrals’ channels.
- To neutralize the heavy warmth caused by tungsten lighting, slightly reduce the Magenta and Yellow sliders.
- Add a touch of Cyan to introduce a cooling effect that specifically counteracts the orange cast.
- Because this adjustment will affect the entire image, select the layer mask and invert it (Ctrl+I). Use the Quick Selection Tool or Select Color Range to mask the adjustment specifically to the floor.

Verifying the Final Result
Always compare your edited floor to the original RAW file to ensure you haven’t lost the texture of the wood grain during the color correction process. The goal is a clean, natural finish that accurately reflects the physical property.
Outsource Your Real Estate Photo Editing
Achieving perfect hardwood floor color accuracy in Photoshop real estate editing requires a trained eye, technical precision, and valuable time. If you are processing hundreds of listing photos a week, manually tweaking RGB values and masking floors can become a massive bottleneck in your workflow.
You don’t have to do it alone. Image Work India and Cloud Retouch specialize in high-end, legally-accurate real estate photo editing. Our expert retouchers understand the nuances of mixed lighting and color casts, ensuring every property you list looks stunning, natural, and 100% true to life.
Stop worrying about buyer disappointment and let us handle the technical edits. Contact Image Work India or Cloud Retouch today to streamline your real estate photography workflow.


