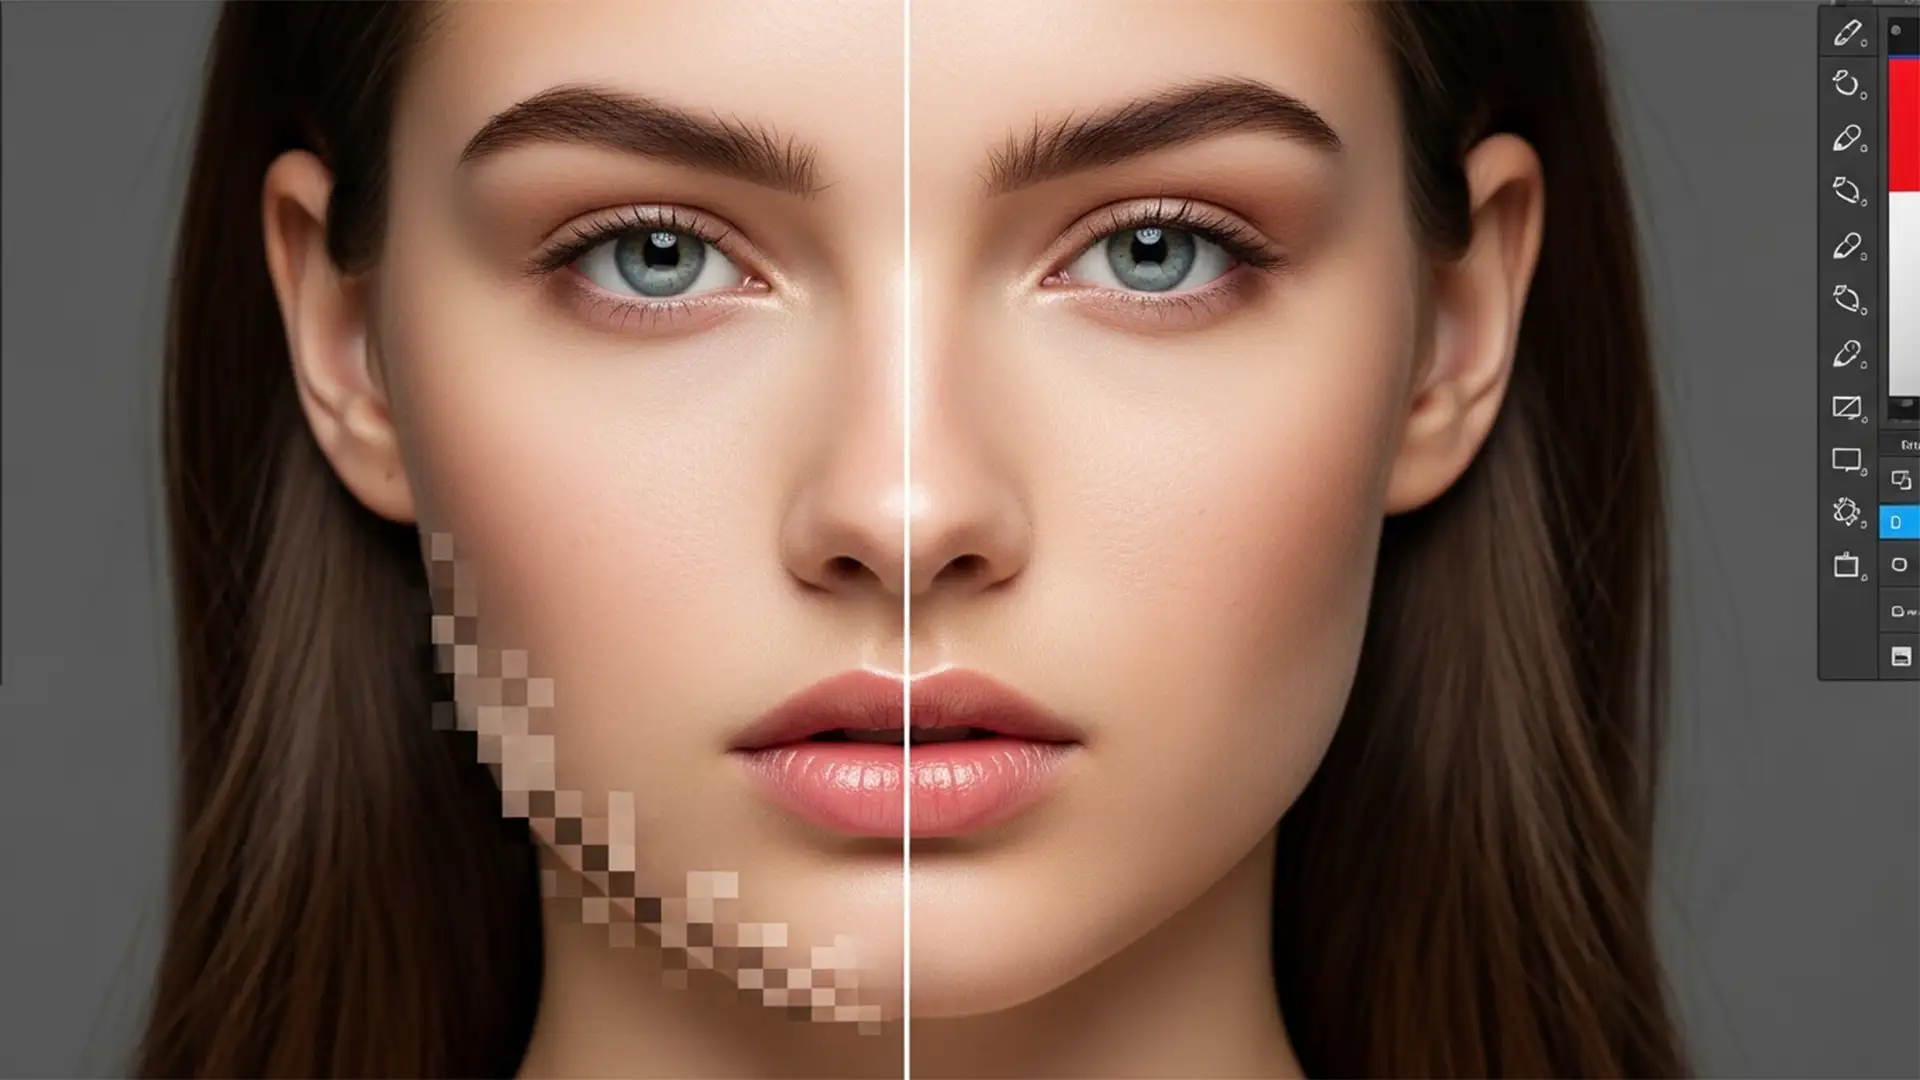
You applied Photoshop 2024’s Ai Skin Smoothing Neural Filter to save time, but instead of magazine-quality skin, you are left with a plastic, over-blurred mess. Blocky pixelation and harsh color banding now plague the jawline, nose bridge, and hairline. Sound familiar?
While machine learning tools are incredibly fast, they frequently misinterpret lighting gradients and destroy high-frequency detail like natural pores. If you want professional results, relying solely on automation is a recipe for amateur-looking images. In this guide, we will walk you through the essential steps for ai skin artifact removal in Photoshop 2024, restoring realistic texture to your model retouching workflows so you can deliver flawless, natural results every time.
Why Photoshop 2024 Neural Filters Create Blocky Skin Artifacts
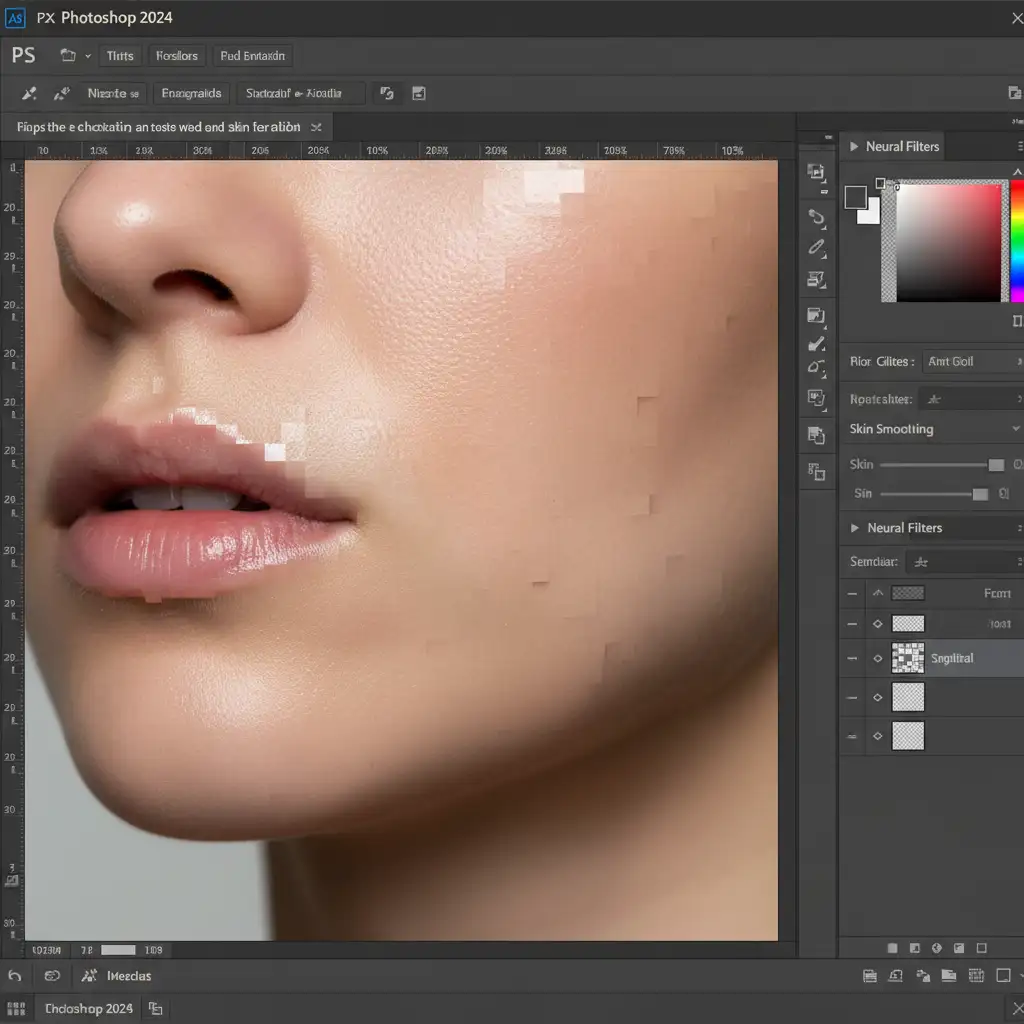
Photoshop 2024 (v25.x) introduced powerful machine learning models designed to expedite the retouching process. However, the ‘Skin Smoothing’ module operates by aggressively blurring tonal transitions. When it encounters high-contrast areas—such as the edge of a jawline or stray hairs crossing the forehead—the algorithm struggles to differentiate between a blemish and a structural shadow.
The result? The filter over-blurs the high-frequency detail (the natural skin texture and pores) and leaves behind blocky artifacts, pixelation, and severe color banding. To maintain a non-destructive workflow, professional retouchers must intervene manually.
Method 1: The Quick Fix Using Selective Layer Masking
If you need a rapid solution to hide the messy edges created by the AI, selective layer masking is your best option. This technique ensures the AI smoothing only applies to the flat planes of the face, keeping artifacts away from the edges.
Step-by-Step Masking Workflow
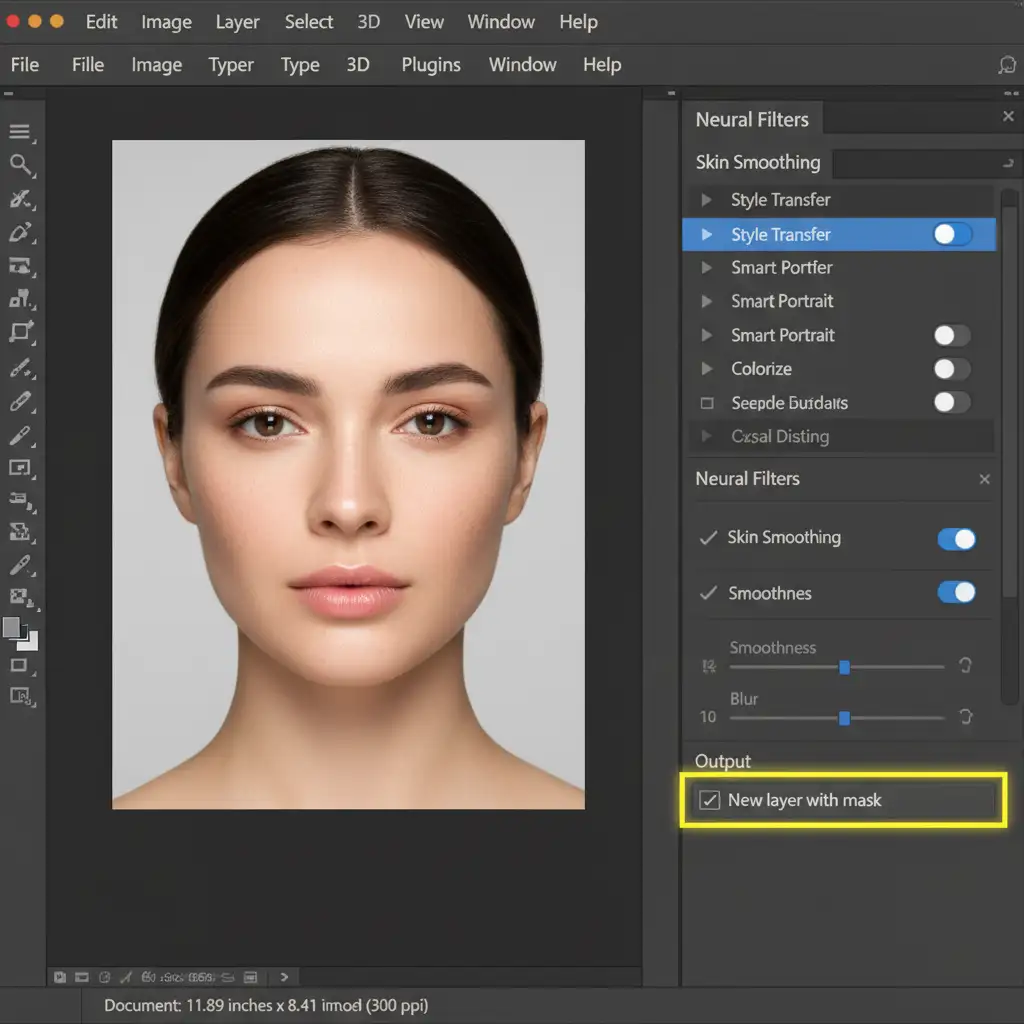
- Open your image and navigate to Filter > Neural Filters.
- Turn on Skin Smoothing and adjust the Blur and Smoothness sliders to your preference.
- Crucial Step: In the bottom right corner of the Neural Filters panel, change the Output dropdown to New layer with mask. Click OK.
- In your Layers Panel, click on the newly created white layer mask.
- Press Ctrl+I (Windows) or Cmd+I (Mac) to invert the mask to black, hiding the AI effect entirely.
- Select a soft round brush (B), set your foreground color to white, and drop your brush opacity to 30%.
- Carefully paint over the cheeks, forehead, and chin. Avoid the jawline, nose bridge, and hairline where blocky artifacts typically generate.
Method 2: The Pro Workaround with Frequency Separation
For high-end beauty and fashion retouching, bypassing the artifacts entirely is better than masking them. By combining AI with Frequency Separation, you can leverage the AI for color blending while strictly preserving the original skin texture.
Integrating AI into Frequency Separation
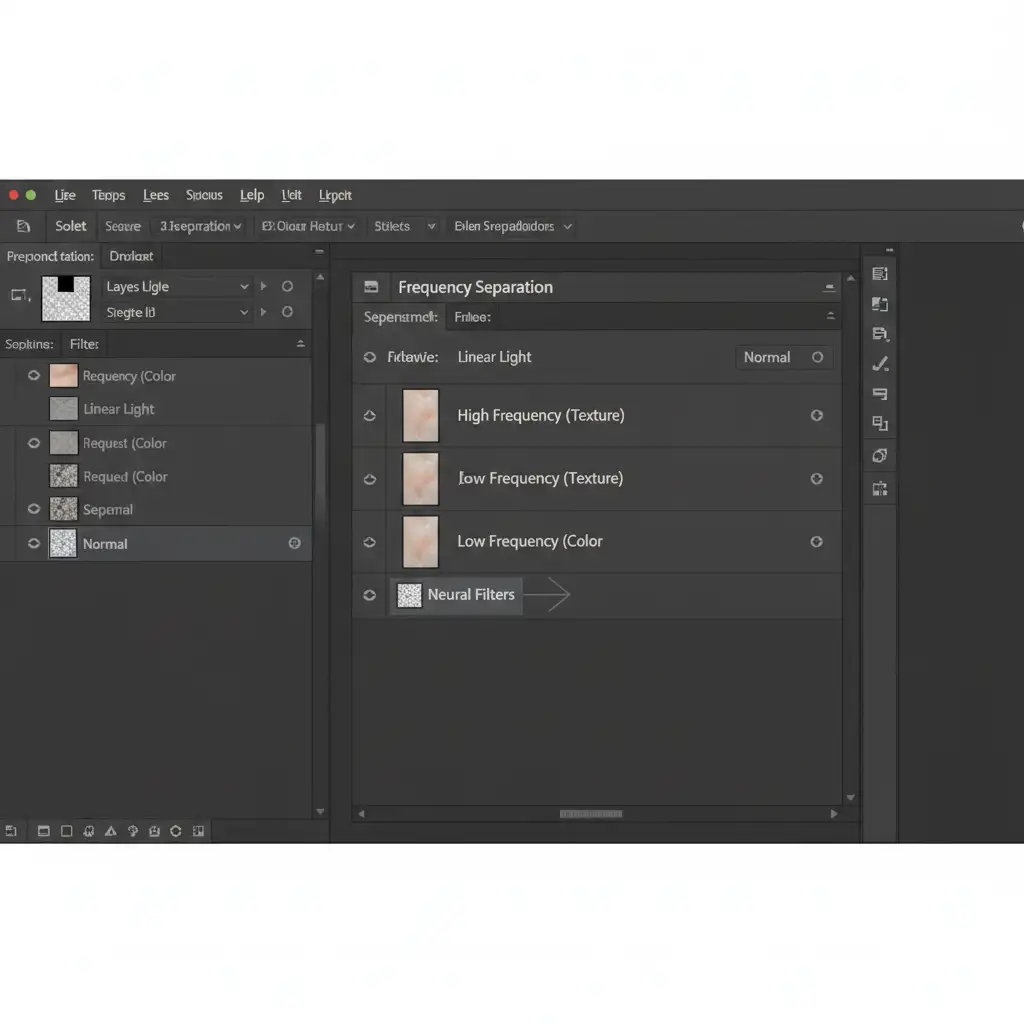
Frequency Separation splits your image into two distinct layers: a Low-Frequency layer (containing color, tone, and shadows) and a High-Frequency layer (containing pores, fine lines, and texture).
- Run your standard Frequency Separation action to split your image into High and Low layers.
- Select your Low-Frequency (Color) layer.
- Navigate to Filter > Neural Filters and apply the Skin Smoothing filter.
- Because the Neural Filter is only analyzing and altering the Low layer, it smooths out the blotchy skin tones and color banding effortlessly.
- Your High-Frequency (Texture) layer remains completely untouched on top. The original pores mask the AI’s plastic effect, rendering any underlying blocky artifacts completely invisible.
(Note: For advanced tonal corrections, you can also experiment with luminosity blending on the Low layer, but standard Normal blending usually suffices here).
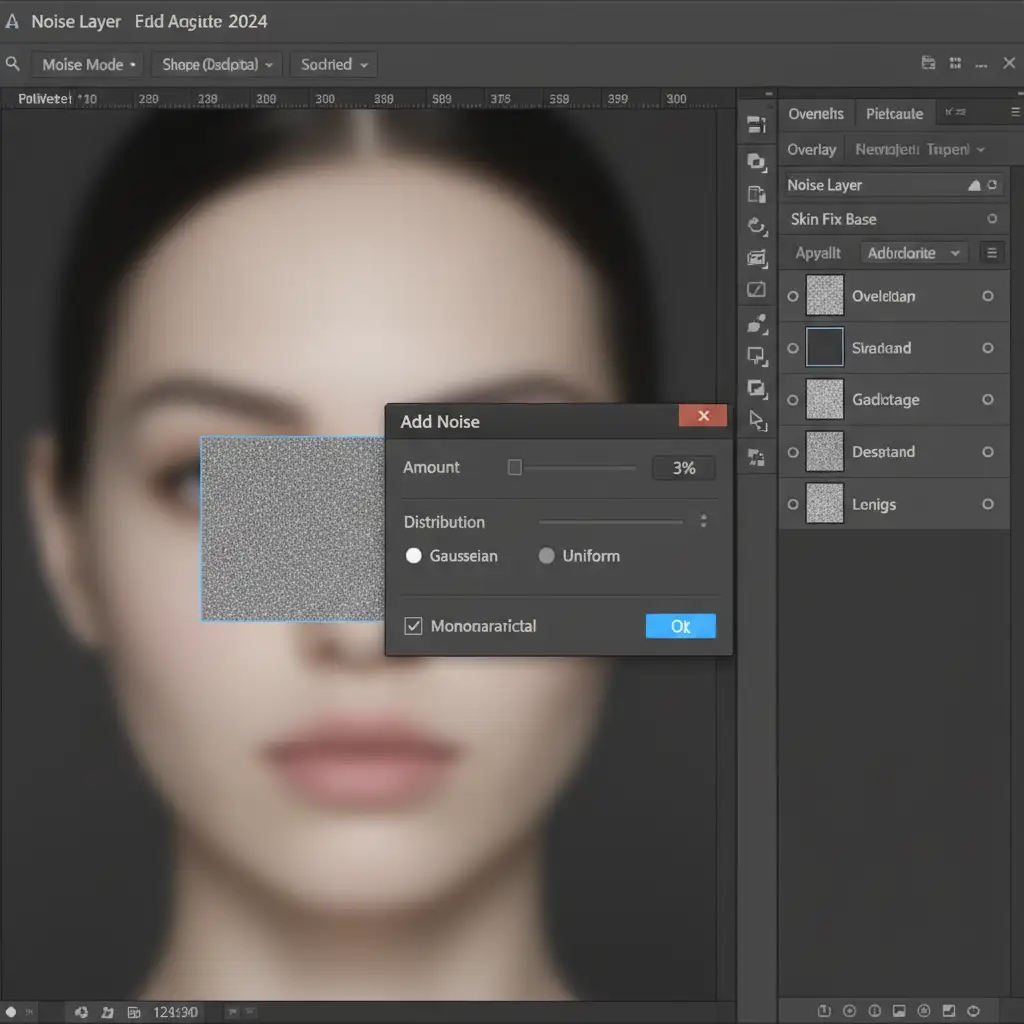
Method 3: Skin Texture Reconstruction for Over-Blurred AI Skin
Sometimes, you receive a file where the AI filter has already been baked into the image, completely destroying the high-frequency detail. In these cases of severe ai skin artifact removal in Photoshop 2024, you must perform skin texture reconstruction by generating artificial pores.
How to Generate Realistic Skin Pores
- Create a new empty layer above your over-smoothed image.
- Fill the layer with 50% Gray (Edit > Fill > 50% Gray).
- Change the layer’s blending mode to Overlay.
- Go to Filter > Noise > Add Noise.
- Set the Amount to 2-3%, choose Gaussian distribution, and check the Monochromatic box. Click OK.
- Artificial noise is too sharp to look like real skin. To soften it, go to Filter > Blur > Gaussian Blur and apply a subtle 0.5px blur.
- Add a black layer mask to this noise layer, and use a soft white brush to paint the artificial pores only over the areas that look plastic or feature blocky AI artifacts.
Skip the Hassle: Let the Experts Handle Your Retouching
Mastering AI skin artifact removal in Photoshop 2024 requires a deep understanding of layer masking, Frequency Separation, and texture reconstruction. While AI tools are marketed as “one-click solutions,” the reality is that high-end retouching still requires a trained human eye to prevent plastic, artificial-looking results.
If you are spending hours fixing pixelation and color banding instead of shooting your next campaign, it is time to scale your workflow. AI can only take your photos so far. For flawless, magazine-quality model retouching that preserves natural beauty without the plastic AI look, partner with the expert human retouchers at Image Work India and Cloud Retouch.
We specialize in high-volume, non-destructive retouching workflows for fashion, e-commerce, and editorial photographers. Contact us today to get a custom quote and elevate your portfolio to the highest industry standards.


