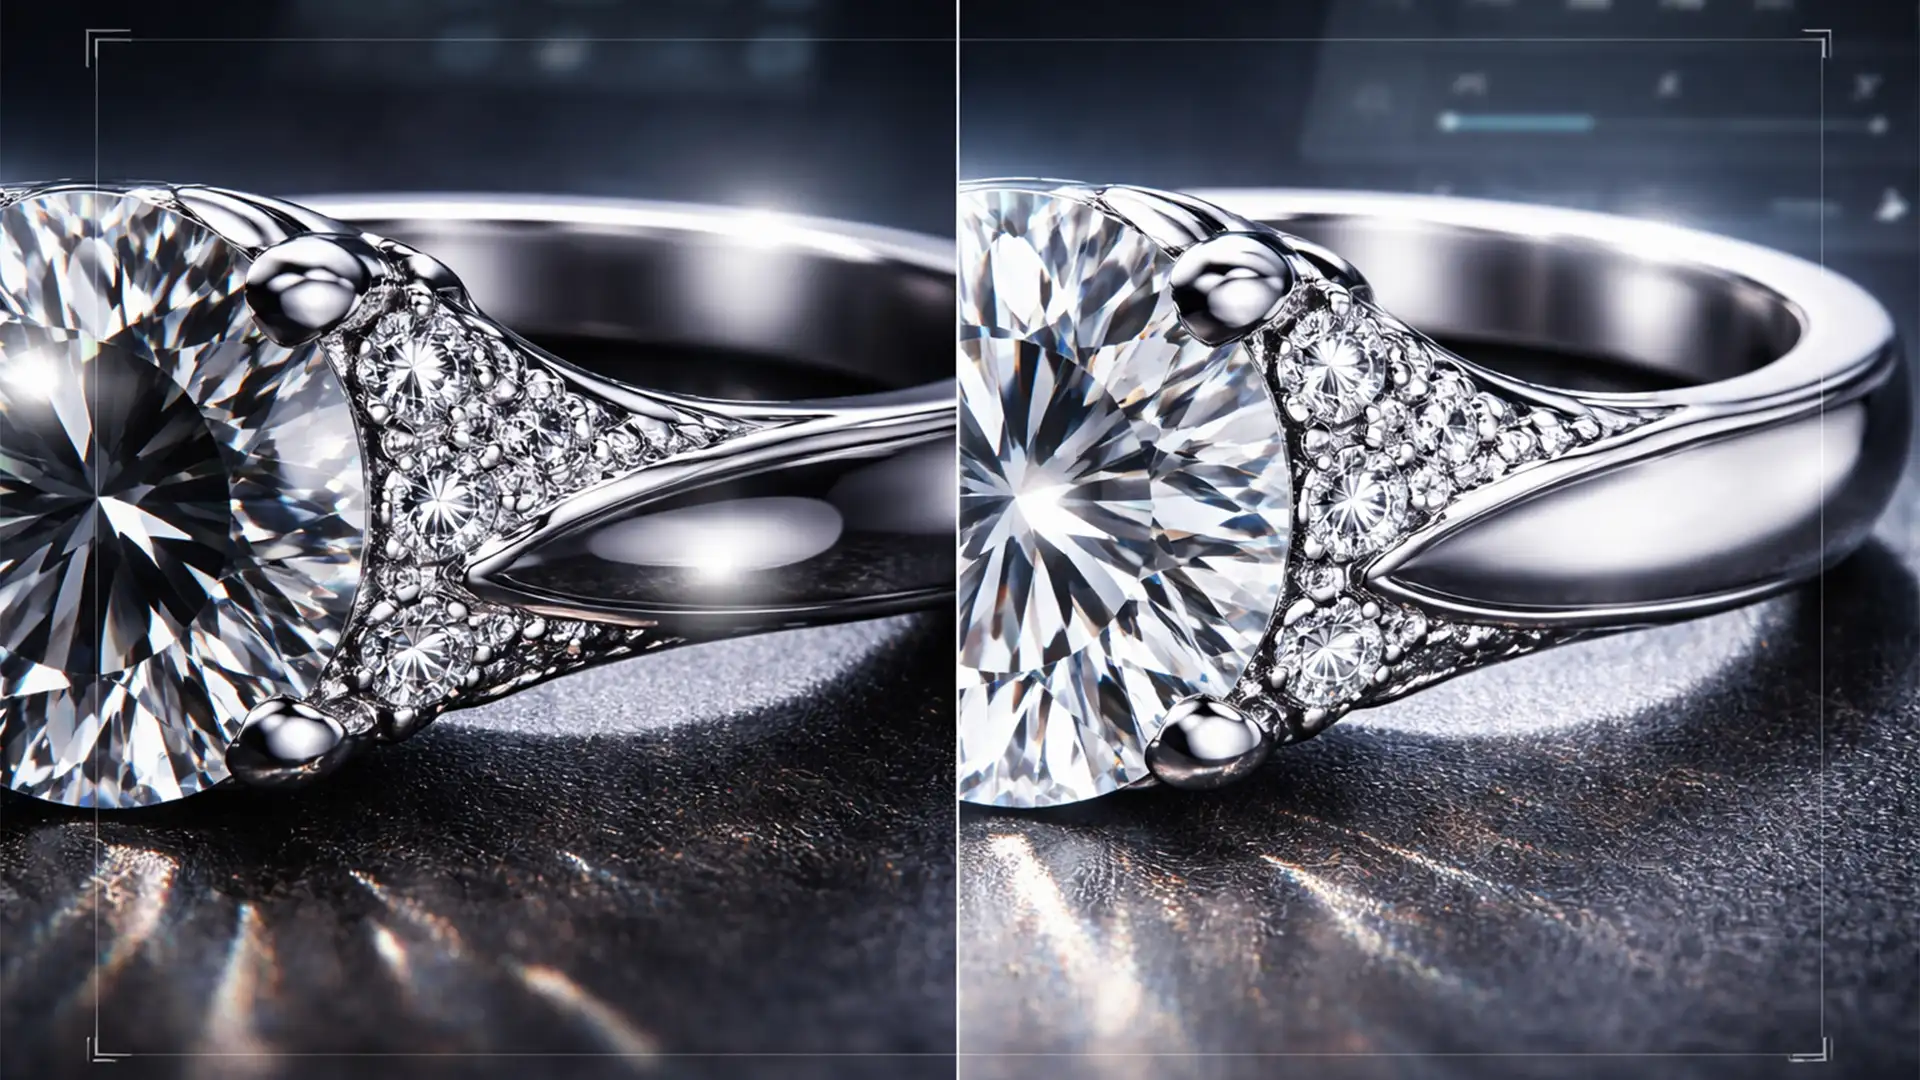
You spend hours setting up the perfect studio lighting, only to pull your macro shots into Photoshop and find a glaring issue: your camera lens and the dark room are staring right back at you. When you need to remove black camera reflections from polished silver, standard retouching techniques often fail, leaving the metal looking smudged, flat, or artificially plastic.
Highly reflective surfaces like platinum, chrome, and polished silver act like funhouse mirrors. The stark contrast between a dark studio environment and brilliant studio strobes destroys the illusion of a smooth, pristine surface.
In this guide, we will break down three professional techniques in Adobe Photoshop (v24.x to v25.x+) to replace pure black pixels with natural mid-tones and highlights. You will learn how to manipulate luminosity and retain surface texture without causing the dreaded color banding.
Why Standard Retouching Fails on Silver
When dealing with polished metals, you aren’t just adjusting color; you are manipulating pure luminosity. Silver has no inherent color; it only reflects its surroundings.
If you try to blindly clone stamp a dark reflection, you will likely destroy the natural cylindrical or flat gradient that gives the jewelry its 3D shape. The technical challenge is replacing the stark black spots while preserving the crisp specular highlight and the subtle gray transitions of the metal.
Here are the three best methods to fix this issue, ranging from a quick patch to a complete surface rebuild.
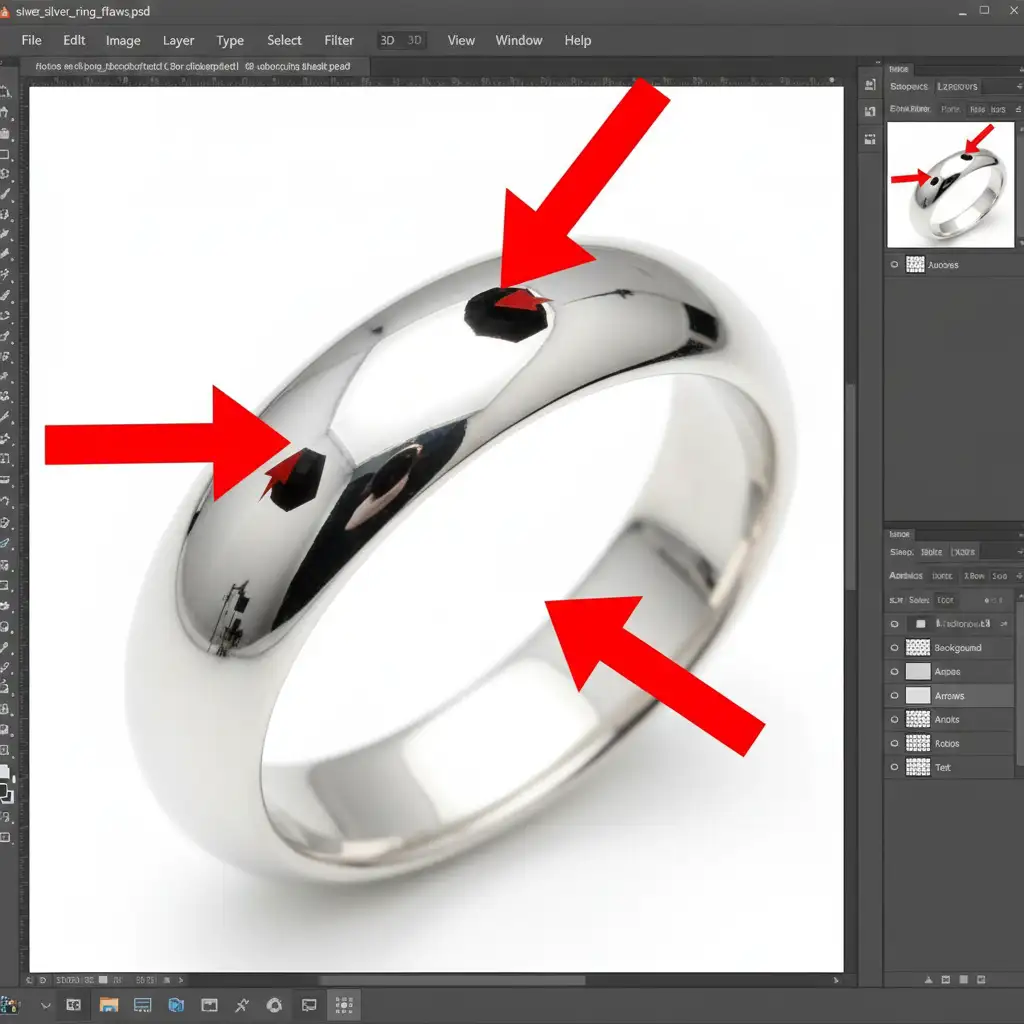
Method 1: The Quick Fix (Photoshop 2024+)
If you are dealing with small, isolated lens spots rather than massive dark panels, Adobe’s latest AI-driven tools are your best starting point.
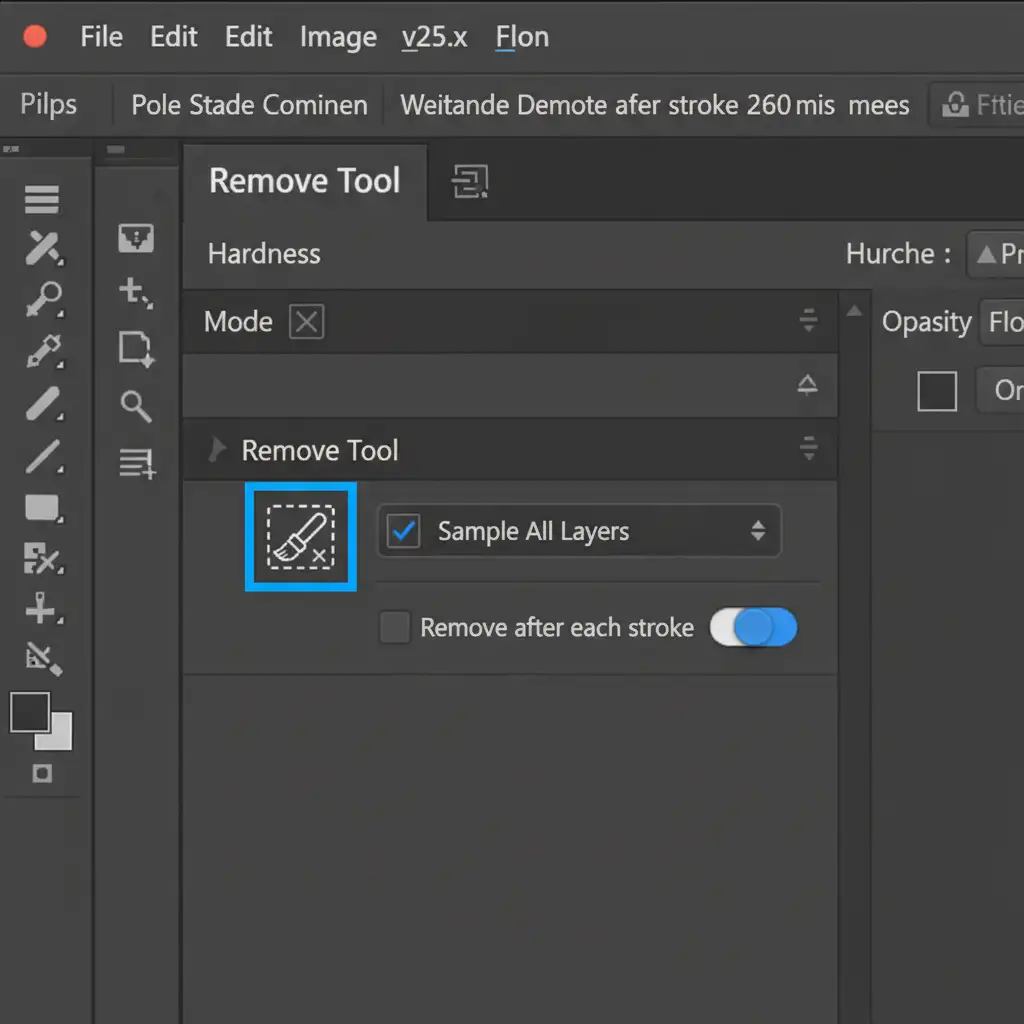
- Select the Remove Tool: In Photoshop v25.x+, locate the Remove Tool (nested with the Spot Healing Brush).
- Configure the Settings: Look at the top settings bar. Ensure it is set to “Remove after each stroke” for precise control.
- Paint the Reflection: Carefully brush over the black lens reflection.
Unlike older Content-Aware Fill algorithms that might pull in unwanted textures, the Remove Tool is highly adept at interpreting the surrounding metallic gradients and filling in the gap seamlessly.
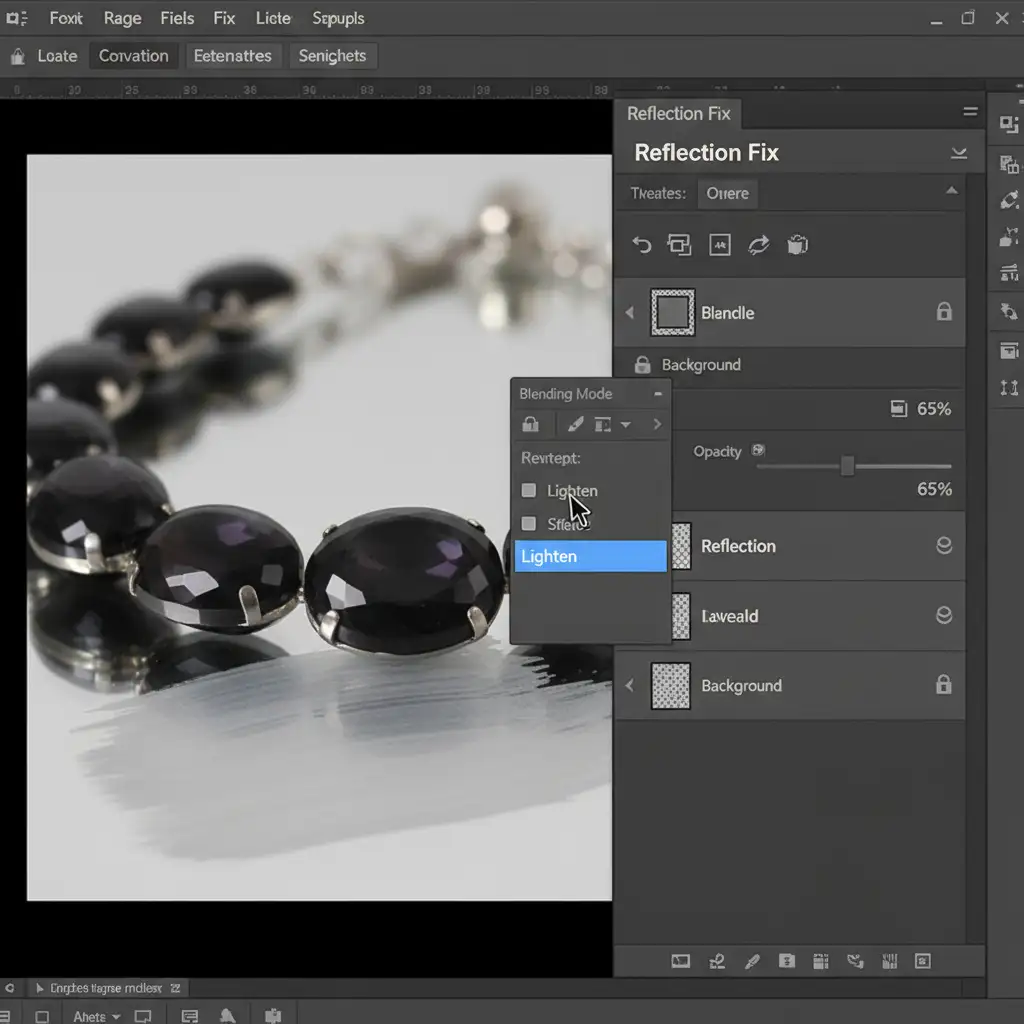
Method 2: The Pro Workaround using Blending Modes
When the Remove Tool struggles with larger dark reflections or creates a muddy texture, you need manual control. This technique uses mid-tone sampling and blending modes to target only the dark pixels.
- Create a New Layer: Add a blank layer above your jewelry image.
- Sample the Metal: Select the Brush tool (B) with a soft edge. Hold Alt (Windows) or Option (Mac) to use the Eyedropper. Click on a clean, light-gray silver mid-tone right next to the black reflection.
- Paint Over the Black: Gently paint directly over the harsh black reflection. It will look like a flat gray blob at first.
- Change the Blending Mode: Go to your Layers panel and change the layer’s Blending Mode from Normal to Lighten.
Because you are using the Lighten blend mode, the gray paint will only affect pixels that are darker than the color you sampled. It completely ignores your bright specular highlights, allowing you to seamlessly hide the black reflection. You can then reduce the layer opacity to blend it naturally.
Method 3: The Technical Deep-Dive (Gradient Recreation)
Sometimes, the camera reflection is so large that it destroys an entire panel of the jewelry. In these cases, you cannot patch the metal; you must rebuild it.
- Isolate the Surface: Use the Pen Tool Isolation technique to draw a precise path around the affected flat or cylindrical silver panel. Convert the path to a selection.
- Apply a Mask: Create a new empty layer and apply a Clipping Mask to your precise selection. Apply slight feathering (0.5 to 1 pixel) to the mask so the edges don’t look artificially sharp.
- Rebuild the Gradient: Select the Gradient Tool (G). Sample a light gray and a dark gray from the original, uncorrupted parts of the metal.
- Draw the Metal: Drag your gradient across the selection to mimic the natural curve of the jewelry.
- Refine with a Gradient Map: For ultimate control, you can apply a Gradient Map adjustment layer clipped to this shape, mapping the darkest shadows to a rich gray rather than pure black, effectively overriding the camera’s reflection entirely.

Stop Struggling with Complex Jewelry Retouching
Learning to remove black camera reflections from polished silver takes patience, a deep understanding of light physics, and advanced Photoshop skills. When you are managing an e-commerce catalog with hundreds of luxury SKUs, spending 20 minutes rebuilding gradients on a single ring simply isn’t scalable.
That is where we step in.
At Image Work India and Cloud Retouch, our dedicated team of high-end jewelry retouchers specializes in transforming raw, reflection-heavy macro shots into flawless, magazine-ready assets. We handle the Pen Tool isolation, complex gradient mapping, and luminosity adjustments so you don’t have to.
Ready to make your jewelry shine without the studio reflections? Contact Cloud Retouch today for professional, high-volume jewelry retouching services tailored to luxury standards.


