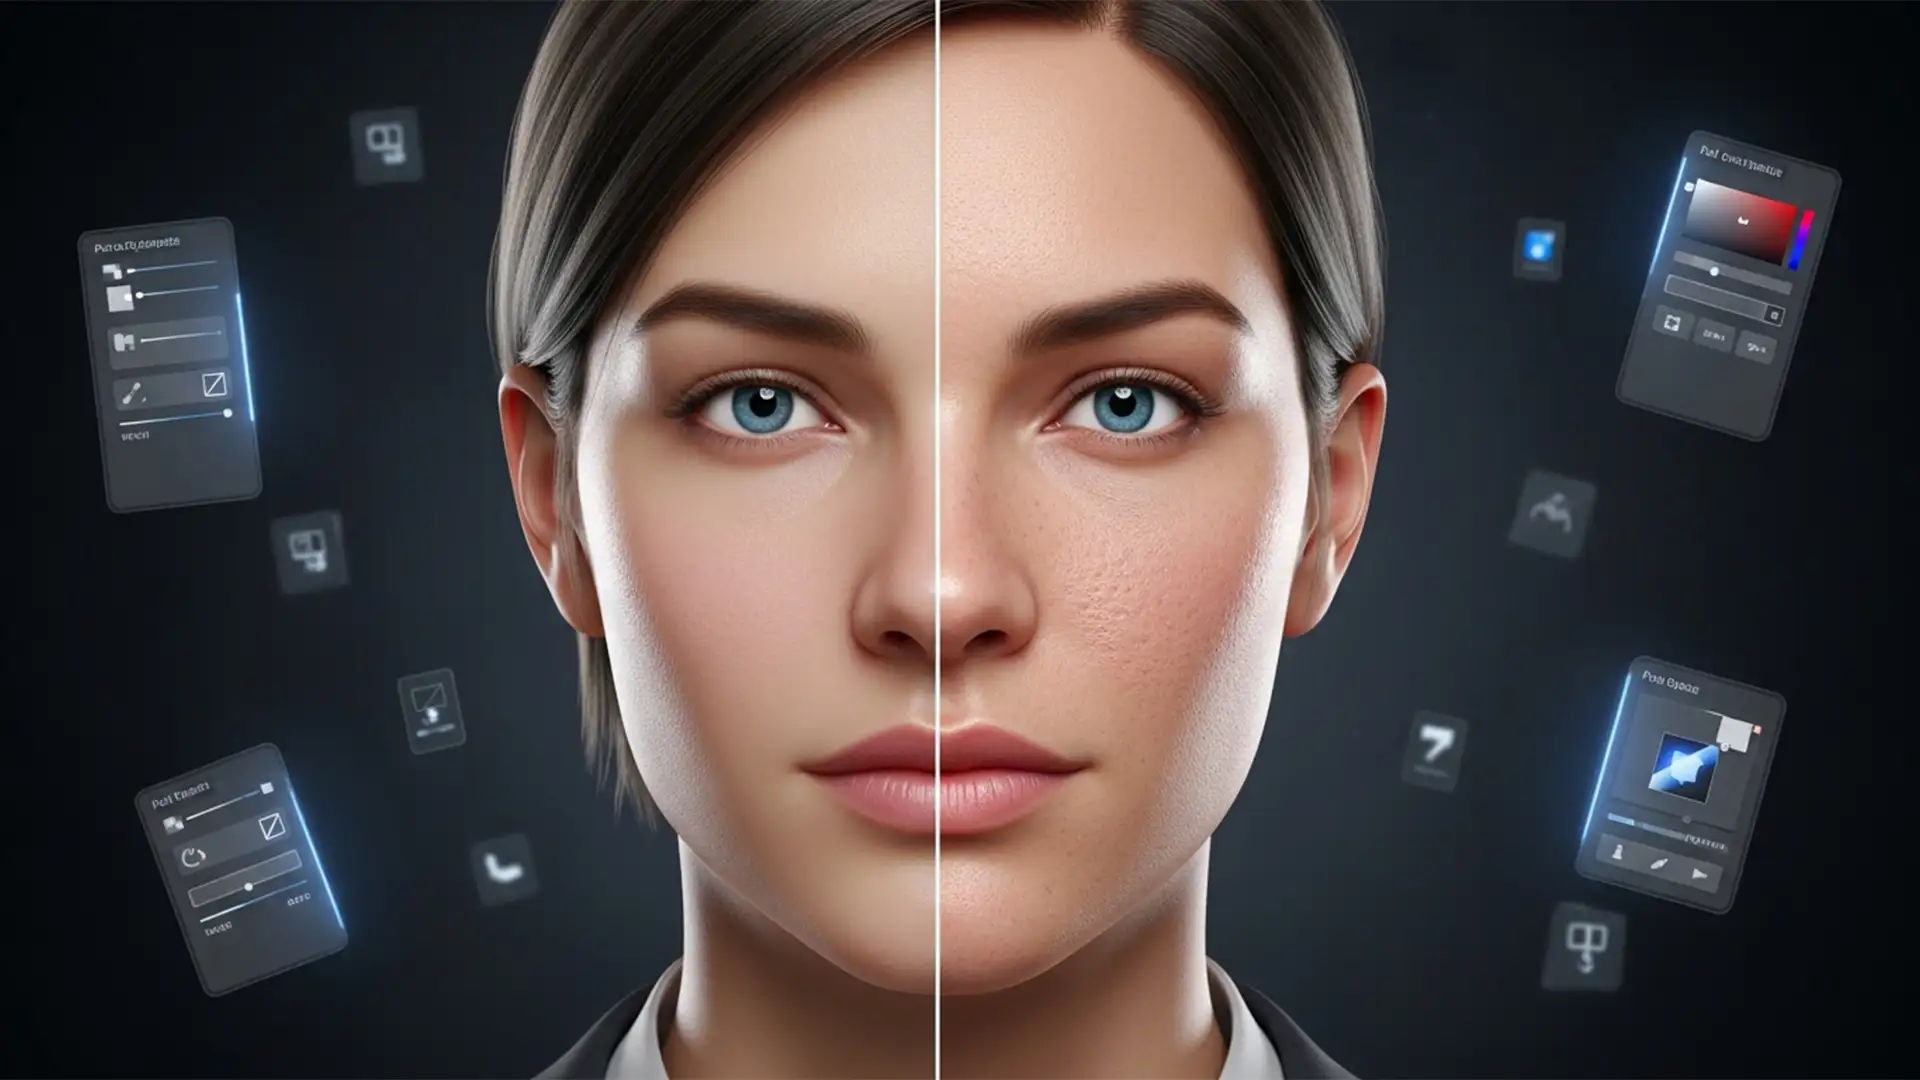
You just generated the perfect corporate ai headshot using Midjourney v6 or Stable Diffusion. The lighting is cinematic, the composition is flawless, but there is a glaring issue: your subject looks like a mannequin.
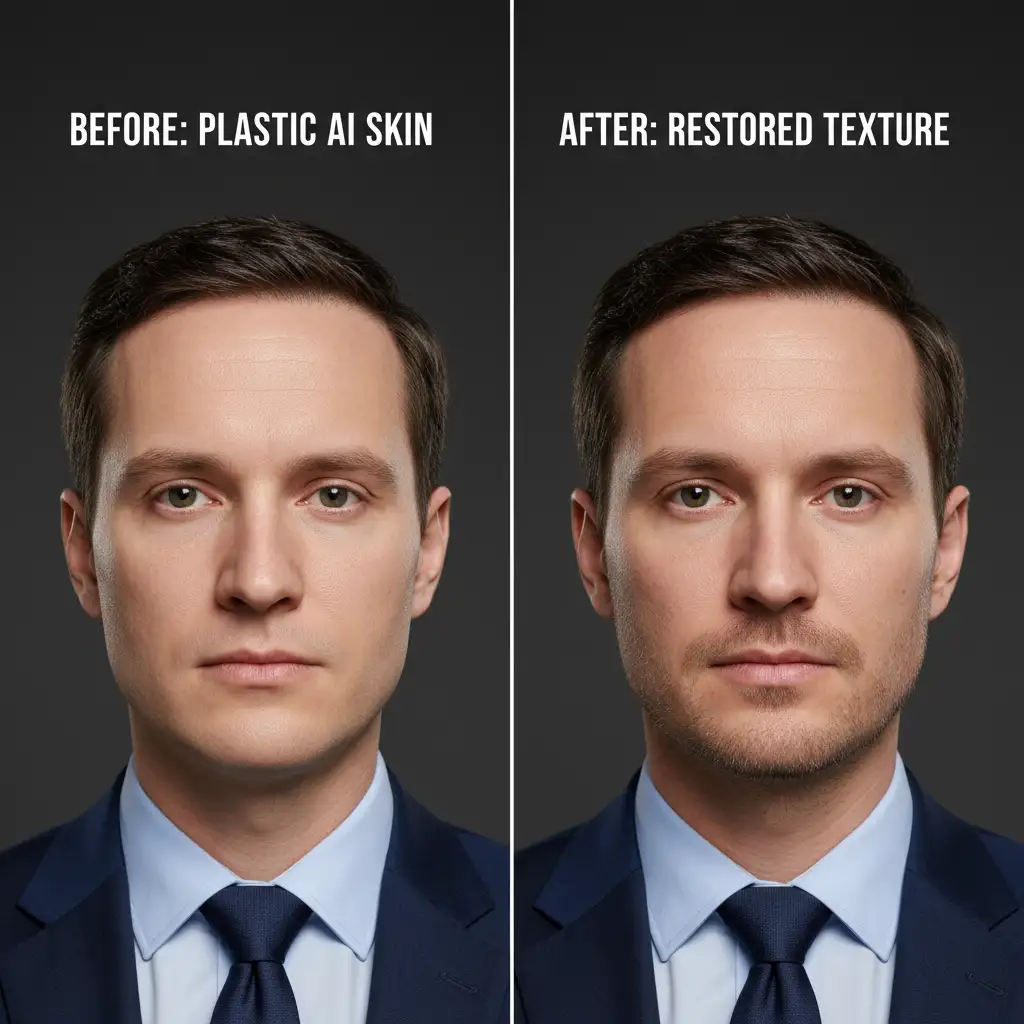
This artificial, plastic appearance is a dead giveaway of the AI generation. It happens because aggressive denoising algorithms strip away natural pores, peach fuzz, and micro-imperfections. When human skin lacks these details, it triggers the “uncanny valley” effect, making the image feel unsettling and unprofessional.
If you want to use AI portraits for business profiles or marketing, you must learn how to fix plastic skin in AI headshots. In this guide, we will walk you through three professional Photoshop techniques to restore realistic skin texture without destroying your foundational lighting.
Why AI Generators Struggle with Human Skin
AI image models are trained to reduce noise and artifacts. While this is great for creating clean images, human skin is inherently “noisy.” It contains a complex web of high-frequency data—pores, fine lines, and subtle color variations. When AI applies its denoising algorithms, it flattens this micro-contrast, resulting in an overly smoothed, plastic finish.
To fix this in Photoshop v25.x and above, we have to manually reintroduce controlled high-frequency data using non-destructive editing techniques.
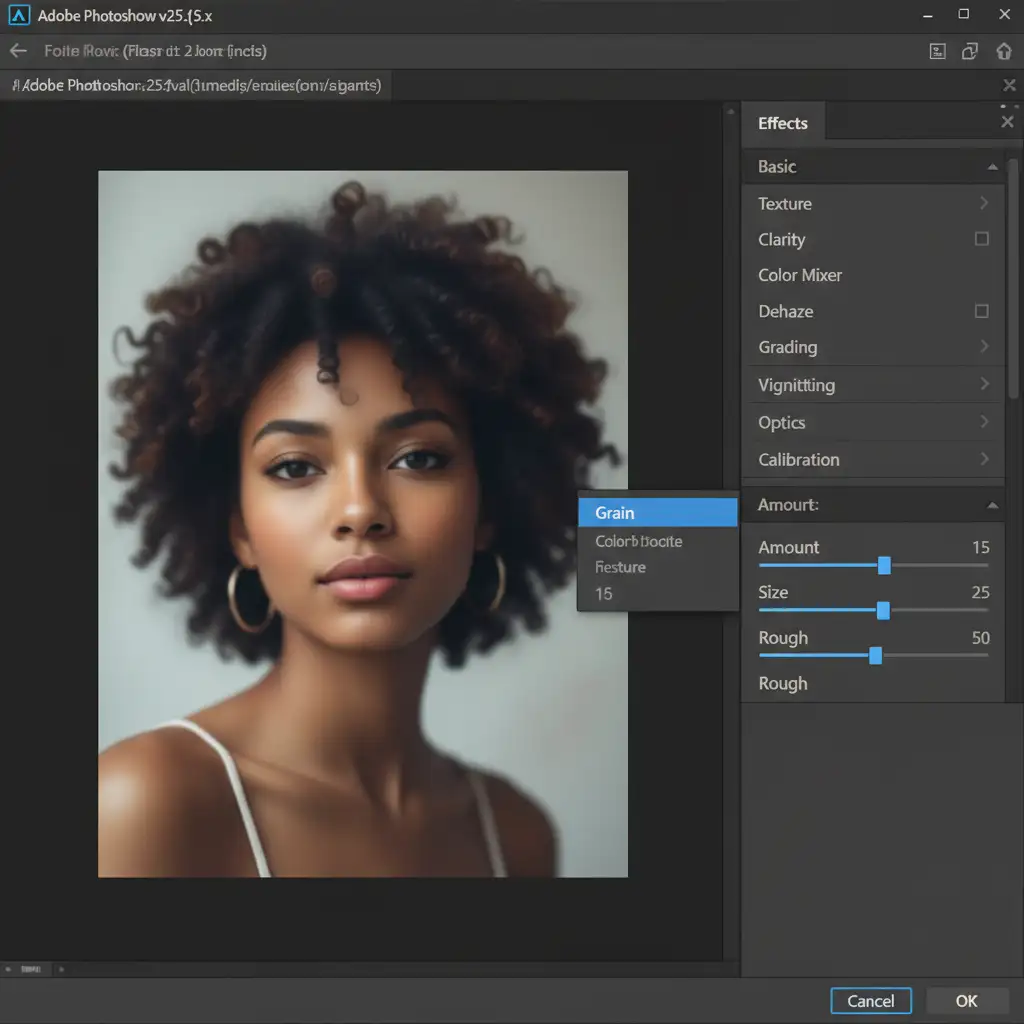
Method 1: The Quick Fix (Camera Raw Filter)
If you need a fast solution to take the edge off a synthetic image, introducing uniform film grain can simulate basic skin texture.
Step-by-Step Workflow:
- Open your AI headshot in Photoshop.
- Convert your image layer to a Smart Object to ensure non-destructive editing.
- Navigate to Filter > Camera Raw Filter.
- Expand the Effects panel on the right side.
- Adjust the Grain sliders. For optimal AI skin recovery, use these baseline settings:
- Amount: 15
- Size: 25
- Roughness: 50
- Click OK.
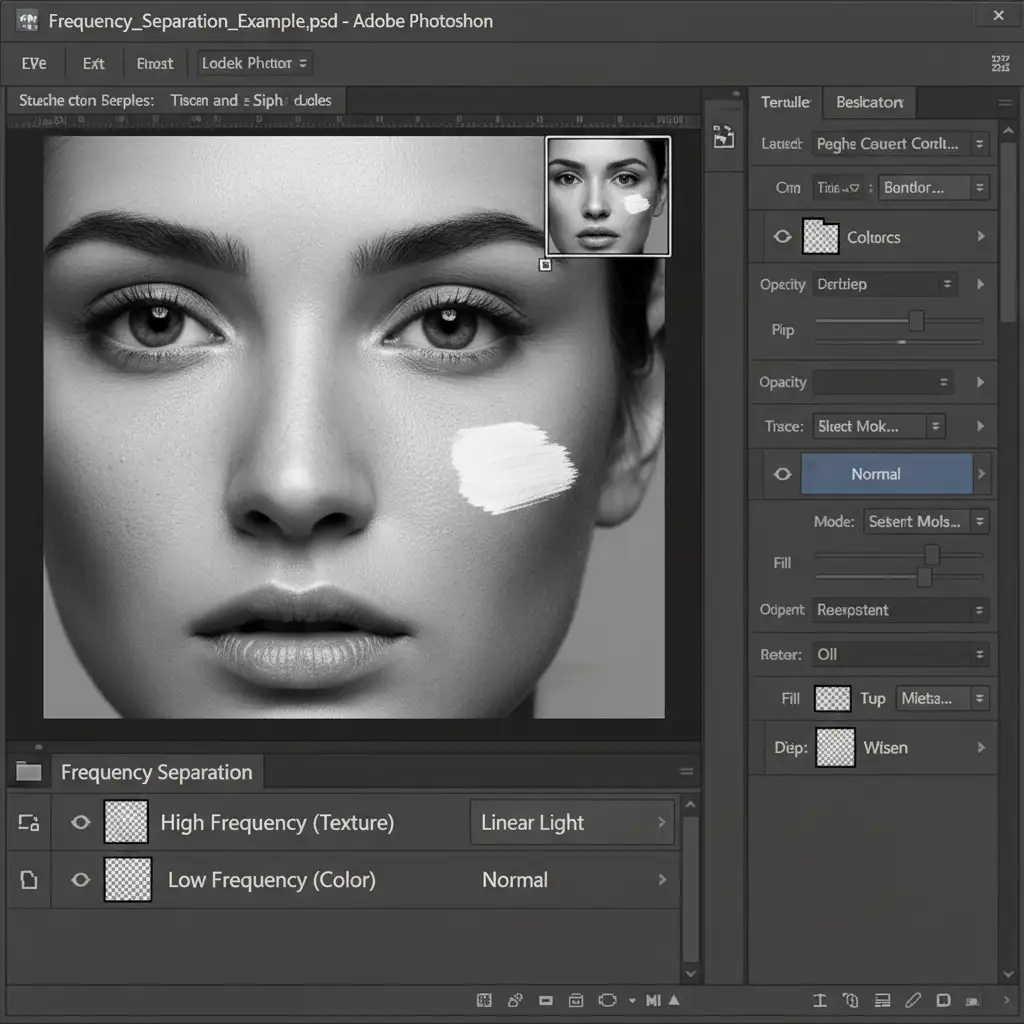
Method 2: The Pro Workaround (Frequency Separation Texture Grafting)
For high-end skin retouching, adding uniform grain isn’t enough. Real pores vary in size and shape depending on the area of the face. To fix plastic skin in AI headshots at a professional level, we use Frequency Separation to graft real skin texture onto the AI image.
Step-by-Step Workflow:
- Duplicate your AI portrait layer twice. Name the bottom layer “Low Frequency” (Color) and the top layer “High Frequency” (Texture).
- Select the Low Frequency layer and apply a Gaussian Blur (Filter > Blur > Gaussian Blur) until the plastic skin details soften further (usually a radius of 5-7px).
- Select the High Frequency layer. Go to Image > Apply Image.
- In the dialog box, set the Layer to “Low Frequency”, Blending to Subtract, Scale to 2, and Offset to 128. Click OK.
- Change the High Frequency layer’s blend mode to Linear Light.
- The Grafting Step: Bring in a high-resolution stock photo of real, healthy human skin. Place it above your High Frequency layer.
- Desaturate the real skin texture, set its blending mode to Overlay or Soft Light, and clip it to your high-frequency layer. Use a black layer mask and a soft white brush to paint this real texture exclusively over the cheeks, forehead, and chin of your AI subject.
Method 3: The Technical Deep-Dive (Noise Overlay & Blend If)
If you don’t have a stock photo to graft from, you can synthesize 3D pores using Photoshop’s Noise and Emboss filters, targeted precisely using Blend If sliders.
Step-by-Step Workflow:
- Create a new blank layer above your AI headshot. Fill it with 50% Gray (Edit > Fill > 50% Gray).
- Change the layer’s blending mode to Overlay.
- Go to Filter > Noise > Add Noise. Choose Uniform and Monochromatic, setting the amount to roughly 5%.
- To turn this flat noise into 3D pores, go to Filter > Stylize > Emboss. Set the Angle to match your portrait’s lighting (e.g., 90 degrees), Height to 1px, and Amount to 50%.
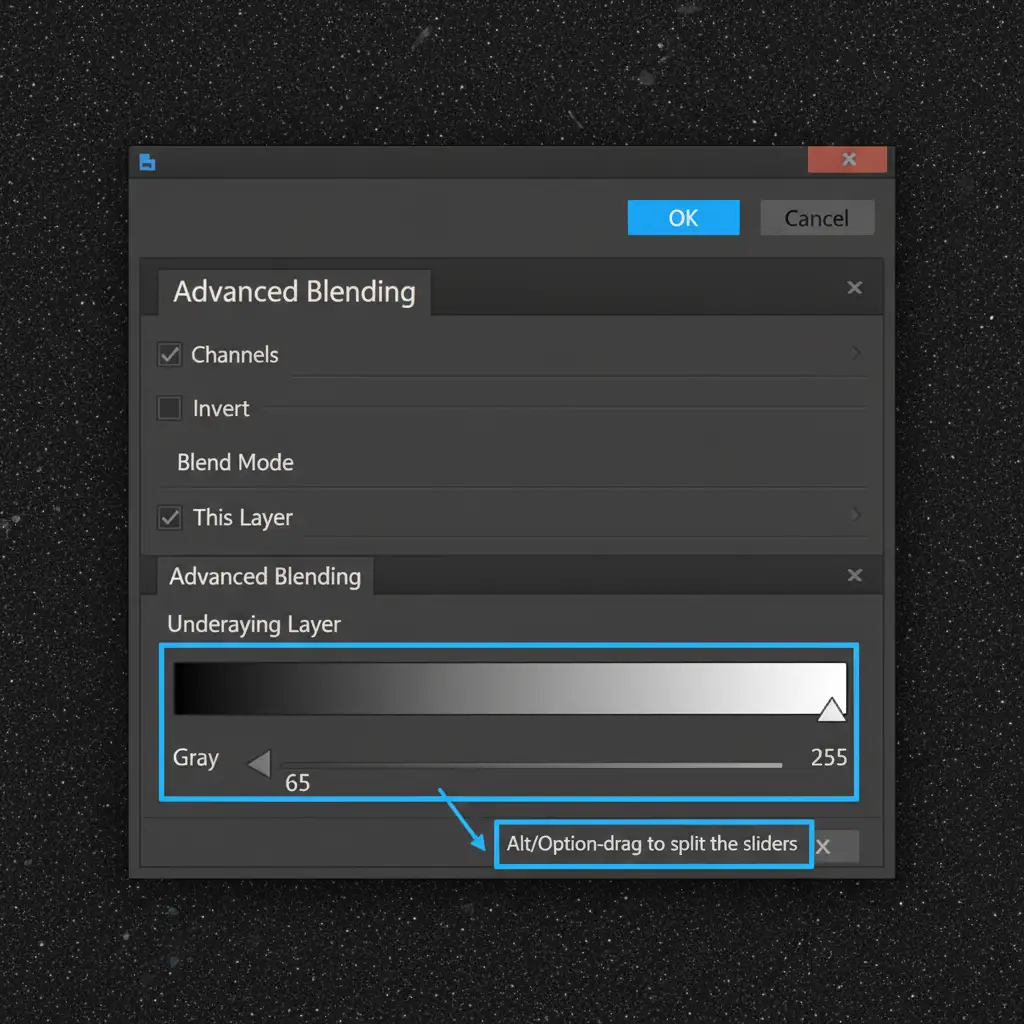
- Targeting the Texture: Real skin texture is most visible in the midtones and highlights, not in deep shadows. Double-click your texture layer to open the Layer Style dialog.
- Look at the Blend If section at the bottom (Underlying Layer). Hold Alt/Option and split the black slider, dragging the right half toward the midtones (around 50-70). This smoothly fades the artificial pores out of the dark shadows, creating incredible realism.
Stop Settling for Fake-Looking AI Portraits
Learning how to fix plastic skin in AI headshots requires a deep understanding of micro-contrast, non-destructive editing, and advanced Photoshop techniques. While the methods above will help you overcome the uncanny valley, executing them flawlessly on dozens of corporate headshots is incredibly time-consuming.
Don’t have the time to manually graft skin textures and adjust Blend If sliders?
Let the professional retouching team at Image Work India and Cloud Retouch handle it for you. Our expert photo editors specialize in high-end skin retouching and AI image refinement. We manually restore realistic pores, fix lighting inconsistencies, and ensure your AI-generated portraits look 100% authentic, human, and ready for your corporate website.
Contact Cloud Retouch today to turn your AI generations into flawless, professional reality.


