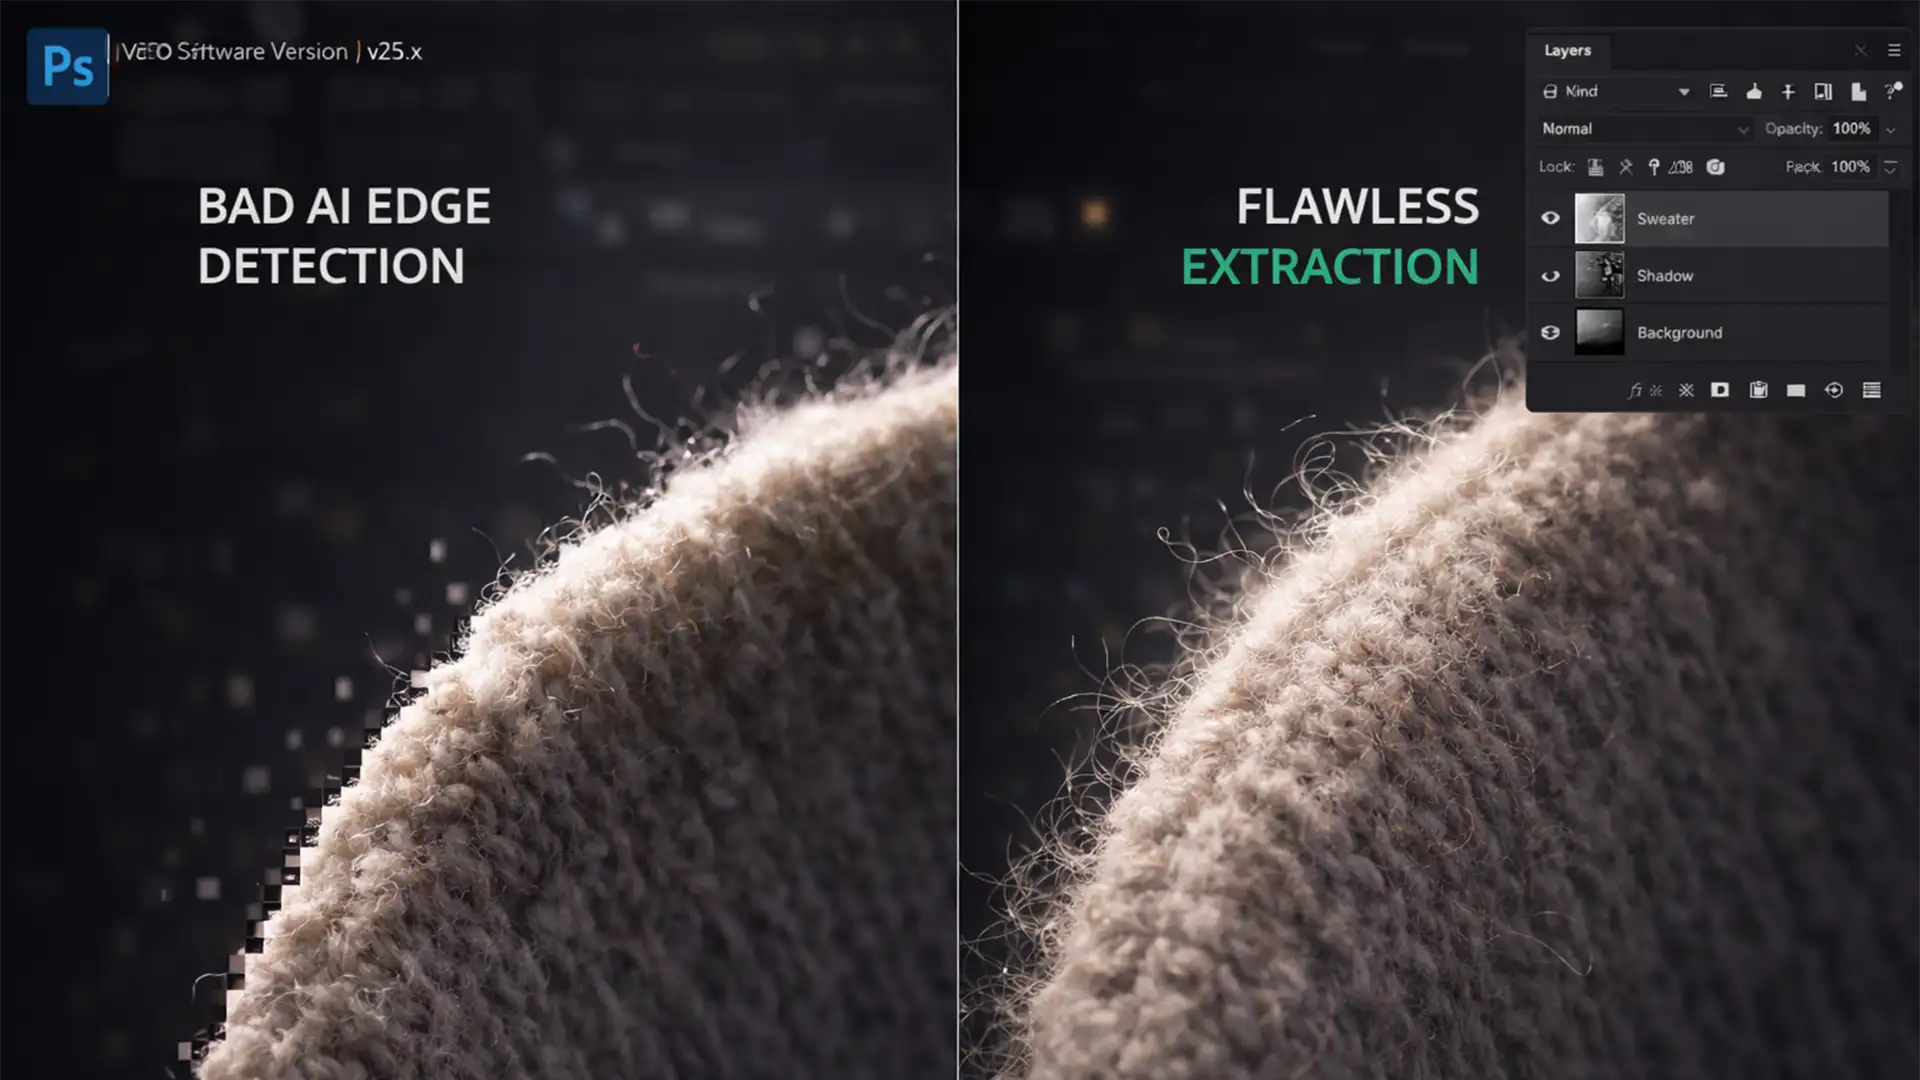
Have you ever used an automated background removal tool on a fuzzy sweater, lace dress, or faux-fur handbag, only to see the edges chopped off like a cheap plastic toy? You are not alone. While one-click tools save time, preserving product texture in AI background removal remains a massive headache for e-commerce retouchers.
When you rely solely on Photoshop v25.x’s Subject Select or Remove Background features, you sacrifice realism. The AI aggressively clips the translucent fibers and soft edges of complex fabrics, destroying the natural micro-contrast and shadow falloff that make apparel look authentic.
In high-end e-commerce, authenticity sells. Here is exactly how to bypass the limitations of AI edge detection and restore pixel-perfect texture to your product photos.
Why Automated Tools Destroy Fabric Edges
The core issue with automated extraction lies in binary masking. When an AI evaluates an image, it attempts to assign every pixel a value of either 100% opaque (the subject) or 100% transparent (the background).
Fabrics like fur, fleece, and lace do not operate in binary. They feature translucent edge pixels and micro-shadows that blend softly into the background. Because AI masking thresholds lack the nuance to interpret this translucency, they forcefully clip these transition areas. The result is a harsh, jagged cutout that instantly lowers the perceived value of your product.
To fix this, you must combine the speed of AI with manual, advanced Photoshop techniques.
3 Methods for Preserving Product Texture in AI Background Removal
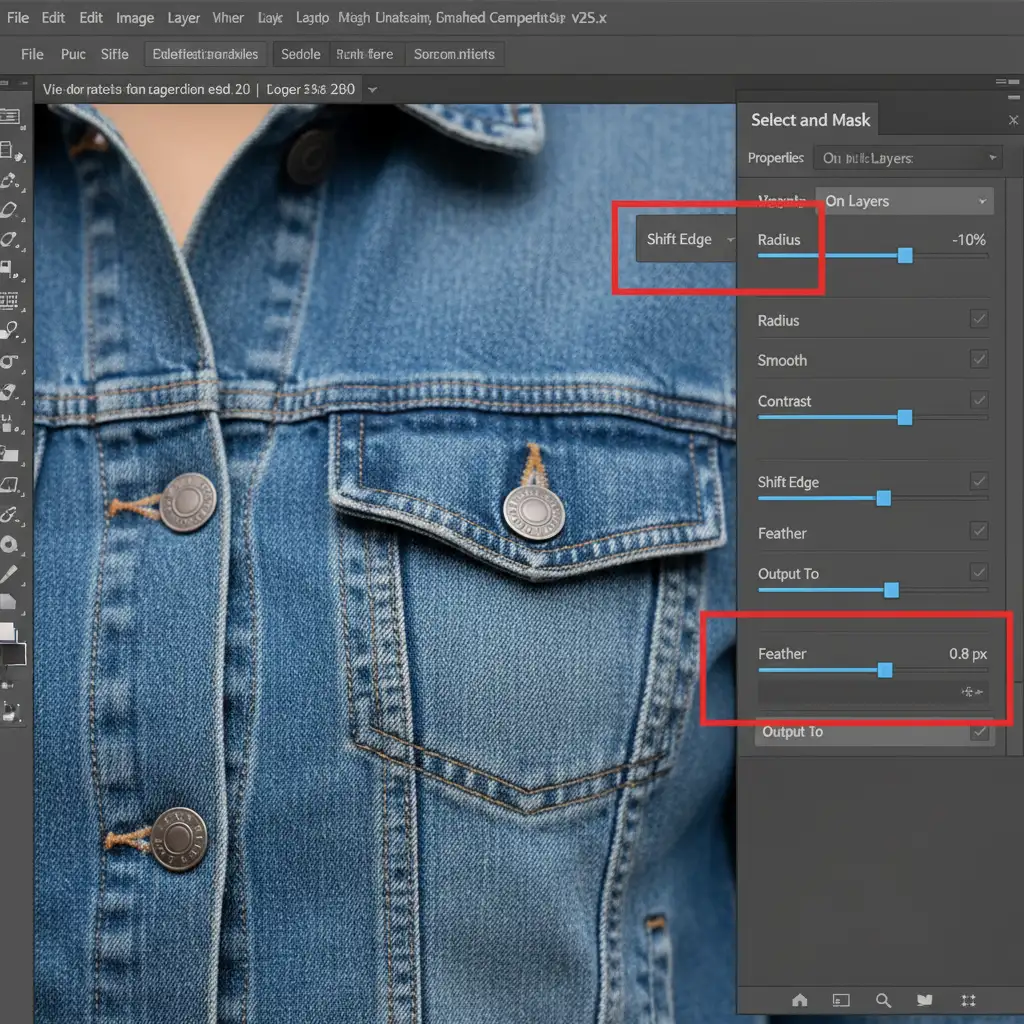
Method 1: The Quick Fix (Select and Mask)
If you are dealing with moderately textured items like denim or heavy cotton, you can often salvage the AI’s initial selection using the Select and Mask workspace.
- Generate your initial AI mask using the Remove Background button.
- Open the mask in the Select and Mask workspace.
- Select the Refine Edge brush and gently paint over the problematic fabric borders to force Photoshop to recalculate the edge transitions.
- Navigate to the right-side properties panel. Adjust the Shift Edge slider negatively (usually between -5% and -15%) to pull the mask inward, hiding the harsh automated cut.
- Add a slight Feather (0.5px to 1px) to soften the perimeter.
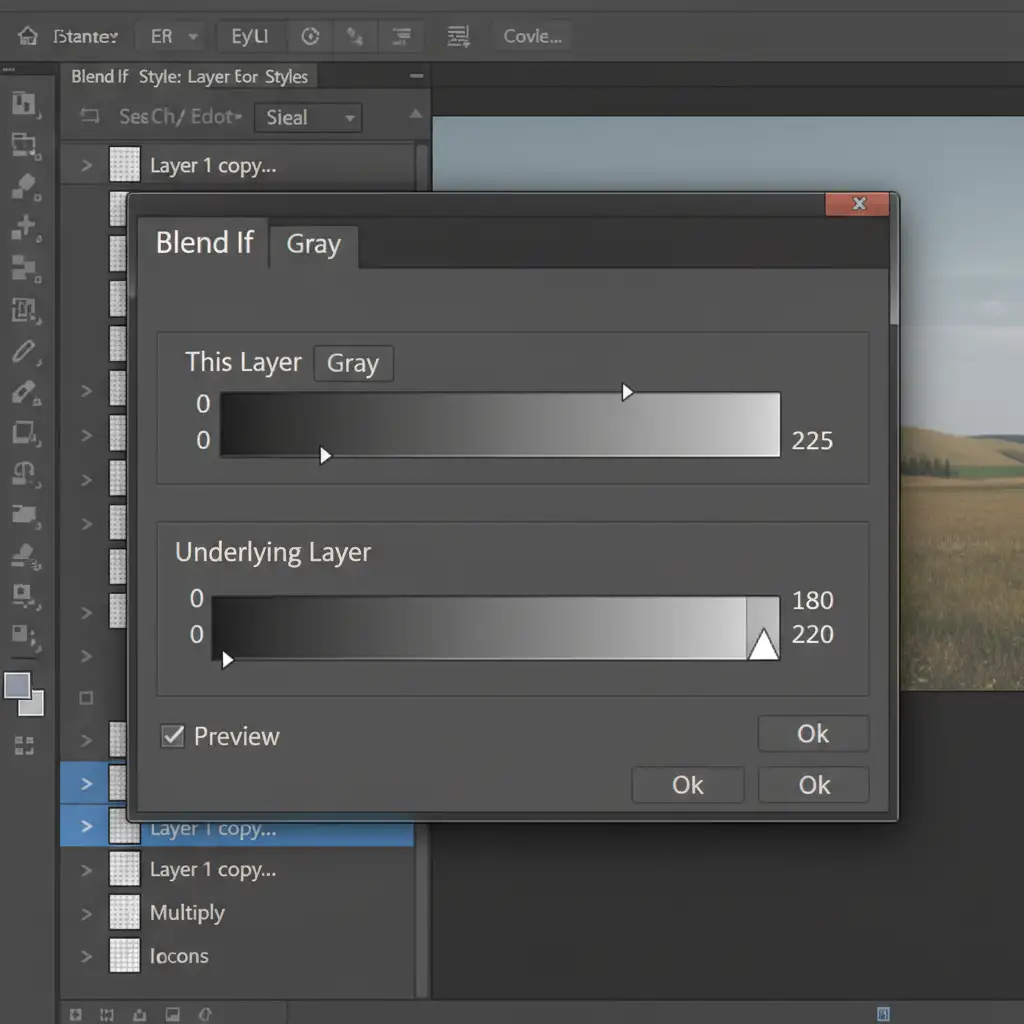
Method 2: The Pro Workaround (Blend If & Luminosity Masks)
For more complex items where the edge detail is critical, you need to bring back the original edge data that the AI deleted.
- Duplicate your original, unedited background layer and place it above your AI-cutout layer.
- Apply the AI mask to the lower layer to remove the bulk of the background.
- On the duplicated top layer, change the blend mode to Multiply or Darken. This instantly drops out lighter backgrounds while keeping the dark micro-shadows and edge textures.
- To prevent this layer from affecting the center of your product, apply a Luminosity Mask or use the Blend If sliders.
- Double-click the top layer to open Layer Style, and adjust the “Blend If: Underlying Layer” sliders, holding Alt/Option to split the nodes for a smooth transition.
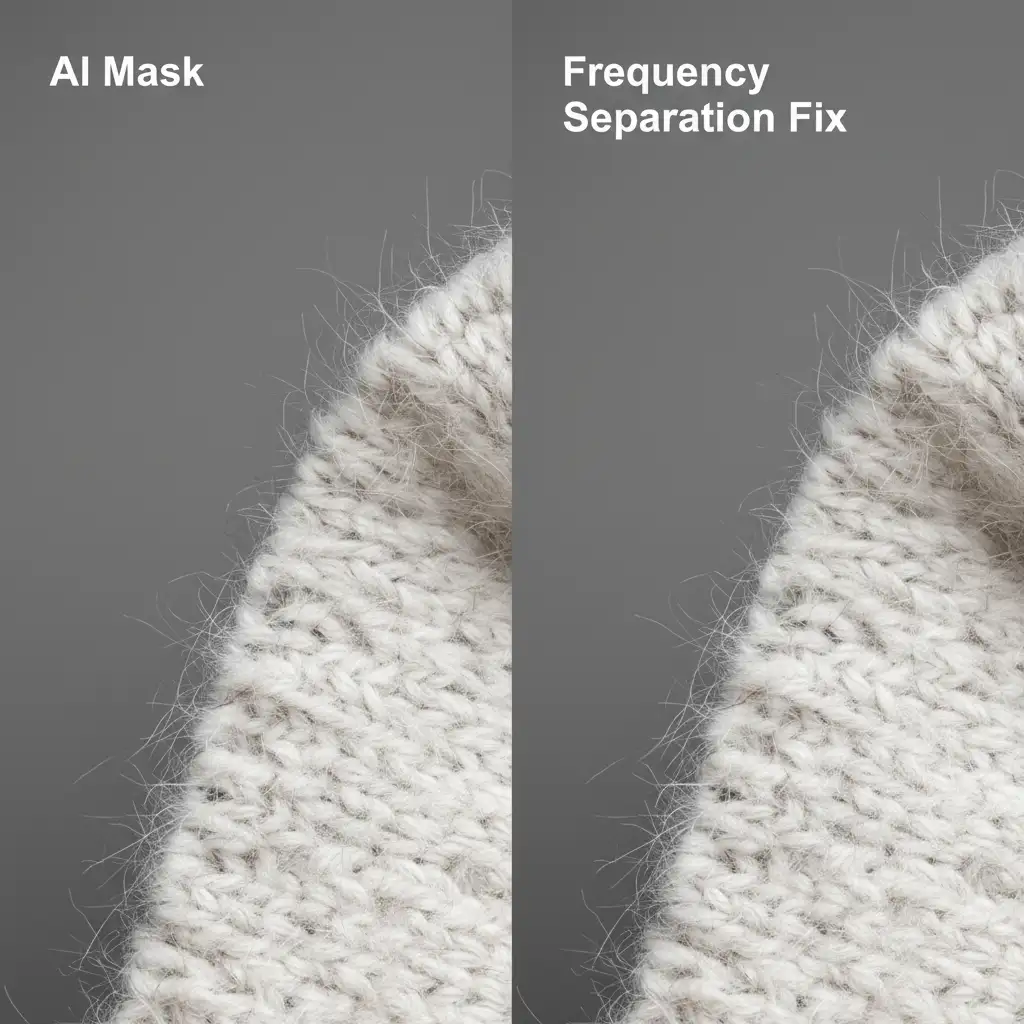
Method 3: The Technical Deep-Dive (Frequency Separation)
When dealing with extreme textures like stray fur, fine lace, or angora wool, you must separate the product’s color data from its texture data. This is where Frequency Separation becomes invaluable for masking.
- Create a standard Frequency Separation setup, splitting your image into a low-frequency layer (color/tone) and a high-frequency layer (micro-contrast and texture).
- Apply your automated AI mask only to the low-frequency color layer. This handles the bulk of the product’s shape.
- Leave the high-frequency layer unmasked initially. Because it only contains texture data and is set to Linear Light, the original fabric edges will extend past the harsh AI cut.
- To clean up the background texture without losing the product’s edge fibers, use precise contrast-based channel masking. Find the color channel with the most contrast at the edge, duplicate it, crush the levels, and load it as a selection. Apply this manual mask to the high-frequency layer.
This guarantees you retain 100 percent of the micro-texture along the product edges, completely bypassing the AI’s binary limitations.
Stop Sacrificing Quality for Speed
Preserving product texture in AI background removal requires a deep understanding of masking, blending modes, and micro-contrast. While these techniques yield flawless results, they are incredibly time-consuming to execute at scale.
If your team is struggling to process high volumes of complex apparel and textured products without losing authenticity, it is time to bring in the experts.
Image Work India and Cloud Retouch specialize in high-end, pixel-perfect e-commerce editing. We don’t rely on blind automated cuts; our professional retouchers utilize advanced masking techniques to ensure every thread, shadow, and texture is perfectly preserved.
Don’t let bad cutouts hurt your conversion rates. [Contact Image Work India and Cloud Retouch today] to outsource your background removal and elevate your product imagery to the highest industry standards.


