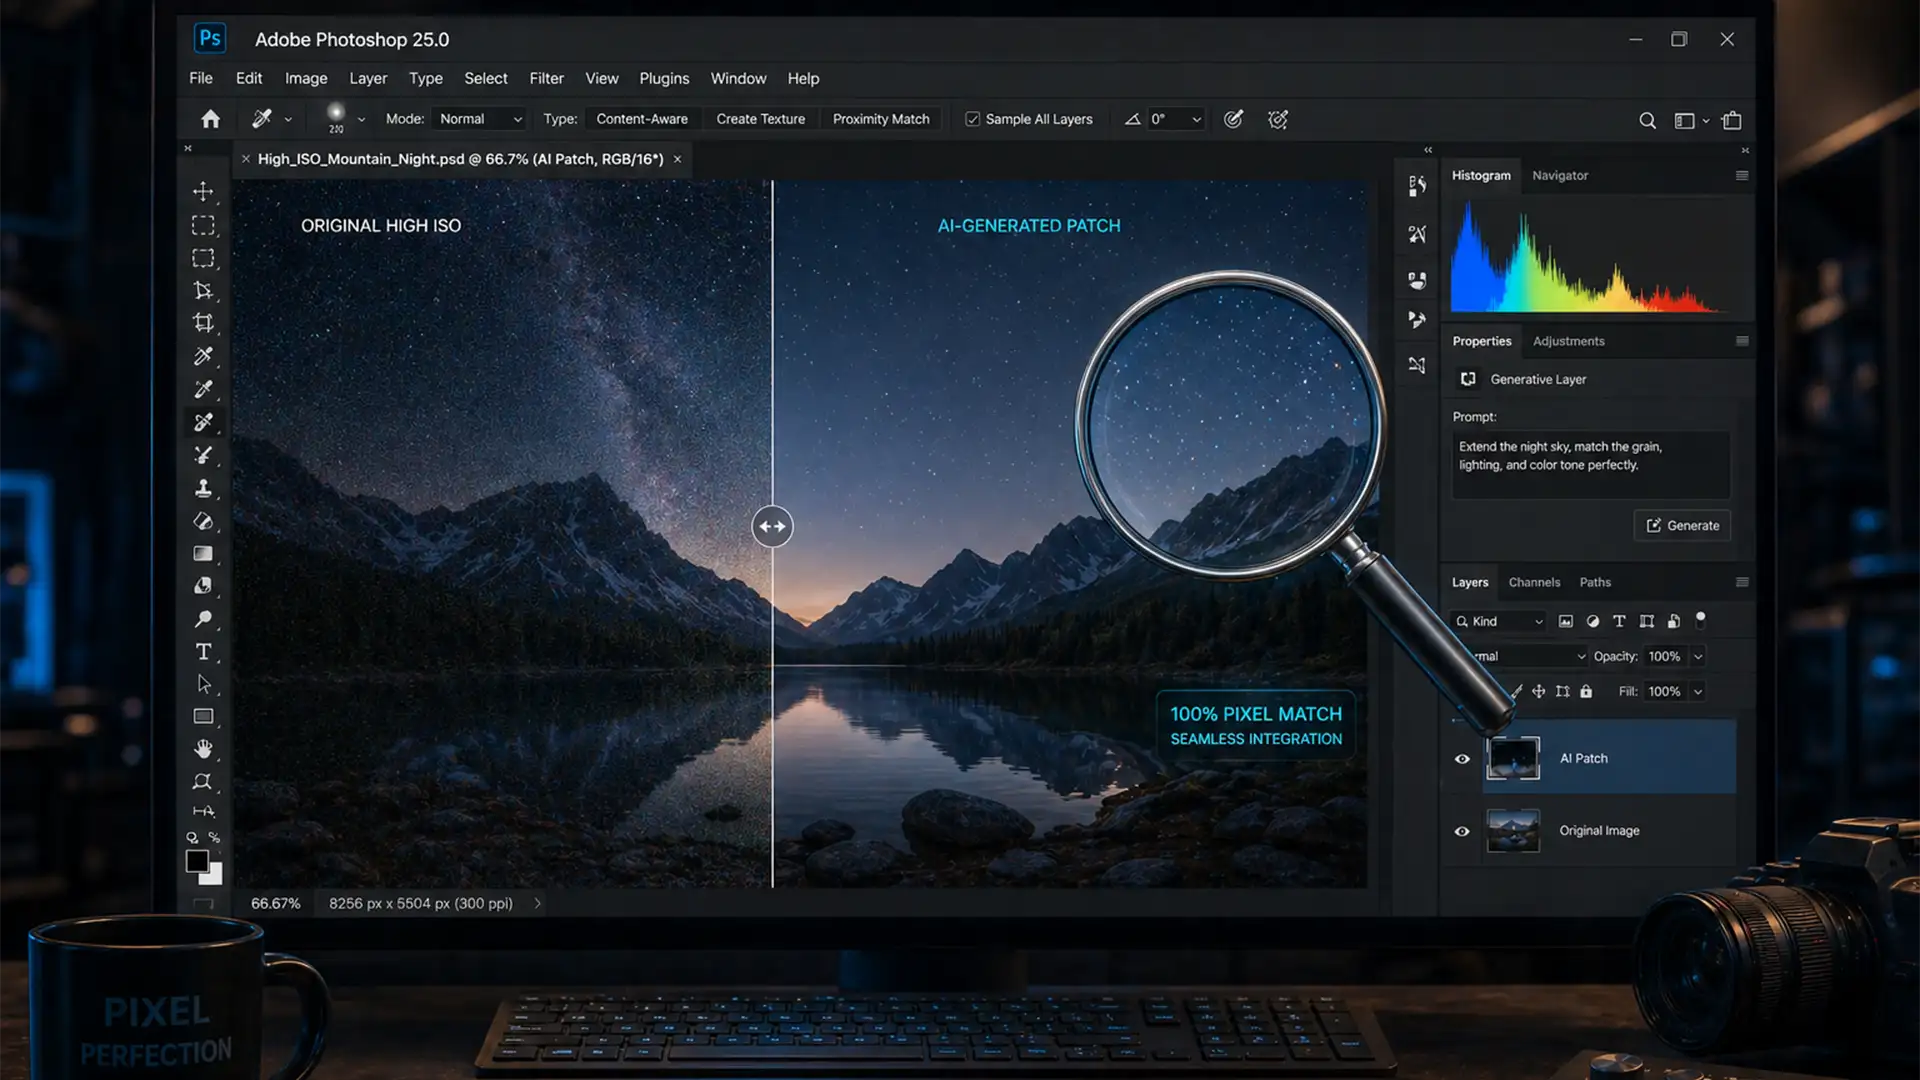
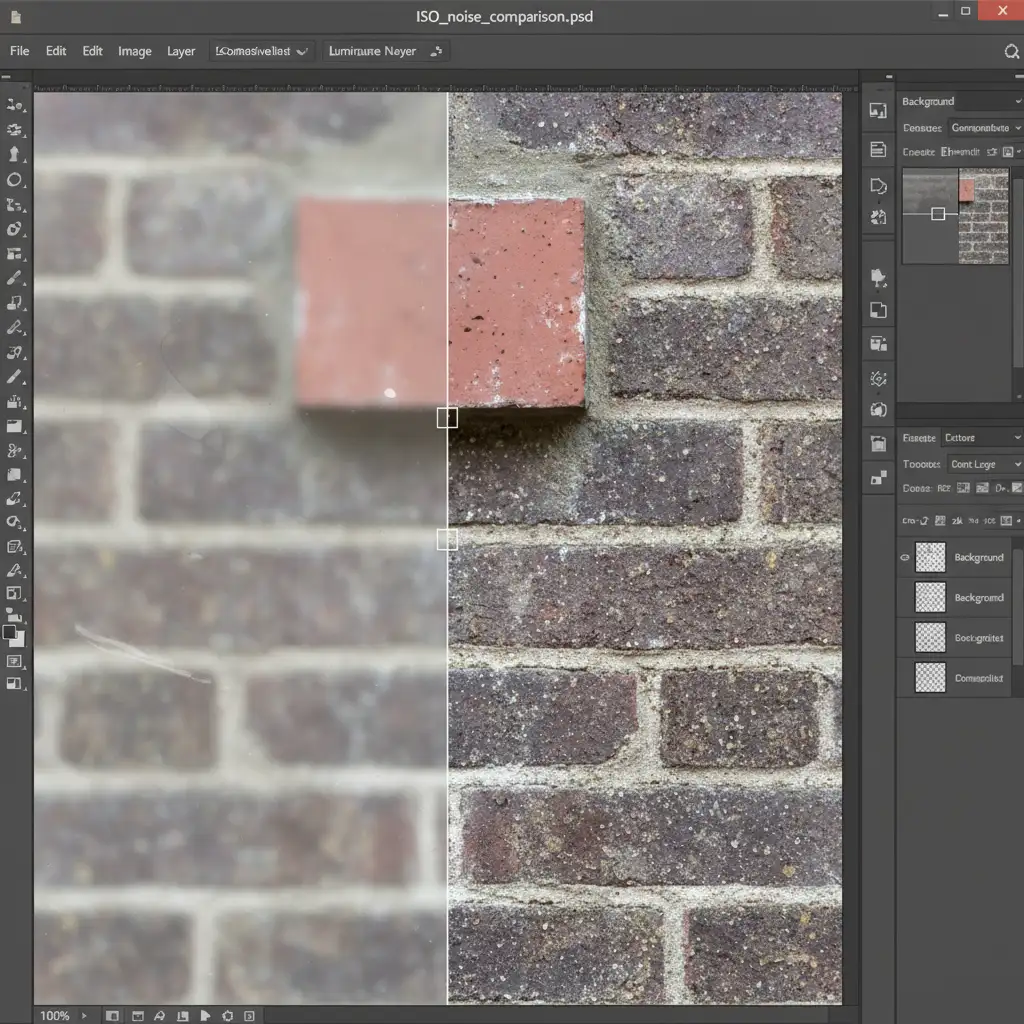
You’ve just used Adobe Photoshop’s Generative Fill to seamlessly remove an object or extend a background. Structurally, the composition looks perfect. But when you zoom in to 100%, disaster strikes: the AI-generated patch is completely smooth, creating a glaring, plastic-looking blur that clashes violently with the natural ISO grain of your original image.
This texture gap exposes your edit instantly, ruining the illusion of a high-end retouch. If you’re tired of AI leaving obvious footprints on your high-ISO photographs or scanned film negatives, you need a reliable Photoshop Generative Fill grain mismatch fix.
Here is exactly why this happens and how professional retouchers bridge the texture gap to achieve undetectable results.
Why Does Generative Fill Look Blurry or Plastic?
In Adobe Photoshop v25.0 and newer, Generative Fill relies on the Adobe Firefly AI model. While Firefly is incredibly capable of reconstructing structural pixels and matching lighting, it generates inherently denoised output.
When you apply this pristine AI generation to an image with heavy sensor noise or film grain, the newly generated patch lacks that critical high-frequency texture. To the trained eye, this absence of luminance noise looks like a blurry smudge. To fix this, we must artificially reintroduce texture back into the generated pixels.
3 Ways to Execute a Photoshop Generative Fill Grain Mismatch Fix
Depending on your timeline and the complexity of the image, there are three professional methods to seamlessly blend Adobe Firefly AI output with your original photography.
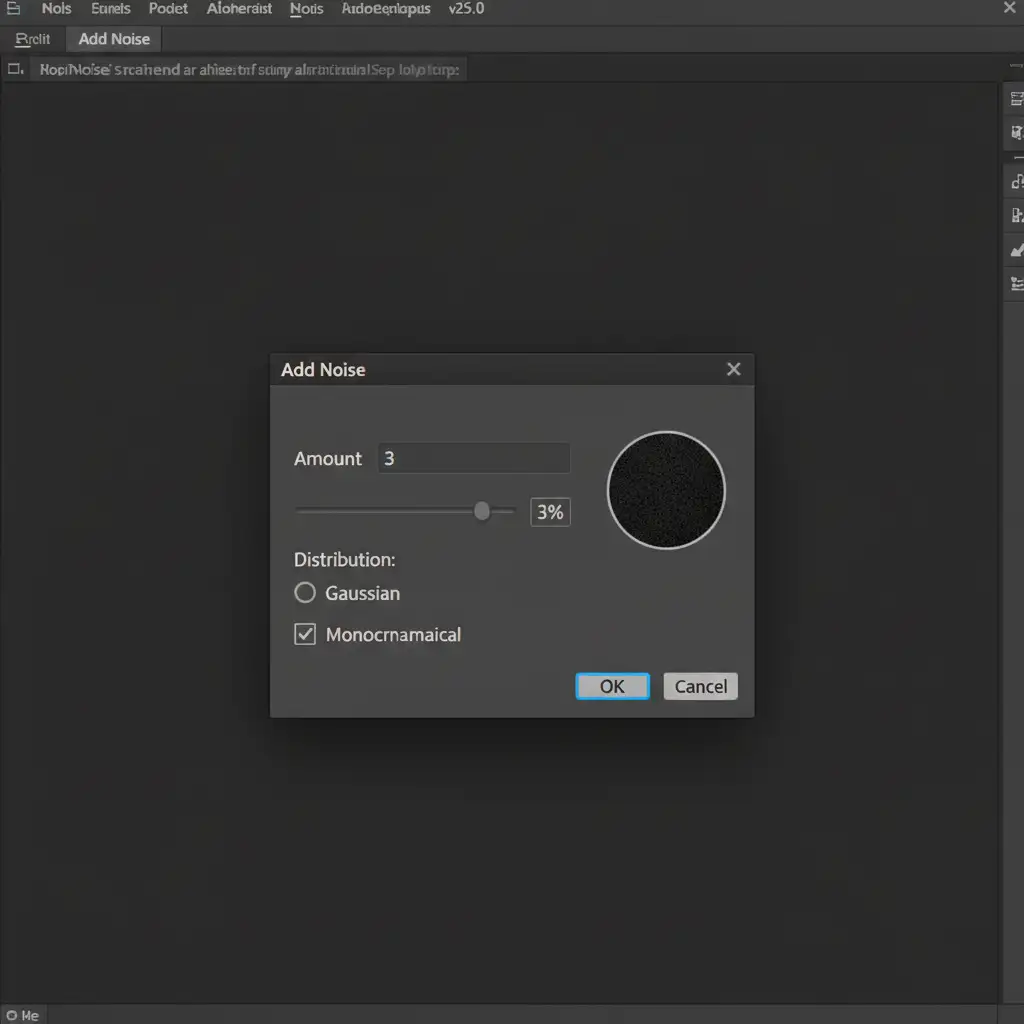
Method 1: The Quick Fix (Add Noise Filter)
For fast edits where you need a passable match quickly, the native noise filter is your best starting point.
- Select your Generative Fill layer in the Layers panel.
- Right-click and select Convert to Smart Object. This ensures your noise adjustments are non-destructive.
- Navigate to Filter > Noise > Add Noise.
- In the dialog box, ensure you check both the Gaussian and Monochromatic boxes. If you don’t check Monochromatic, Photoshop will introduce color noise, which looks unnatural.
- Adjust the Amount slider (typically between 2% and 5%) until the AI patch visually matches the surrounding image grain.
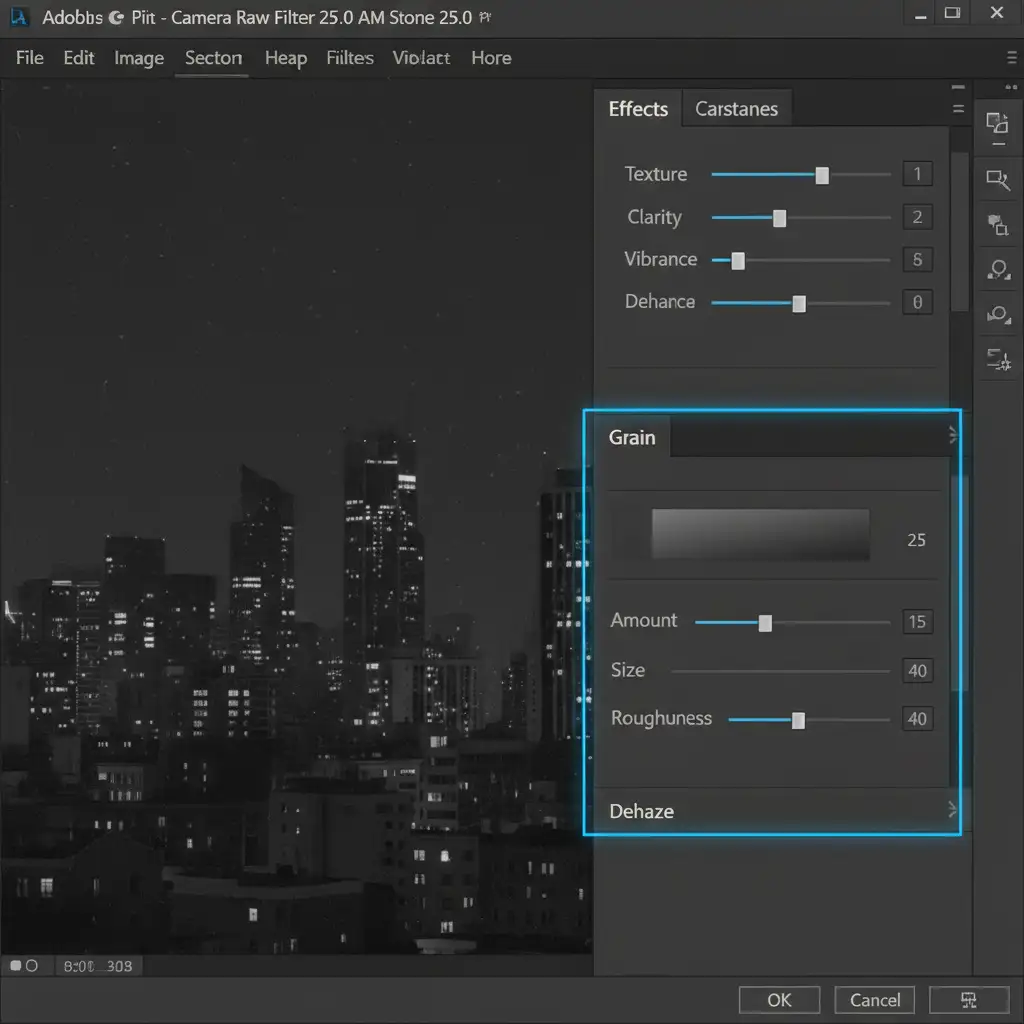
Method 2: The Pro Workaround (Camera Raw Filter)
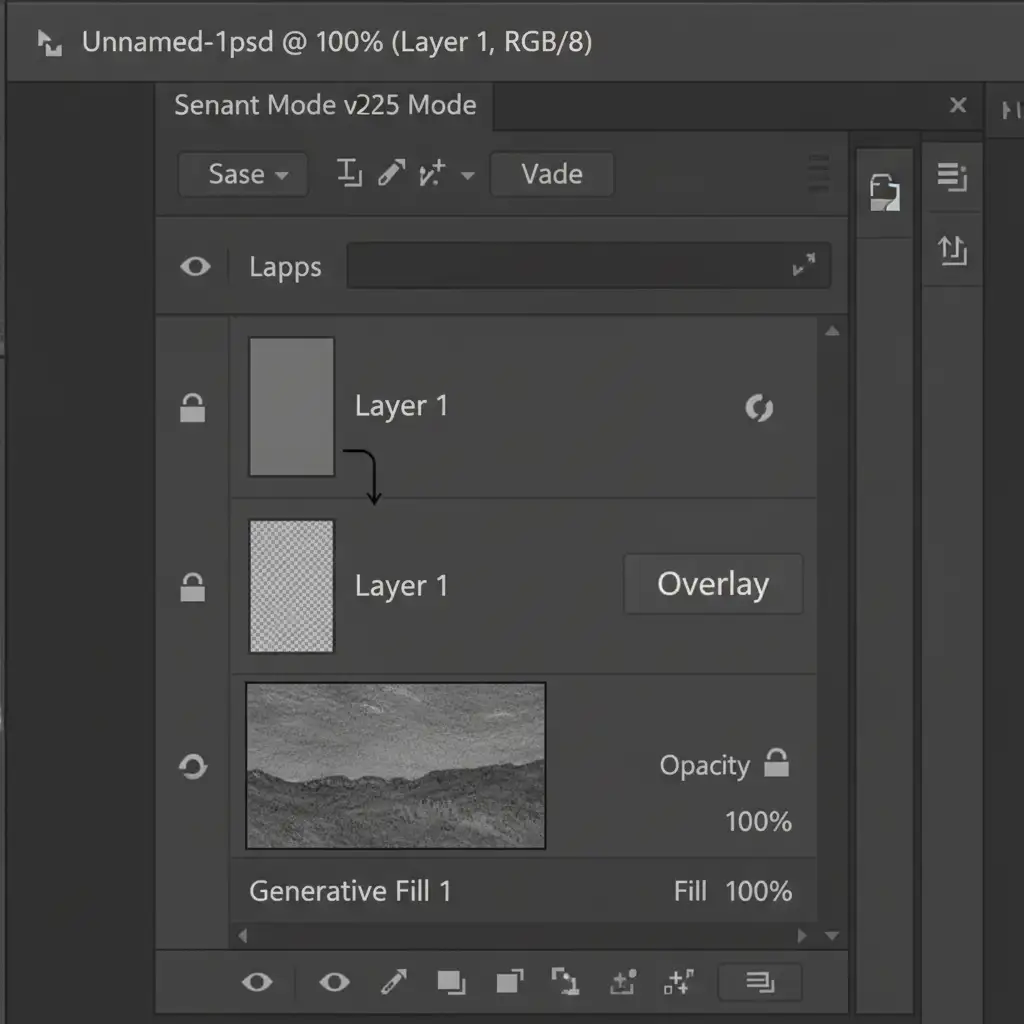
The Add Noise filter is fast, but it lacks nuance. Real film grain and sensor noise vary in size and roughness. To get a perfect, customizable match, use a 50% gray overlay clipping mask combined with the Camera Raw Filter.
- Create a new empty layer directly above your Generative Fill layer.
- Go to Edit > Fill, choose 50% Gray from the Contents dropdown, and click OK.
- Change the blending mode of this gray layer to Overlay.
- Right-click the layer and select Create Clipping Mask. This restricts the grain so it only applies to the AI-generated patch, not the whole image.
- With the gray layer selected, go to Filter > Camera Raw Filter.
- Open the Effects panel. Here, you can finely tune the Grain Amount, Size, and Roughness sliders to dial in an exact match to the original photograph.
Method 3: The Technical Deep-Dive (Frequency Separation)
If you are working on high-end beauty, fashion, or product retouching, adding fake noise might not be enough. The ultimate solution is to use the original image’s actual sensor grain. We achieve this using a Frequency Separation workflow before generating the AI pixels.
- Duplicate your original background layer twice.
- Separate the image data into texture (high frequency) and color/tone (low frequency). You can use the High Pass filter method on the top layer to isolate your luminance noise and fine details.
- Make your selections and run the Generative Fill exclusively on the low-frequency (color/tone) layer.
- Because your original high-frequency texture layer sits untouched at the very top of your layer stack, the native sensor grain seamlessly overlays the newly generated AI color patches beneath it.
This method completely eliminates the mismatch, utilizing the photograph’s true, organic texture rather than simulating it.
Scale Your High-End Retouching Workflow
Mastering the Photoshop Generative Fill grain mismatch fix is essential for keeping your edits undetectable. However, executing 50% gray clipping masks, adjusting Camera Raw Filter grain, and managing complex Frequency Separation layers on hundreds of images takes hours of meticulous work.
If you are struggling to achieve undetectable edits at scale, you don’t have to do it alone. Hire the professional retouching team at Image Work India and Cloud Retouch. We specialize in flawless, high-end compositing, seamless AI integrations, and pixel-perfect texture matching.
Focus on growing your photography business or agency, and let our expert retouchers handle the heavy lifting. Contact Image Work India and Cloud Retouch today to elevate your post-production workflow.


