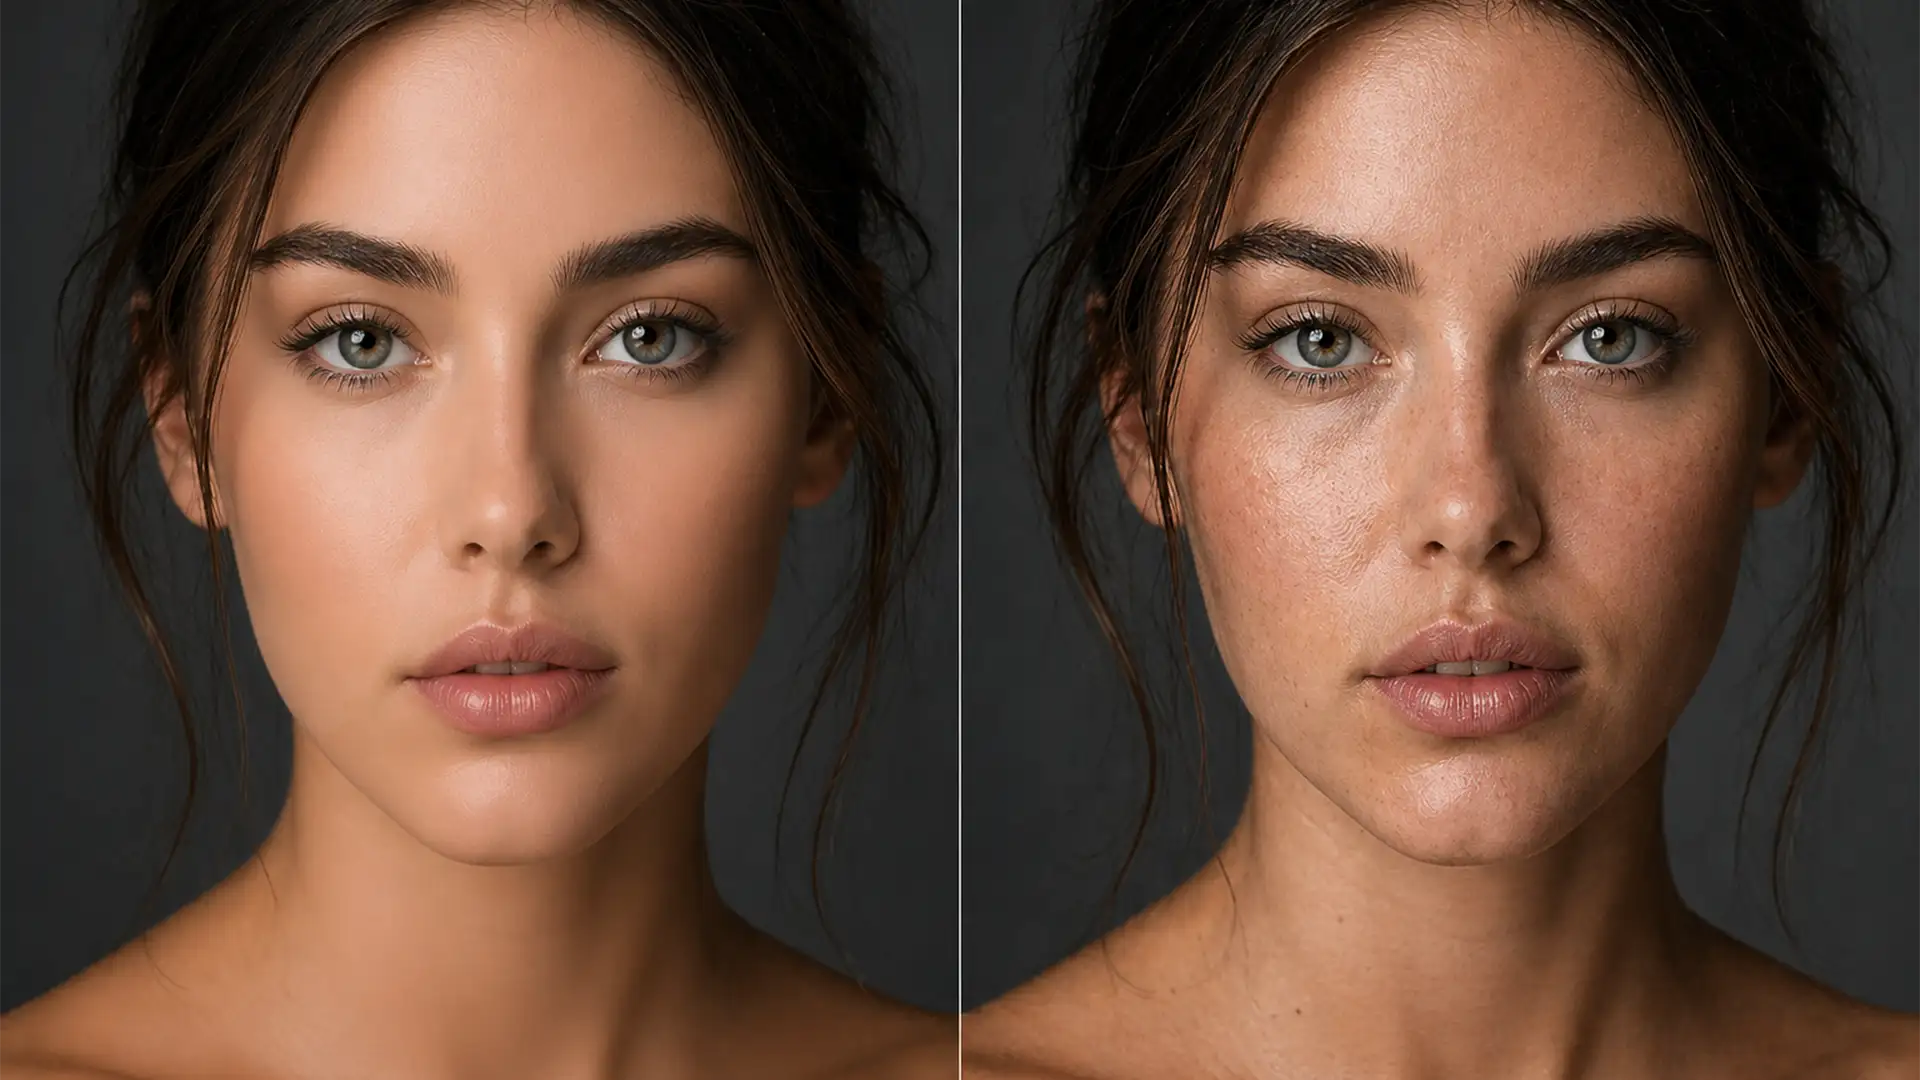
You just ran a batch of headshots through Photoshop Neural Filters (v24.x+) or a third-party plugin like Evoto. The blemishes are gone, but there’s a massive problem: your subject now looks like a wax mannequin. If you are struggling with fixing AI over-smoothed skin texture, you aren’t alone. Today’s AI retouching algorithms are incredible at evening out mid-frequency tones, but they aggressively destroy high-frequency data—the microscopic pores and fine peach fuzz that make human skin look real. This loss of pixel-level luminance variation plunges your portraits straight into the uncanny valley.
Let’s look at how to restore that natural texture, preserve your micro-contrast, and save your photos from the plastic look.
The Problem: Why AI Destroys Skin Realism
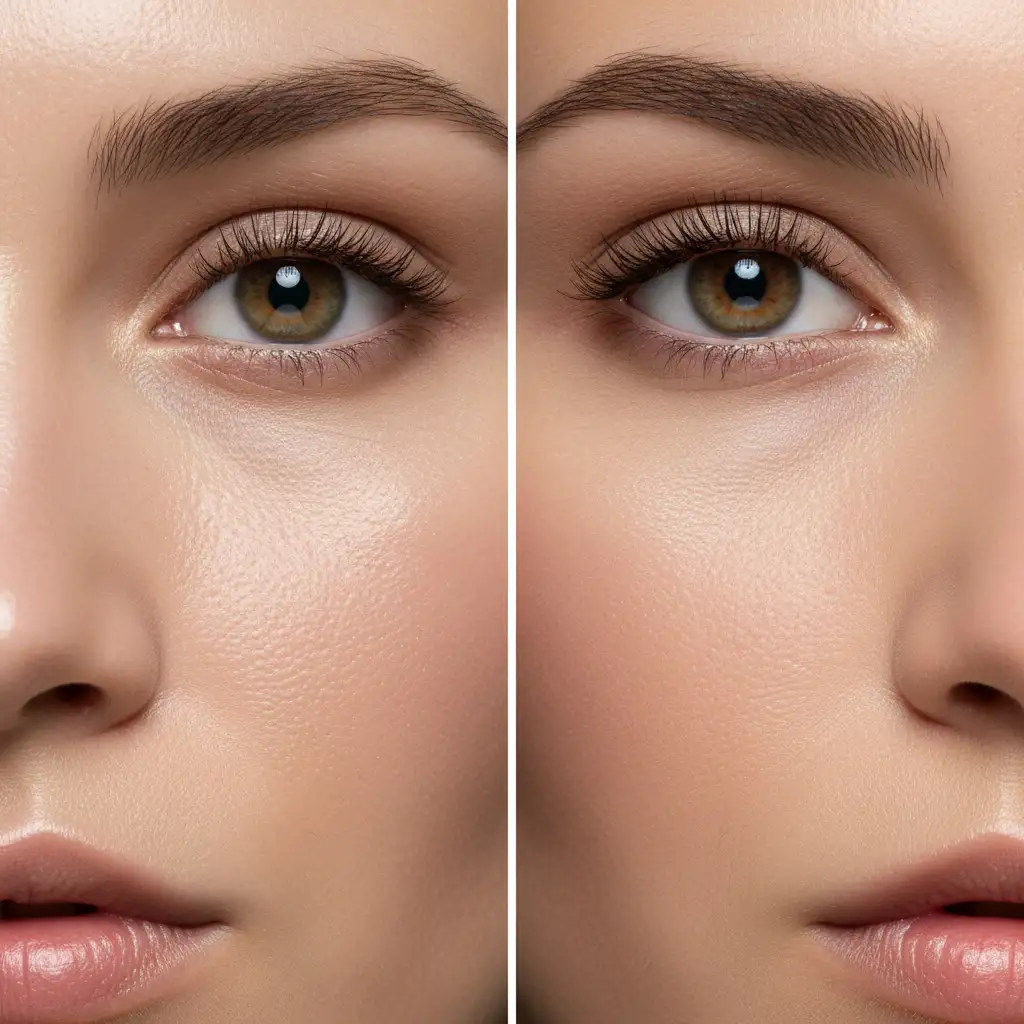
AI tools are trained to identify and eliminate variations in skin tone. However, algorithms often cannot distinguish between a genuine blemish (mid-frequency data) and natural skin pores (high-frequency data). When you apply heavy automated retouching, the software flattens the micro-contrast across the face.
The human eye relies on these tiny luminance variations to perceive depth and realism. Without them, the brain interprets the image as artificial or CGI. To achieve professional, non-destructive editing, we must separate the AI’s tonal corrections from the original texture of the skin.
3 Professional Methods for Fixing AI Over-Smoothed Skin Texture
Depending on how much time you have and the resolution of your original file, there are three distinct workflows to rescue your portraits.
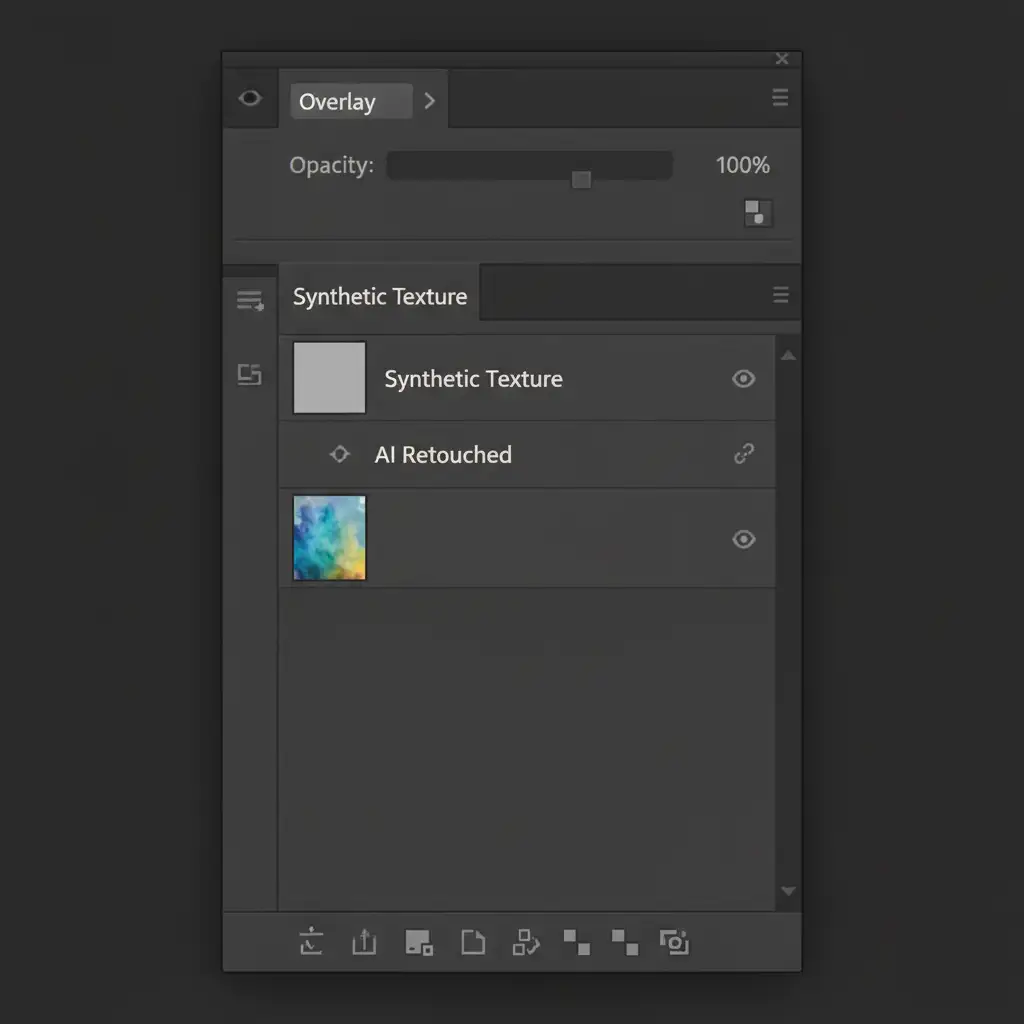
Method 1: The Quick Fix (Synthetic Skin Texture)
If you don’t have access to the original high-resolution RAW file’s texture, you can generate synthetic pores to break up the plastic look.
- Create a Texture Layer: Create a new blank layer above your AI-retouched image.
- Fill with Gray: Go to Edit > Fill and select 50% Gray.
- Change Blend Mode: Set this layer’s blending mode to Overlay.
- Generate Pores: Go to Filter > Noise > Add Noise. Select Uniform and Monochromatic, setting the amount to 2-5%.
- Soften the Noise: Digital noise consists of perfectly square pixels. To make it look like organic skin, go to Filter > Blur > Gaussian Blur and apply a 0.5px radius.
Method 2: The Pro Workaround (High Pass Texture Graft)
This method is superior to synthetic noise because it uses the subject’s actual, original pores.
- Duplicate the Original: Take your original, unedited portrait layer and duplicate it. Move it to the very top of your layer stack, above the AI-edited layer.
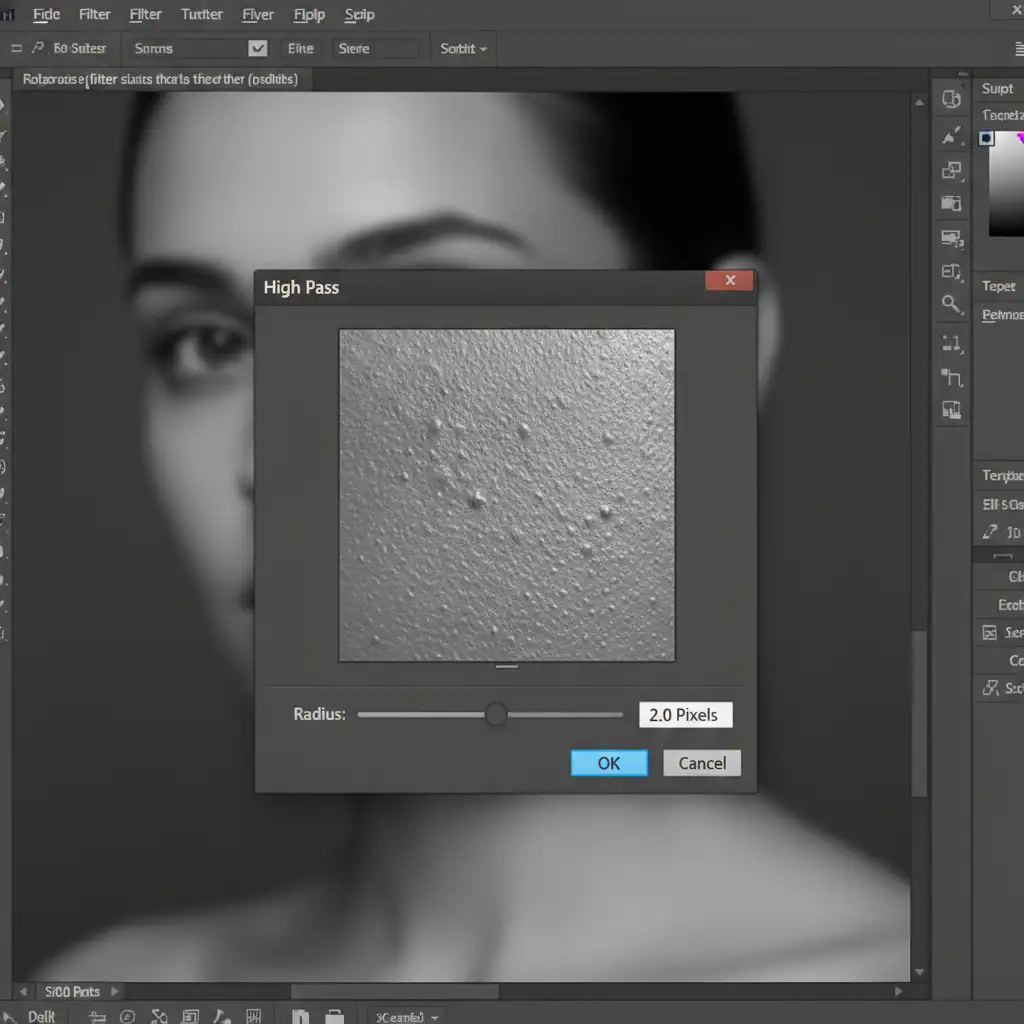
- Isolate the Pores: With the top layer selected, go to Filter > Other > High Pass.
- Set the Radius: Adjust the radius until you only see the fine outlines of pores and hair—usually between 1.5 to 3.0 pixels.
- Blend the Texture: Change the High Pass Filter layer’s blend mode to Linear Light blending mode.
- Mask it In: Add an inverted (black) layer mask. Use a soft-edge brush with white paint to reveal the original texture only on the cheeks, forehead, and chin, avoiding the eyes and lips.

Method 3: Technical Deep-Dive (Hybrid Frequency Separation)
For absolute perfection, high-end retouchers use a hybrid Frequency Separation technique. This grafts the perfect original high-frequency texture onto the AI-generated low/mid-frequency tones.
- Prepare the Stack: Place your AI-edited layer into a Group folder. Duplicate your original, unedited RAW image twice, placing both above the Group. Name the bottom duplicate “Low” and the top duplicate “High”.
- Blur the Low Layer: Select the “Low” layer and apply a Gaussian Blur. Increase the radius just until the blemishes disappear (usually 5-8px).
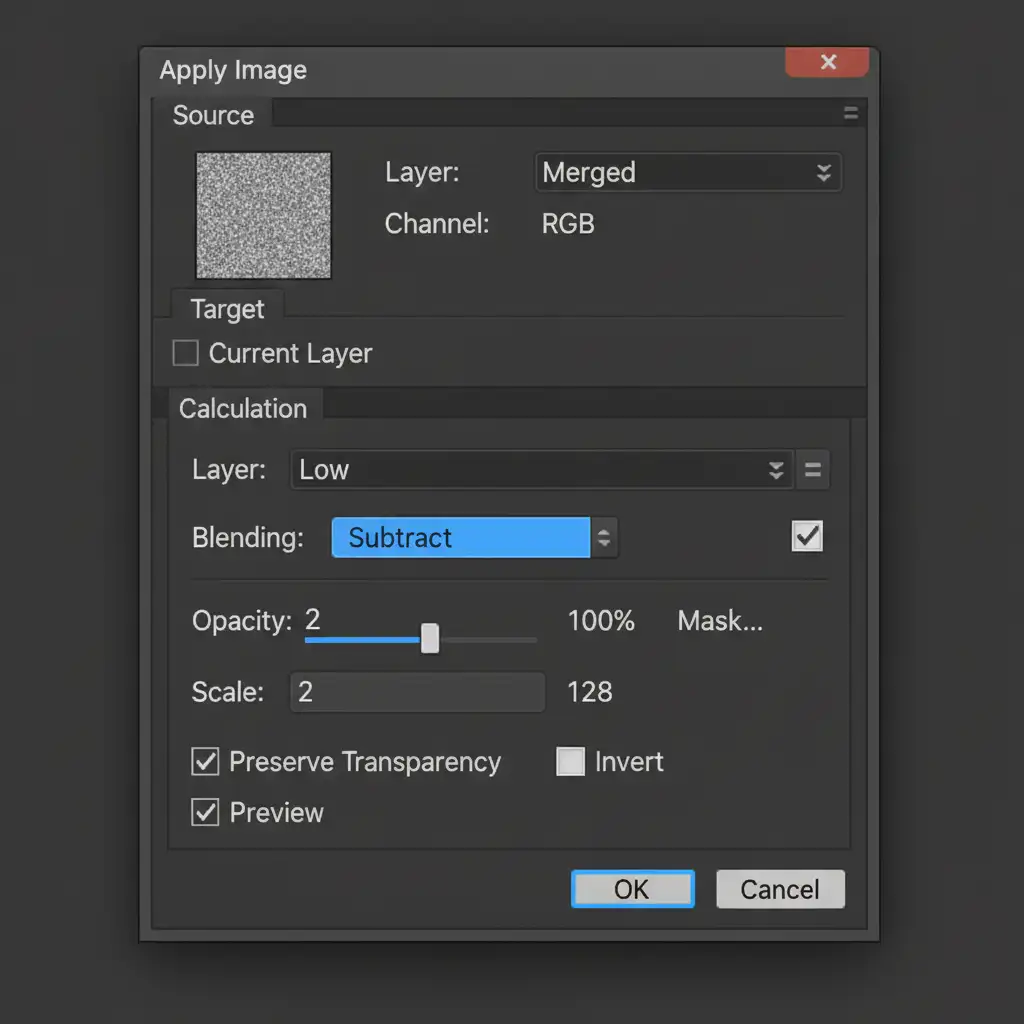
- Extract the High Frequencies: Select the “High” layer. Go to Image > Apply Image.
- Configure Apply Image (for 8-bit images):
- Source: Select the “Low” layer.
- Blending: Subtract
- Scale: 2
- Offset: 128
- Finalize the Separation: Change the “High” layer’s blend mode to Linear Light blending mode.
- The Hybrid Swap: Here is the magic step. Delete the “Low” layer entirely. Drag your AI-edited Group into the exact spot where the “Low” layer used to be.
You have now successfully mapped 100% of the original, organic skin texture over the perfectly smooth, AI-corrected tones. You can further refine this using Luminosity Masking to ensure shadows and highlights transition flawlessly.
Stop Fighting the Algorithm: Let the Experts Handle It
Fixing AI over-smoothed skin texture is entirely possible, but doing it correctly requires a deep understanding of pixel math, layer blending, and frequency isolation. If you are processing hundreds of wedding portraits, e-commerce headshots, or editorial campaigns, manually grafting high-frequency data onto every single image is a massive drain on your time and resources.
You don’t have to choose between the plastic “uncanny valley” look and hours of tedious manual editing.
Partner with Image Work India and Cloud Retouch. Our expert team of professional retouchers specializes in high-end skin retouching. We utilize advanced, non-destructive workflows that guarantee flawless, even skin tones while preserving 100 percent of the subject’s natural texture and micro-contrast.
Stop settling for artificial AI results. Contact Image Work India and Cloud Retouch today, and let us deliver the pristine, photorealistic quality your clients demand.


