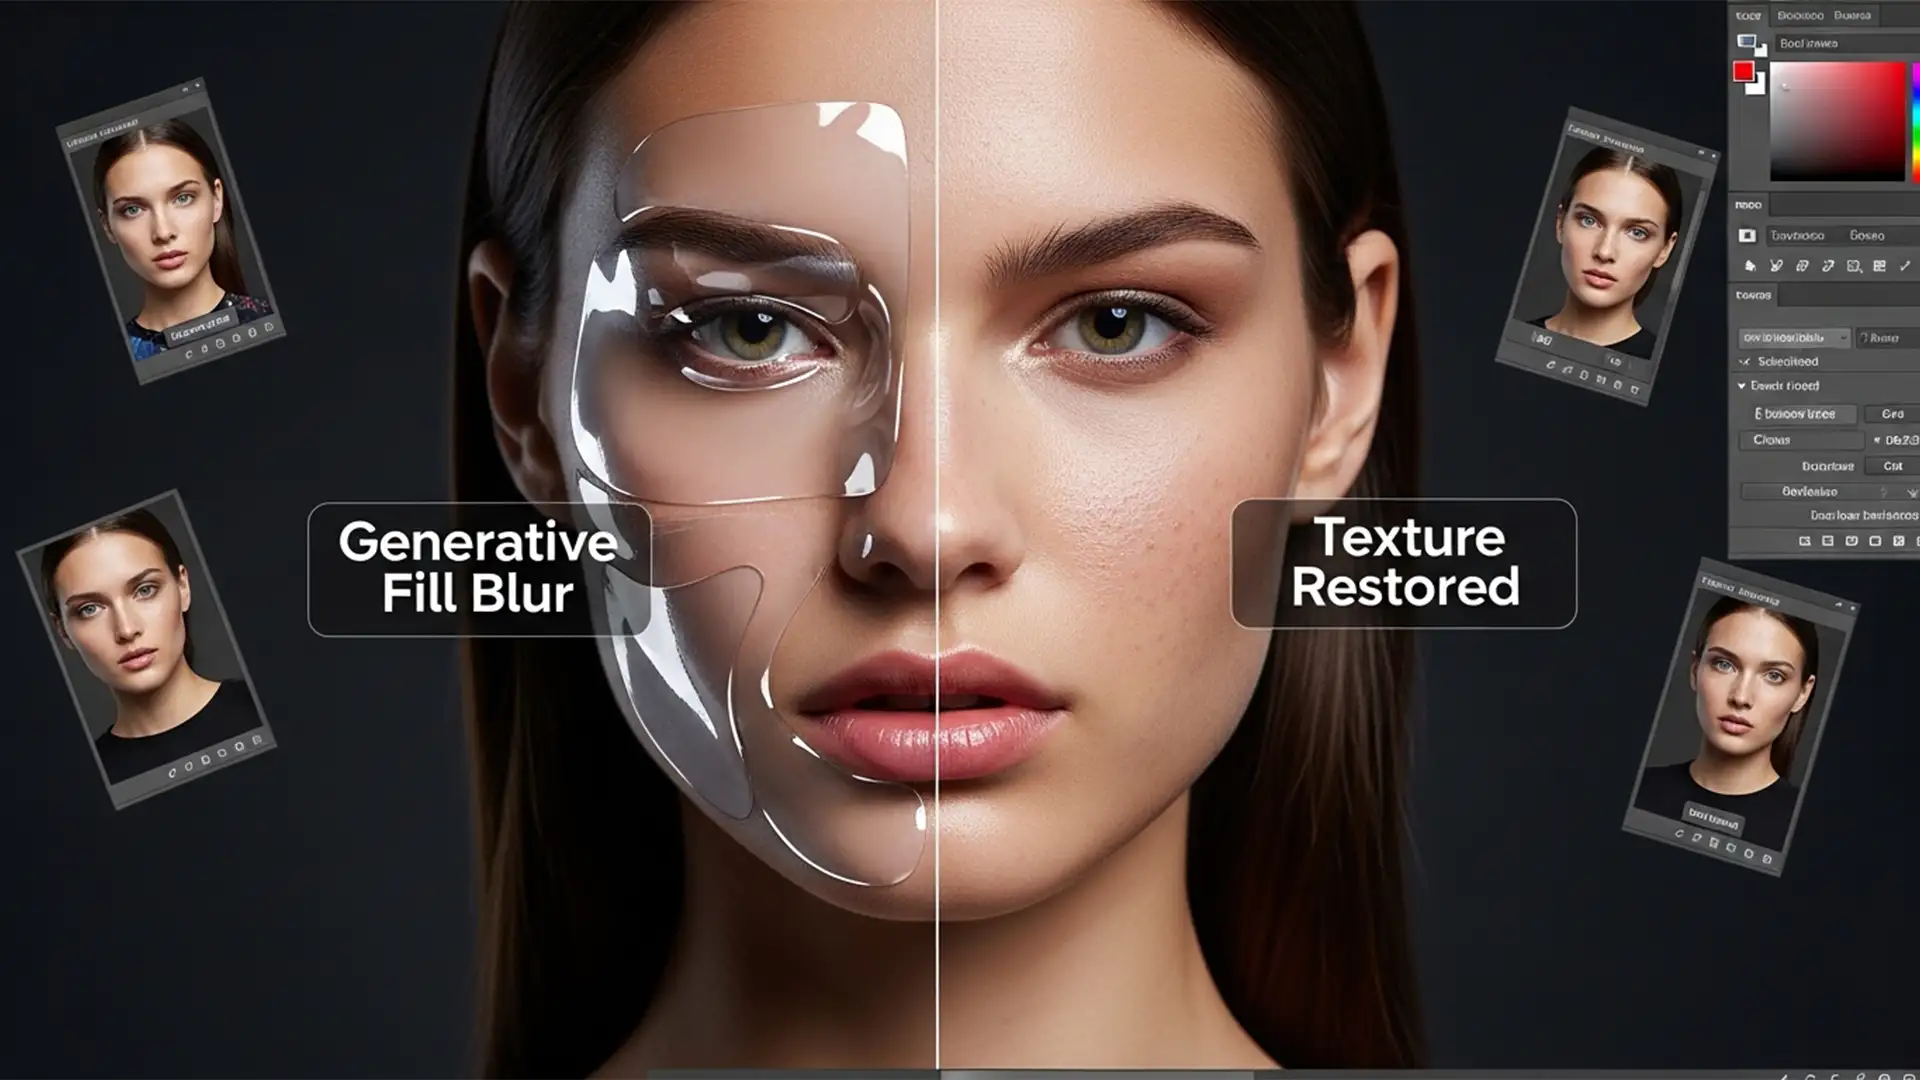
You’ve just used Photoshop’s Generative Fill to remove a stray hair or extend a background on a high-resolution portrait. It looks great from afar, but zoom in, and disaster strikes. The AI-generated patch is a soft, blurry, plastic-looking mess that completely destroys the natural skin pore texture. If you are struggling with fixing generative fill skin blur, you aren’t alone. This happens because Adobe Firefly currently limits outputs to 1024×1024 pixels. When stretched over a 4K or 8K image, high-frequency detail vanishes. Here is the exact professional workflow to restore flawless skin texture and eliminate AI artifacts.
Why Photoshop Generative Fill Destroys High-Resolution Skin
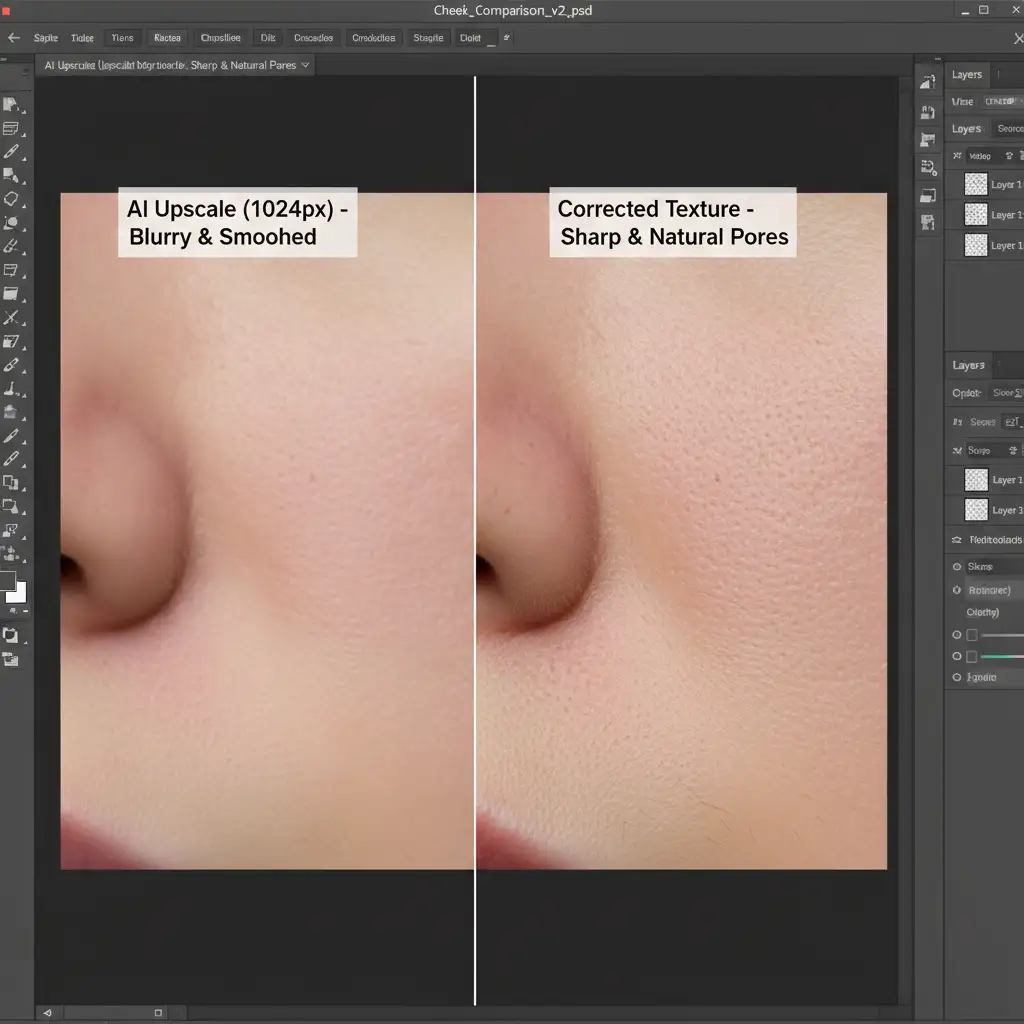
The core issue lies in the current technical limitations of the Adobe Firefly model powering Photoshop’s AI. Generative Fill generates images at a maximum resolution of 1024×1024 pixels.
When you make a large selection on a high-resolution portrait (such as a 4K or 8K raw file), Photoshop generates a 1024px patch and automatically upscales it to fit your canvas. This aggressive upscaling destroys high-frequency detail—the micro-contrast, peach fuzz, and skin pore texture that makes a portrait look authentic. The result is a jarring transition between the model’s natural skin and the heavily smoothed, plastic-like AI generation.
3 Professional Methods for Fixing Generative Fill Skin Blur
To fix this issue, retouching professionals use techniques akin to frequency separation to rebuild the lost texture without altering the AI-generated color and tone. Here are three proven methods to solve the problem.
Method 1: The Quick Fix (Grain Matching)
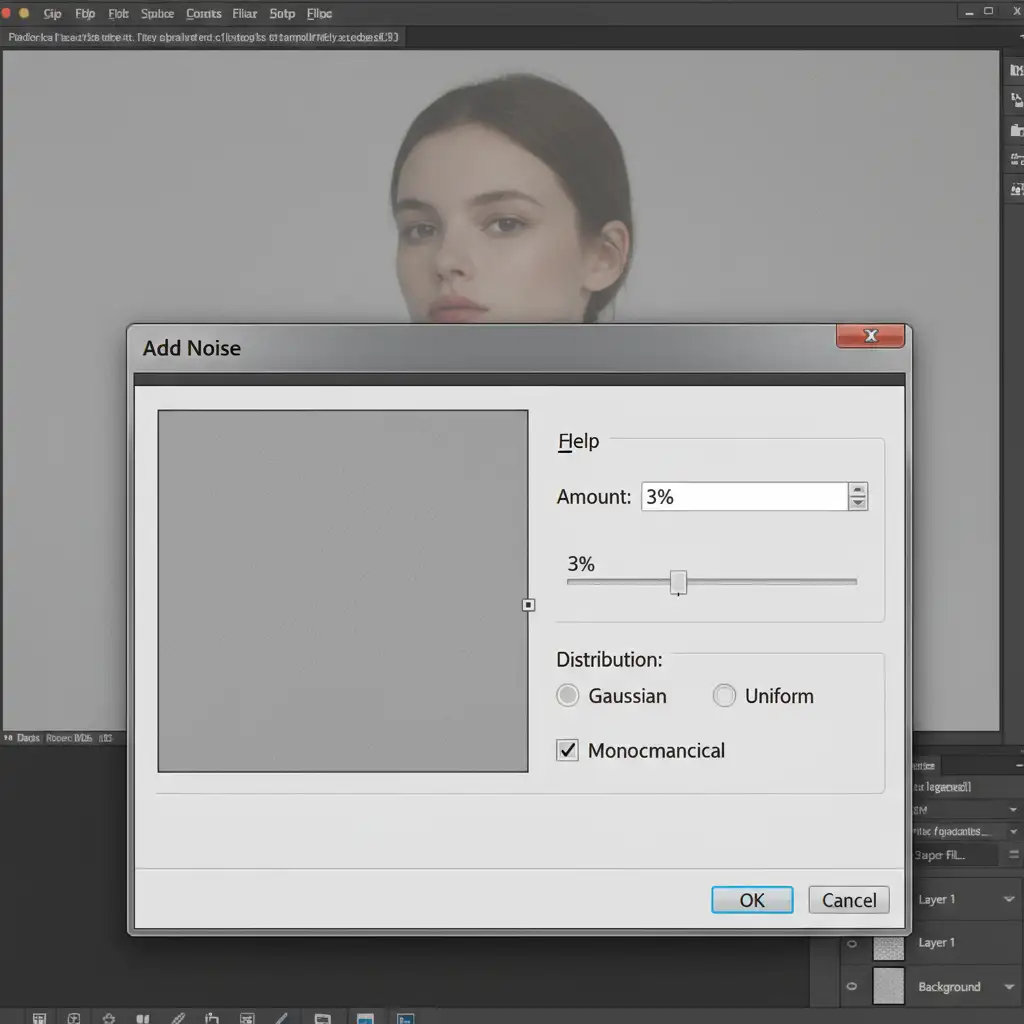
If you are working on a tight deadline, adding synthetic noise is the fastest way to mask the AI blur and blend the patch into the surrounding skin.
- Create a Texture Layer: Create a new layer directly above your Generative Fill layer.
- Fill with Gray: Go to Edit > Fill, choose 50% Gray, and click OK.
- Change Blend Mode: Set the layer’s blend mode to Overlay.
- Convert to Smart Object: Right-click the layer and select “Convert to Smart Object.” This allows you to adjust the noise non-destructively later.
- Add Noise: Go to Filter > Noise > Add Noise. Select Gaussian noise and check the “Monochromatic” box.
- Clip and Adjust: Create a clipping mask (Alt/Option + Click between the layers) so the noise only affects the Generative Fill layer. Lower the opacity until the grain matches the natural digital noise of the surrounding skin.
Method 2: The Pro Workaround (Texture Grafting)
For high-end beauty and fashion retouching, synthetic noise isn’t enough. You need actual human skin pores. This method “grafts” real texture from an adjacent area of the portrait over the blurry AI patch.
- Sample Real Skin: Use the Lasso tool to select a clean area of high-resolution skin adjacent to the blurry patch. Copy and paste this onto a new layer above your Generative Fill.
- Desaturate: Press Ctrl/Cmd + Shift + U to remove the color data from your grafted skin.
- Apply High Pass Filter: Go to Filter > Other > High Pass filter. Set the radius between 2-4px. You only want to see the sharp edges of the pores, not the underlying shadows.
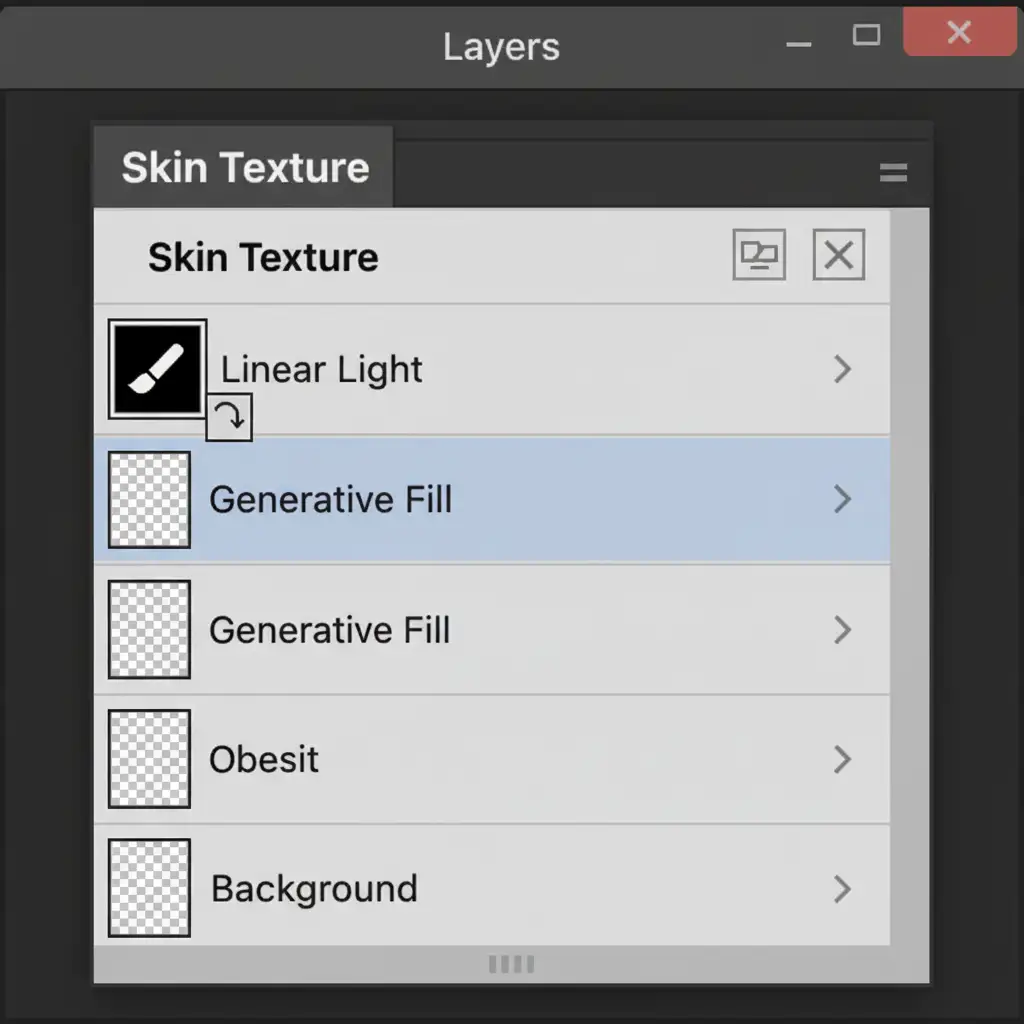
- Blend and Clip: Change the grafted layer’s blend mode to Linear Light blend mode. Create a clipping mask to confine it to the Generative Fill layer below.
- Masking: Add an inverted (black) layer mask. Use a soft white brush to paint the pore texture strictly over the blurry areas where the AI failed.

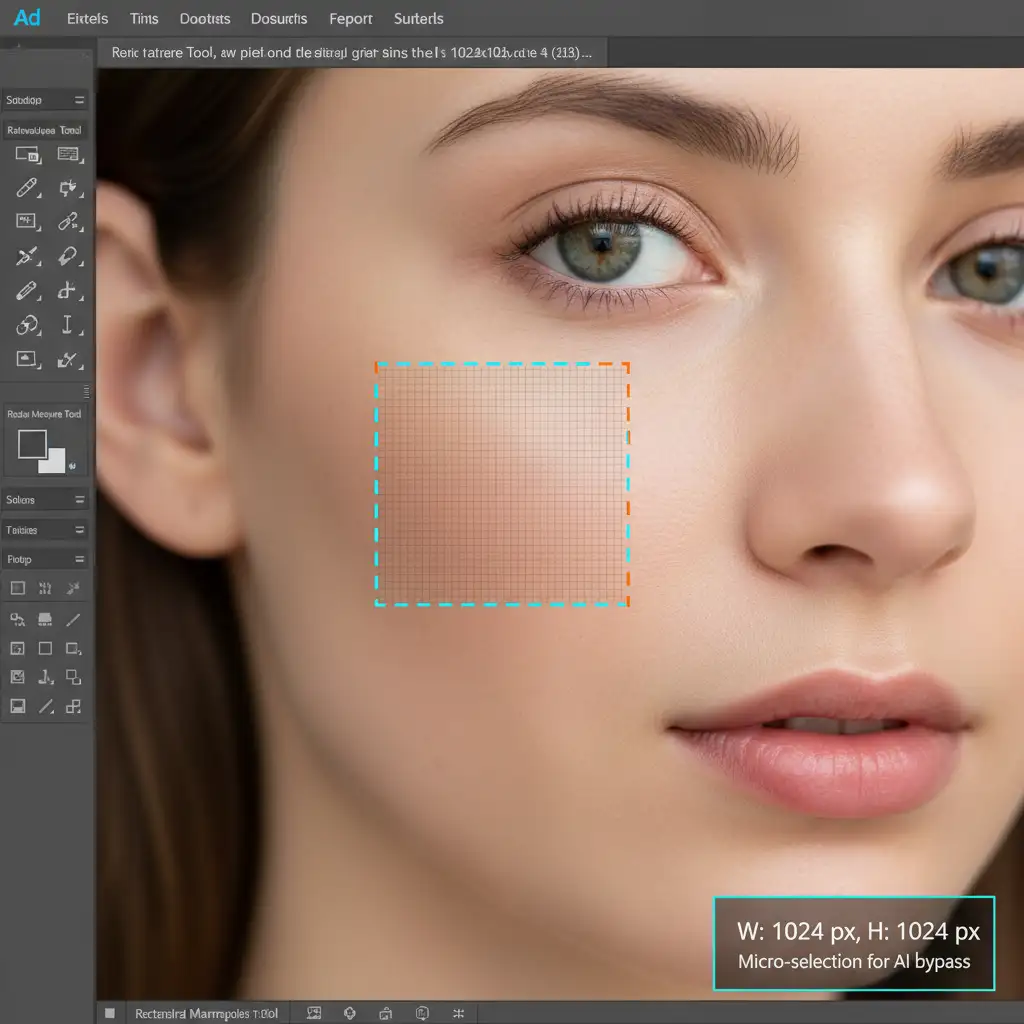
Method 3: The Technical Deep-Dive (Grid Patching)
The most effective way of fixing generative fill skin blur is to prevent the 1024px limit upscaling from happening in the first place.
Instead of drawing one massive lasso selection over a large area, break your retouching down into a grid.
- Use the Rectangular Marquee tool.
- Ensure your selection is strictly under 1024×1024 pixels (you can check this in the Info panel).
- Run Generative Fill on this micro-selection.
Because the selection is smaller than the Firefly output limit, Photoshop generates the pixels at a 1:1 ratio. Zero upscaling occurs, meaning the AI preserves the native high-frequency detail and perfectly matches the surrounding skin texture.
Flawless Skin Retouching Without the Hassle
Mastering these techniques is essential for modern editors, but fixing generative fill skin blur takes time, patience, and an expert eye for high-frequency detail. If your agency, studio, or e-commerce brand needs pixel-perfect portraits without the plastic-looking AI artifacts, let the experts handle it.
At Image Work India and Cloud Retouch, our dedicated team of professional retouchers specializes in flawless, high-end skin retouching, frequency separation, and complex image manipulation. We deliver natural, magazine-quality results at scale.
Stop fighting with AI limitations. [Contact Cloud Retouch today] to elevate your portrait photography with professional, artifact-free retouching services.


