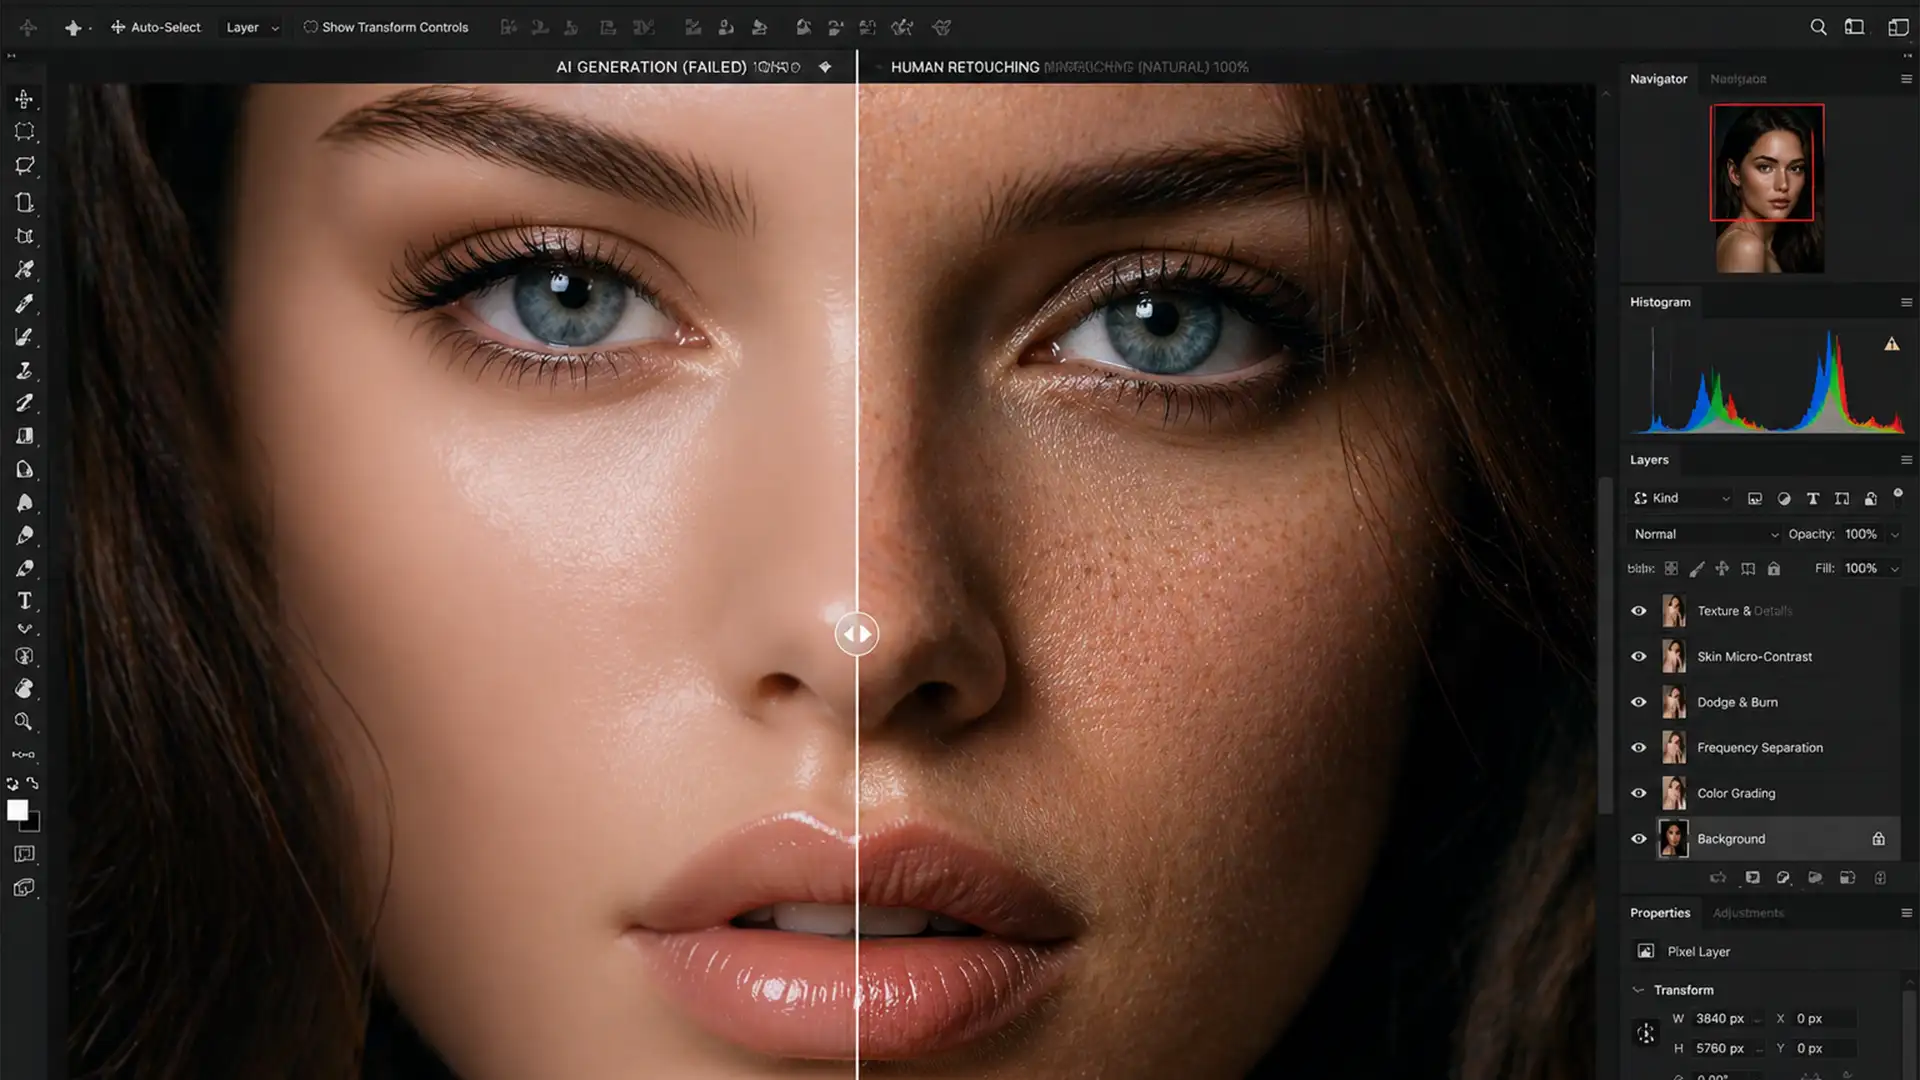
You’ve just used Photoshop’s Generative Fill to remove a distracting blemish or seamlessly expand a background on a stunning, high-resolution portrait. The overall composition looks great, but as you zoom in to 100%, your heart sinks. The AI-edited area looks like a melted plastic mannequin—completely devoid of natural pores, fine hairs, and micro-contrast. This “waxy” patch instantly ruins the realism of your composite.
If you’re struggling with this exact issue, you aren’t alone. Today, we’re diving into the professional techniques for restoring skin texture after generative fill, bridging the gap between Adobe Firefly’s synthesized pixels and your camera’s original sensor noise.
Why Does Photoshop Generative Fill Cause “Waxy” Skin?
In Photoshop v25.0 and newer, Generative Fill utilizes the Adobe Firefly engine to synthesize pixels based on text prompts and surrounding visual data. While it excels at matching color and tone, it frequently fails at the micro-level.
When applied to high-resolution portraits, the AI averages out high-frequency details. It essentially smooths over the unique sensor noise and organic skin texture captured by your camera. This discrepancy creates a jarring transition between the original photograph’s crisp realism and the AI-generated pixels, resulting in an overly smooth, “plastic” appearance.
3 Professional Methods to Restore Realistic Skin Pores
To fix this, retouchers must rely on non-destructive editing techniques that introduce artificial or borrowed texture back into the AI-generated areas. Here are three proven methods, ranging from a quick fix to a technical deep-dive.
Method 1: The Quick Fix (Noise Grafting)
If you are working on a tight deadline, synthesizing a basic pore structure using a 50% gray layer is your best defense against plastic-looking skin.
- Create the Texture Layer: Create a New Layer above your Generative Fill layer. Fill it with 50% Gray (Edit > Fill > 50% Gray).
- Adjust Blending Modes: Change the layer’s blending mode to Soft Light. The gray will become invisible, but it will allow texture to show through.
- Generate Pores: Go to Filter > Noise > Add Noise. Select Uniform and Monochromatic, and set the amount to approximately 3-5% (depending on your image resolution).
- Soften the Effect: Raw noise looks like digital grain, not skin. Apply a 1px Gaussian Blur (Filter > Blur > Gaussian Blur) to soften the sharp noise into realistic-looking ‘pores’.
- Clip to AI Layer: Hold Alt (or Option on Mac) and click between your noise layer and the Generative Fill layer to create a Clipping Mask. This ensures the texture only applies to the newly generated AI skin.
Method 2: The Pro Workaround (High Pass Texture Grafting)
For a more authentic result, you shouldn’t synthesize pores—you should steal them from the original image. This method uses the High Pass filter to extract real texture and graft it over the AI patch.
- Sample Real Skin: Find an area of original skin in your photograph that has great texture and matches the lighting of your AI-edited patch. Duplicate this section onto a new layer.
- Extract the Texture: Move this copied skin over your Generative Fill area. Go to Filter > Other > High Pass. Set the radius between 2 to 5 pixels. You want to see the pores and fine hairs clearly, but no color or shading.
- Blend the Texture: Change this layer’s blending mode to Linear Light. The gray disappears, leaving only the crisp, original skin texture overlaid on the AI’s color data.
- Refine with Layer Masking: Add a black layer mask to hide the texture graft. Use a soft white brush to carefully paint the authentic texture only where the Generative Fill looks waxy.
Method 3: The Technical Deep-Dive (Frequency Separation Integration)
High-end beauty retouchers rarely use Generative Fill on a flattened image. Instead, they integrate it into a Frequency Separation workflow. This separates the image into a Low Frequency layer (color and tone) and a High Frequency layer (texture), allowing you to fix blemishes with AI without ever touching the original pores.
- Set Up Frequency Separation: Separate your base image into Low Frequency and High Frequency layers using your standard action.
- Target the Color Layer: Select the Low Frequency layer. Use the Lasso tool to select shadows, color blotches, or areas needing structural repair.
- Apply Generative Fill: Run Generative Fill strictly on this Low Frequency layer. The AI will fix the underlying color and tone perfectly. Because the High Frequency layer sits above it untouched, the original skin pores remain 100% intact.
- Address New Areas: If your Generative Fill expands the image or covers a completely new area (where no original texture exists), select the High Frequency layer. Use the Clone Stamp Tool to sample real pores from elsewhere in the image and stamp them directly over the newly generated AI skin.
Flawless Skin, Zero Frustration
Restoring skin texture after generative fill is a critical skill for modern retouchers. While Adobe Firefly is a powerful tool for structural edits and color blending, it still requires the human touch to restore micro-contrast and ensure the final image doesn’t scream “AI-generated.”
However, mastering noise grafting, High Pass filters, and Frequency Separation takes time—time you could spend shooting your next campaign.
Don’t want to deal with the plastic look yourself? Outsourcing your high-end portrait retouching ensures flawless, natural skin textures every single time. At Image Work India and Cloud Retouch, our expert team specializes in seamlessly integrating advanced AI tools with industry-standard, non-destructive retouching techniques. We preserve the authentic beauty of your subjects while delivering picture-perfect results.
Contact Image Work India and Cloud Retouch today to elevate your portrait portfolio with expert, AI-integrated editing services.


