Shooting statement jewelry on mannequins or acrylic busts leaves e-commerce brands with a massive post-production headache. Removing transparent necklines, sticky tack, or fishing wire often destroys microscopic chain links and dulls the luminosity of intricate gemstone facets. If you are tired of spending hours trying to fix ruined chains or settling for flat, unrealistic shadows, you are not alone.
Mastering jewelry ghost mannequin editing requires more than basic background removal; it demands high-end compositing, sub-pixel pathing, and a deep understanding of light. In this guide, we will walk you through the advanced Photoshop techniques required to create a flawless, 3D “floating” effect for your heaviest statement necklaces and chandelier earrings.
The Technical Challenges of Invisible Jewelry Photography
In Adobe Photoshop v24.x and v25.x, creating a convincing ghost mannequin effect for jewelry involves overcoming severe focal and extraction challenges. Unlike clothing, jewelry is highly reflective and heavily detailed.
When editors attempt to mask out acrylic stands or support wires, they frequently run into two major issues:
- Detail Degradation: Automated tools struggle to differentiate between a transparent acrylic prop and the highlights of a diamond or silver chain.
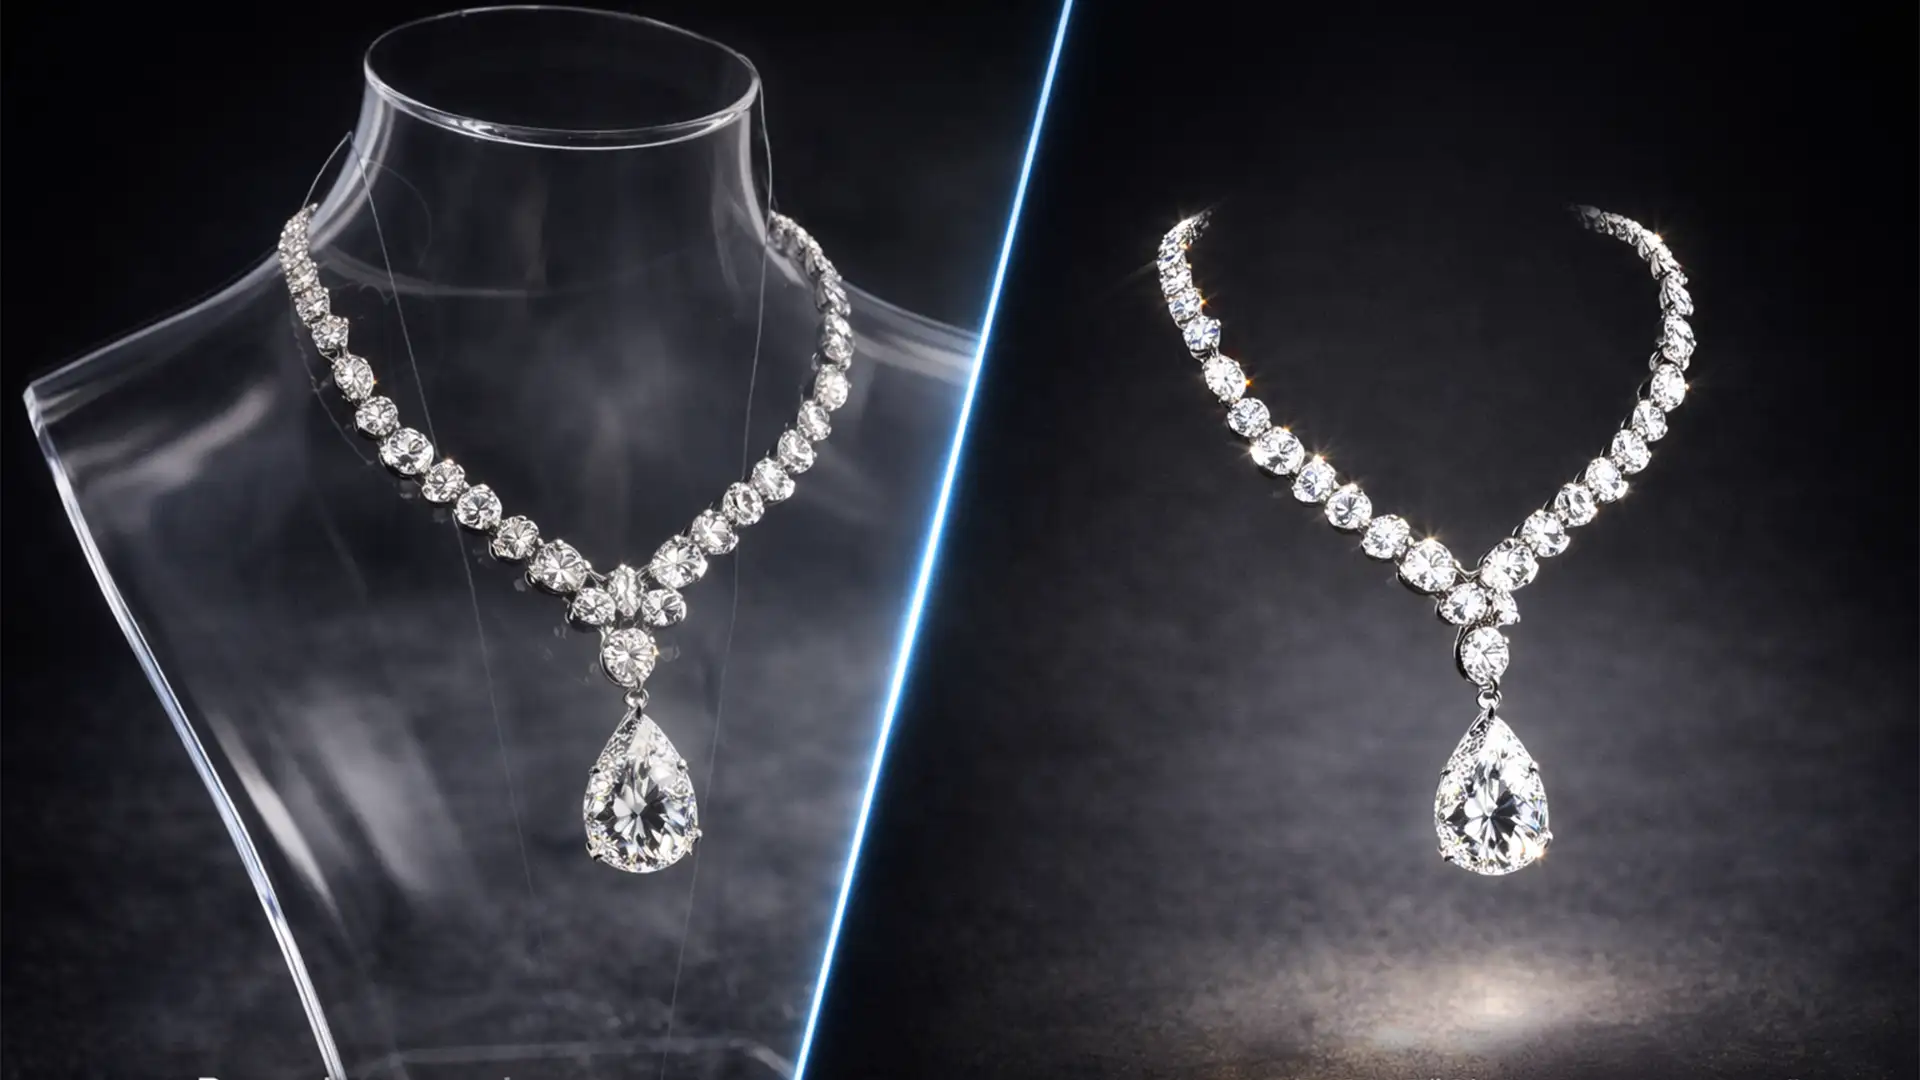
- Loss of Depth: When a necklace is digitally removed from a bust, it loses its natural shadow, resulting in a flat, unappealing aesthetic. Statement pieces require synthetic 3D drop shadows to re-establish spatial depth.
Step-by-Step Solutions for Flawless Floating Jewelry
Depending on the complexity of your prop setup and the intricacy of the piece, there are three primary ways to tackle jewelry ghost mannequin editing.
Method A: The Quick Fix for Basic Acrylic Props
If you are working with thick, solid chains and minimal prop interference, Photoshop’s AI-driven tools can speed up your workflow.
- Select the Object Selection Tool to roughly isolate the necklace from the standard acrylic prop.
- Open the Select and Mask workspace.
- Use the Refine Edge tool to paint over the smaller chain links where the acrylic background bleeds through.
- Output to a new layer with a Layer mask.
Note: While fast, this method often fails on semi-transparent gemstones or micro-chains, requiring a more manual approach.
Method B: The Pro Workaround for Delicate Chains
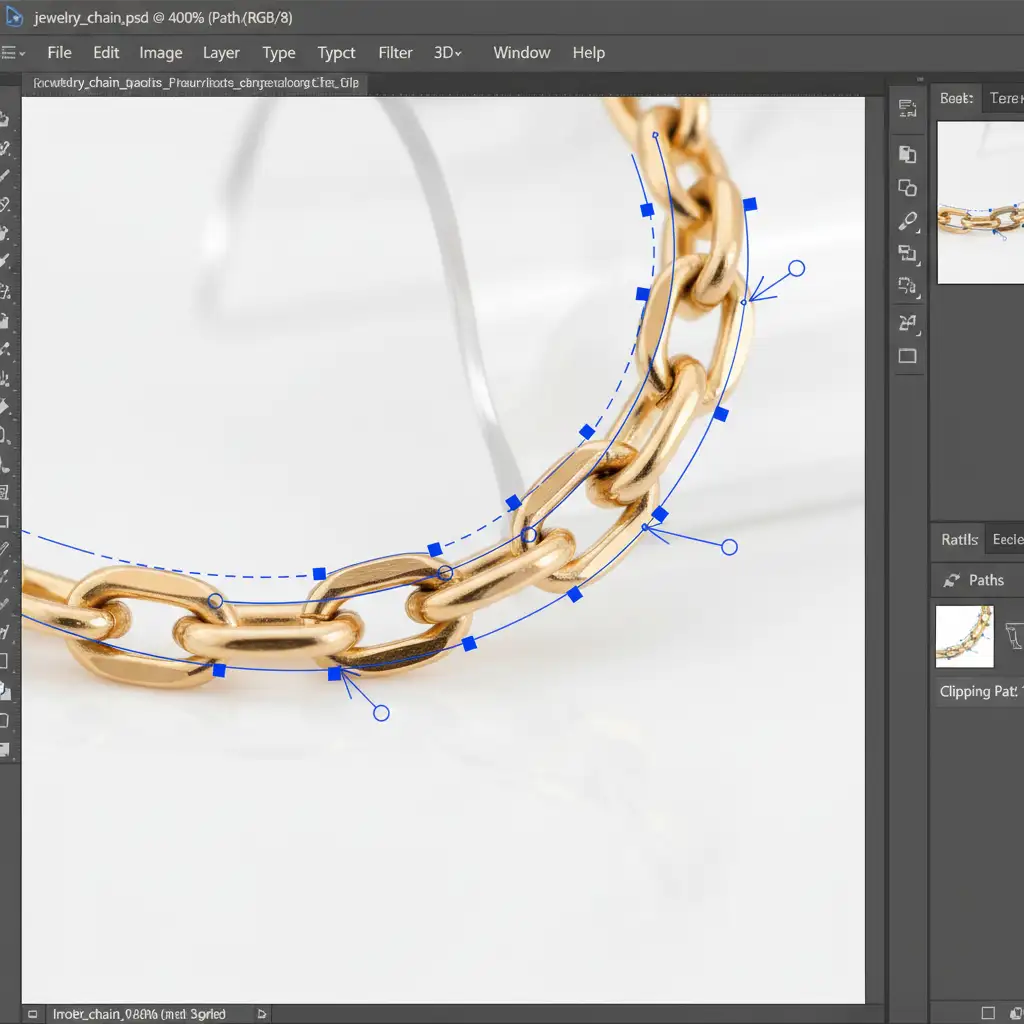
For complex gemstone clusters and delicate links, manual pathing is non-negotiable.
- Select the Pen Tool and zoom in to 300% or more.
- Draw a manual, sub-pixel Clipping path around the complex gemstone clusters, entirely ignoring the acrylic bust or wire.
- Convert the path to a selection and extract the jewelry.
- Create a new blank layer. Utilize Content-Aware Fill and the Healing Brush to seamlessly rebuild the microscopic chain parts that were physically obscured by strings or wires during the shoot.
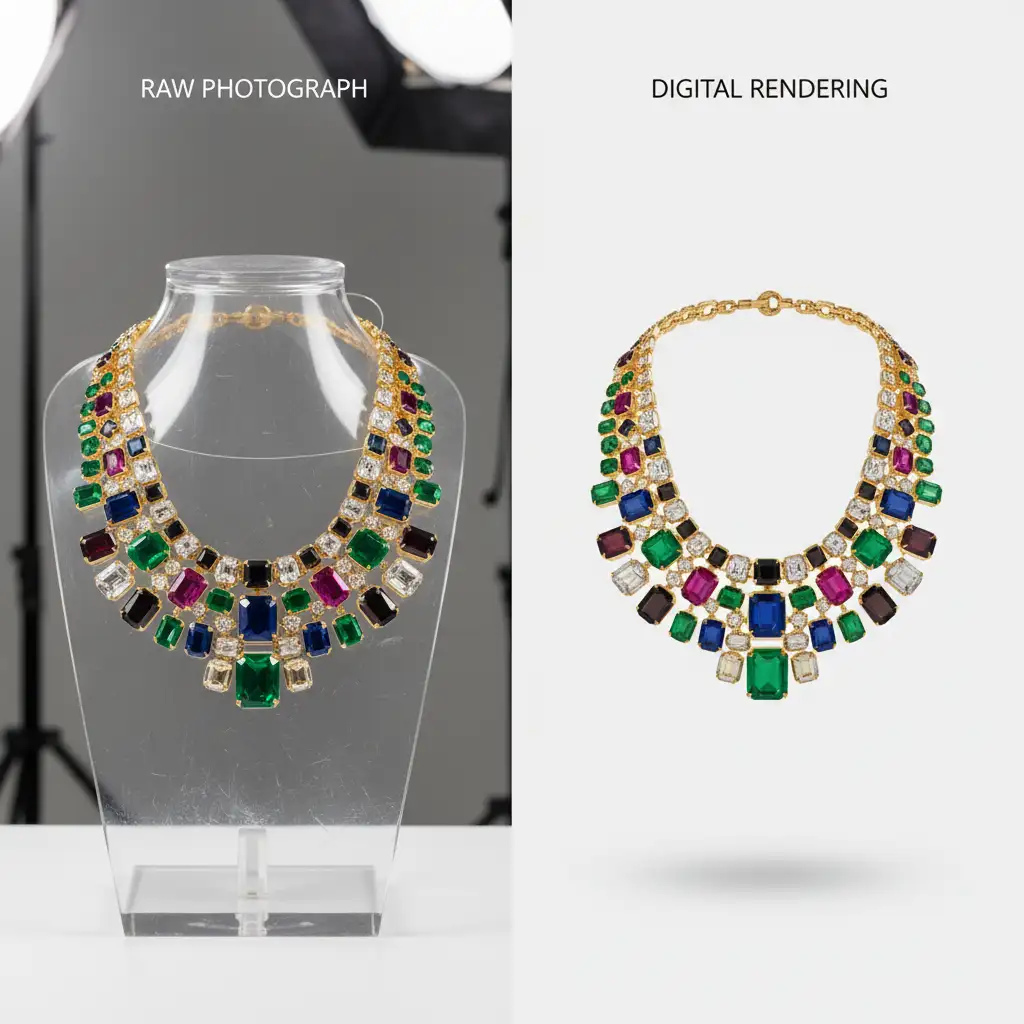
Method C: Technical Deep-Dive (Multi-Exposure Compositing)
For the ultimate “invisible neckline” effect—especially for choker-style statement necklaces—you must perform a full multi-exposure Composite image. This mimics the traditional apparel ghost mannequin technique but requires significantly more precision.
- Capture Two Images: Shoot the ‘on-mannequin’ photo (front view) and a ‘flat-lay’ inside-back photo (showing the inner clasp and back chain).
- Align the Exposures: Stack both images in Photoshop.
- Masking: Use precise Layer masks and Alpha channels to stitch the inner collar from the flat-lay shot behind the front-facing necklace. This completes the loop of the necklace, simulating the true ghost effect.
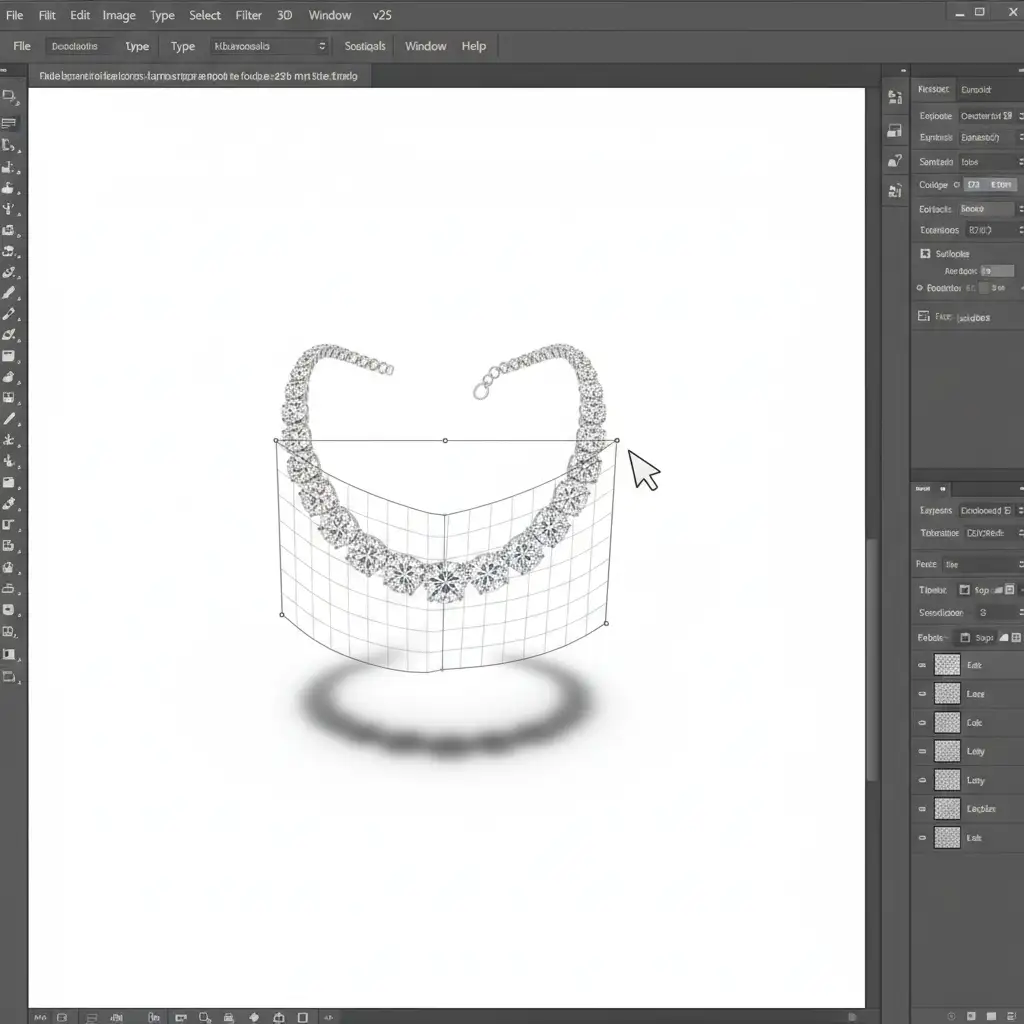
Crafting Synthetic 3D Drop Shadows for Depth
Once your necklace is perfectly extracted and composited, it will look like a flat sticker on a white background. To make statement jewelry look expensive, you must anchor it with a custom Drop shadow. Standard drop shadow layer styles will not work here.
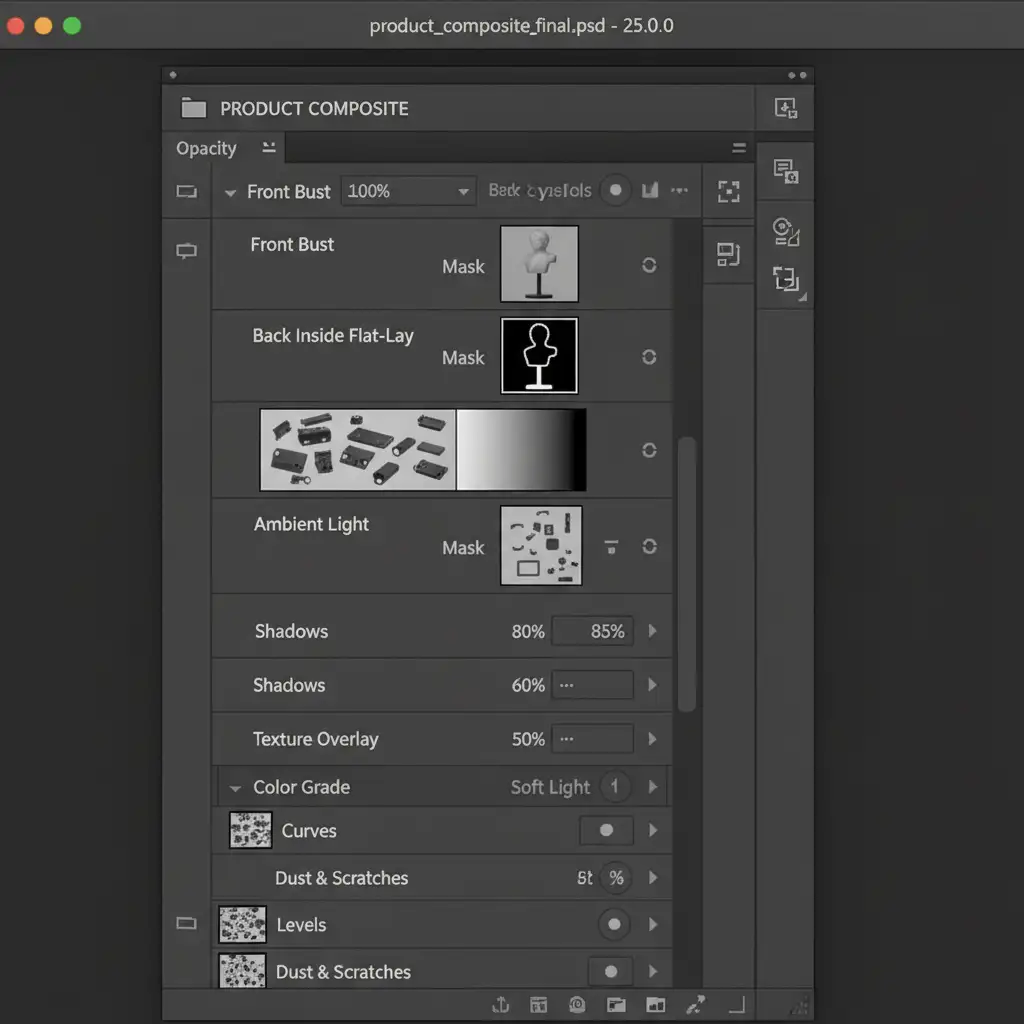
The Custom Shadow Workflow:
- Duplicate your finished, composited jewelry layer.
- Apply a Black Color Overlay to the duplicated layer.
- Convert the layer to a Smart Object and apply a heavy Gaussian blur to soften the edges.
- Press Ctrl+T (or Cmd+T) to activate the Free Transform tool.
- Hold Ctrl (or Cmd) to manipulate the corner nodes, warping the shadow so it lays flat beneath the jewelry, simulating a realistic studio floor shadow. Lower the opacity to 15-20%.
Scale Your Jewelry Post-Production with the Experts
Perfecting jewelry ghost mannequin editing requires an immense amount of patience, technical skill, and an eye for detail. When you are processing hundreds of SKUs for a seasonal catalog, meticulous clipping and multi-exposure compositing for statement jewelry will rapidly drain your in-house resources.
You don’t have to bottleneck your workflow. Partner with Image Work India and Cloud Retouch for pixel-perfect jewelry retouching at scale. Our dedicated teams specialize in complex extraction, sub-pixel pathing, and flawless composite imaging. We ensure your gemstone luminosity remains intact and your chains look naturally suspended, delivering high-end, conversion-ready visuals every time.
[Contact Image Work India & Cloud Retouch today to elevate your jewelry imagery and streamline your post-production workflow.]


