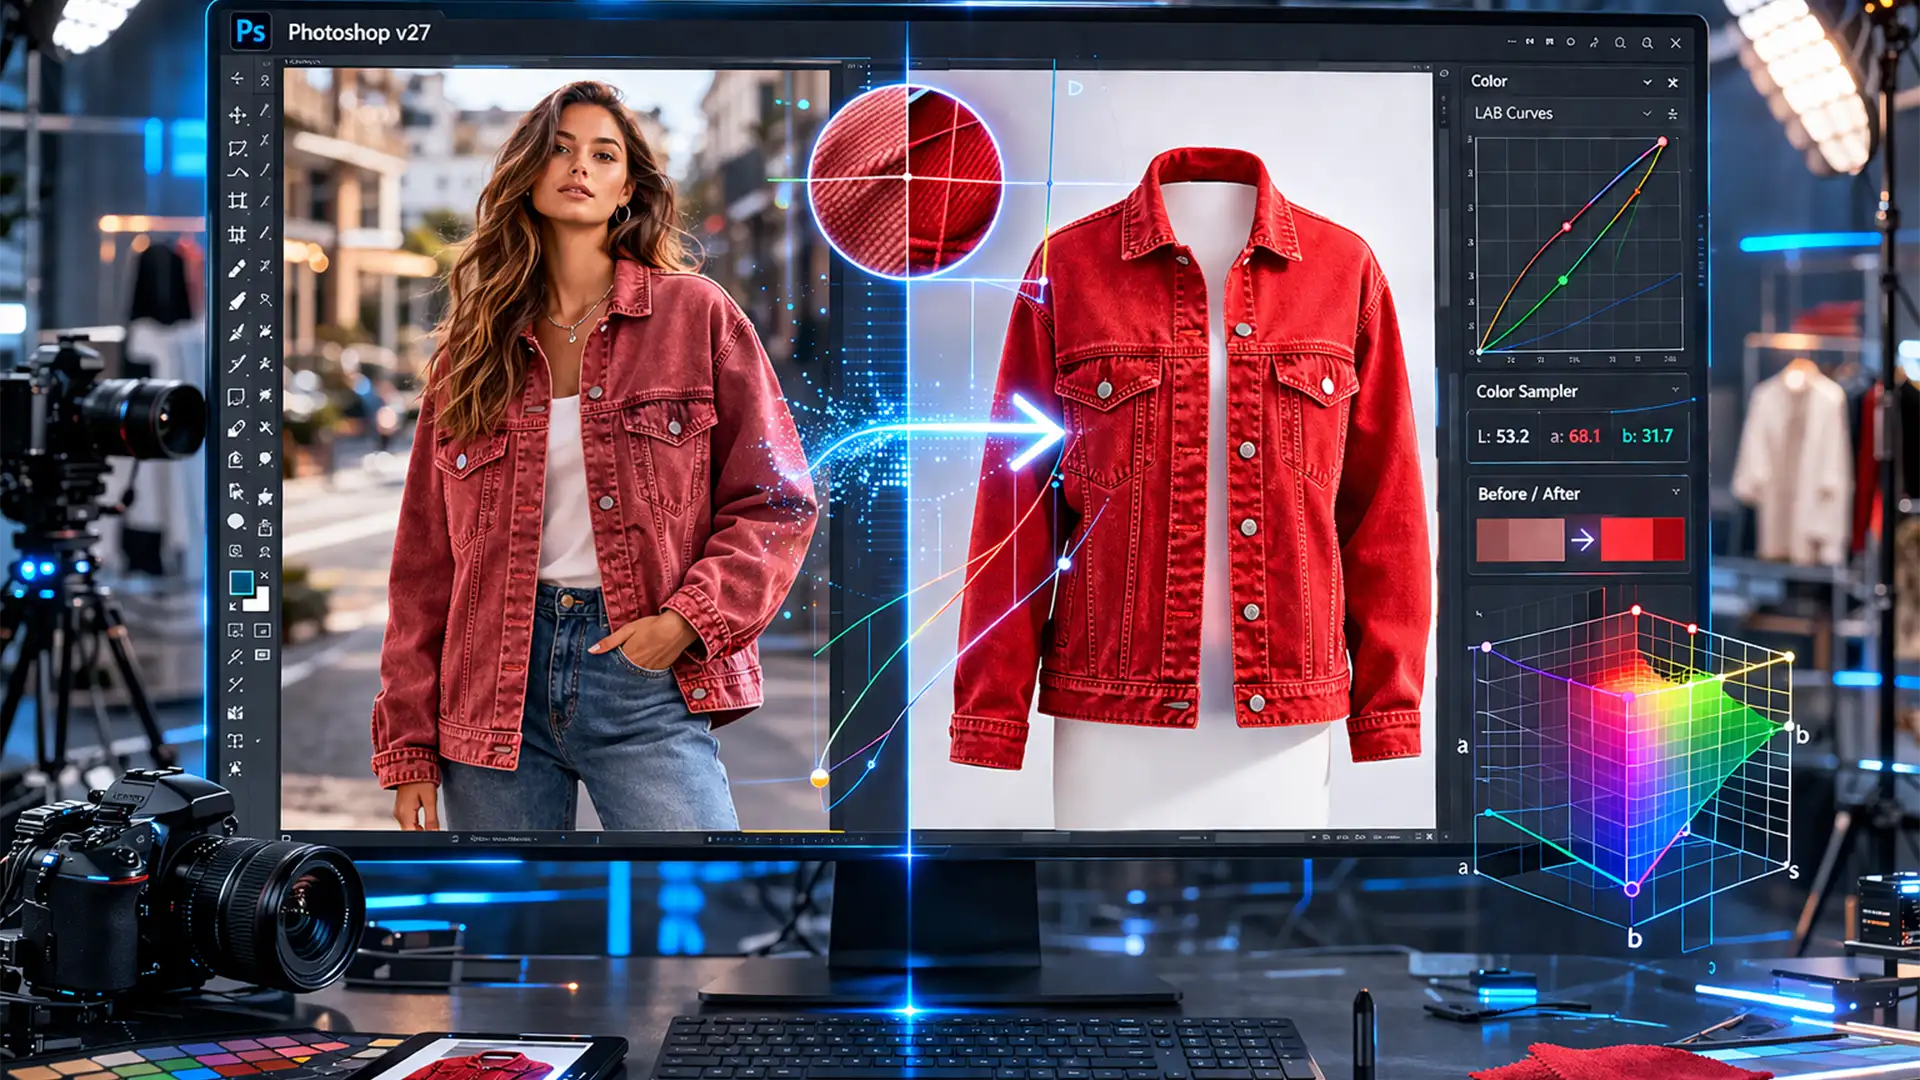
You just received the latest batch of product images from three different agencies. The lifestyle shots look overly warm, the ghost mannequin images are washed out, and the flat lays have a distinct blue color cast. The absolute worst part? The manufacturer didn’t provide hex codes for the garments.
Figuring out how to match product colors across assets without hex codes is one of the most frustrating bottlenecks in e-commerce retouching. When different camera profiles, mixed lighting, and varying studio setups are fighting against you, simple flat fill layers will only destroy the garment’s natural texture and luminosity.
In this guide, we will break down three non-destructive workflows in Photoshop v27.x (2026) to align perceptual color across disparate lighting environments—purely by the numbers.
The E-Commerce Color Matching Challenge
When dealing with high-volume e-commerce catalogs, visual consistency is non-negotiable. A customer looking at a lifestyle shot and a studio shot of the same sweater expects the tones to be identical. Without a manufacturer hex code to use as an absolute baseline, editors must rely on relative color sampling.
The goal is to shift the hue, saturation, and lightness of the target image to match a chosen reference image, without flattening the shadows or losing the fabric’s weave. Here are three ways to achieve this, ranging from a quick automated fix to a mathematically perfect color space manipulation.
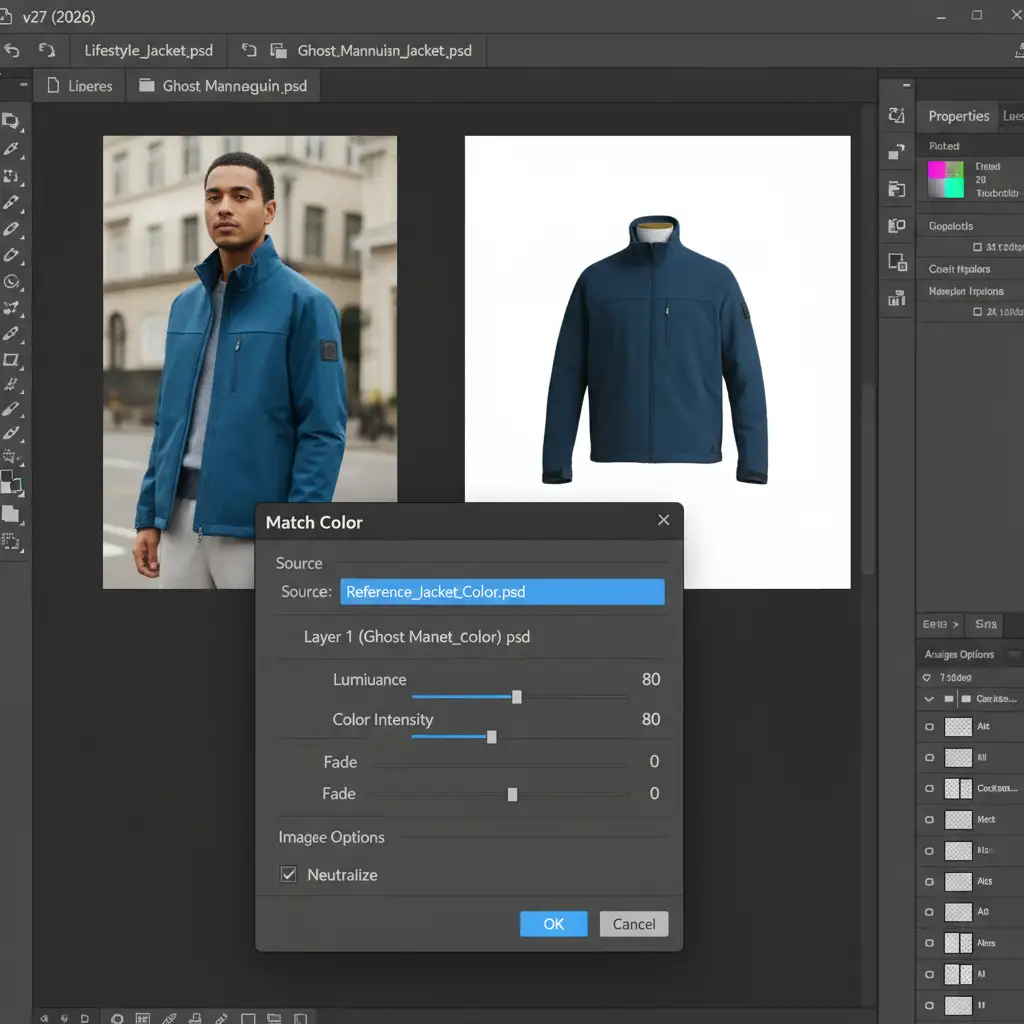
Method 1: The Quick Fix Using the Match Color Tool
If you are on a tight deadline and need a rapid baseline correction, Photoshop’s built-in automation is your first line of defense.
Step-by-Step Workflow:
- Open both your target image (the one needing correction) and your reference image in Photoshop v27.
- Select the target image document.
- Navigate to Image > Adjustments > Match Color.
- In the dialog box, go to the Image Statistics section at the bottom.
- Click the Source dropdown and select your reference document.
- Carefully adjust the Luminance and Color Intensity sliders to refine the transition.
Pro Tip: Apply this adjustment to a duplicated layer and use a Clipping Mask to isolate the effect solely to the garment, preventing unwanted shifts in the model’s skin tone or the background.
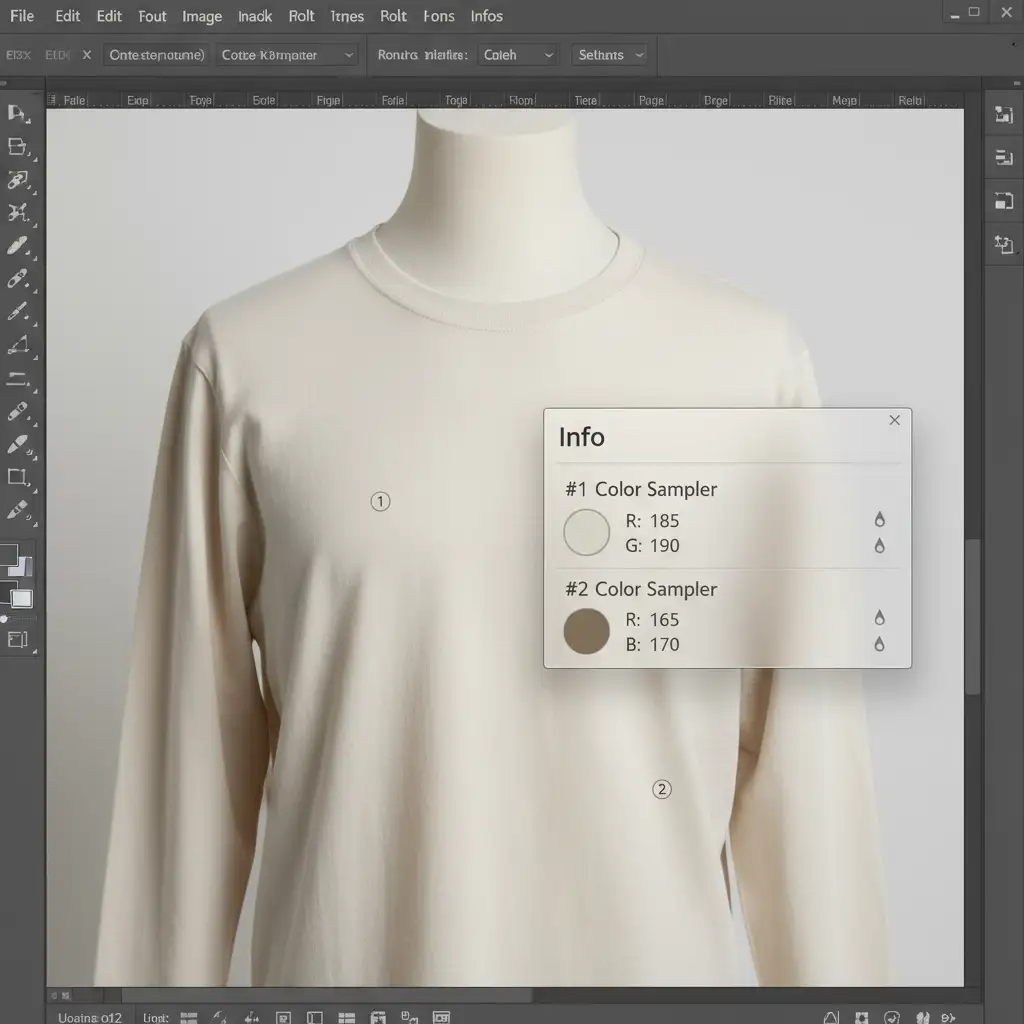
Method 2: The Pro Workaround with Color Sampler & Hue/Saturation
For more precise control, professional retouchers rely on manual data readouts. This method ensures that the midtones of both garments share the exact same RGB values.
Step-by-Step Workflow:
- Select the Color Sampler Tool from the toolbar (hidden under the Eyedropper tool).
- In the top options bar, change the sample size from Point Sample to a 5×5 Average. This prevents you from accidentally sampling a microscopic dark pixel in the fabric’s texture.
- Drop a sample point on a clear midtone area of the reference image (Point #1).
- Drop a second sample point on the corresponding midtone area of the target image (Point #2).
- Open the Info Panel (F8). You will now see live RGB readouts for both points.
- Add a Hue/Saturation adjustment layer to your target image.
- Tweak the Hue, Saturation, and Lightness sliders while watching the Info Panel. Stop when the RGB values of Point #2 perfectly match Point #1.
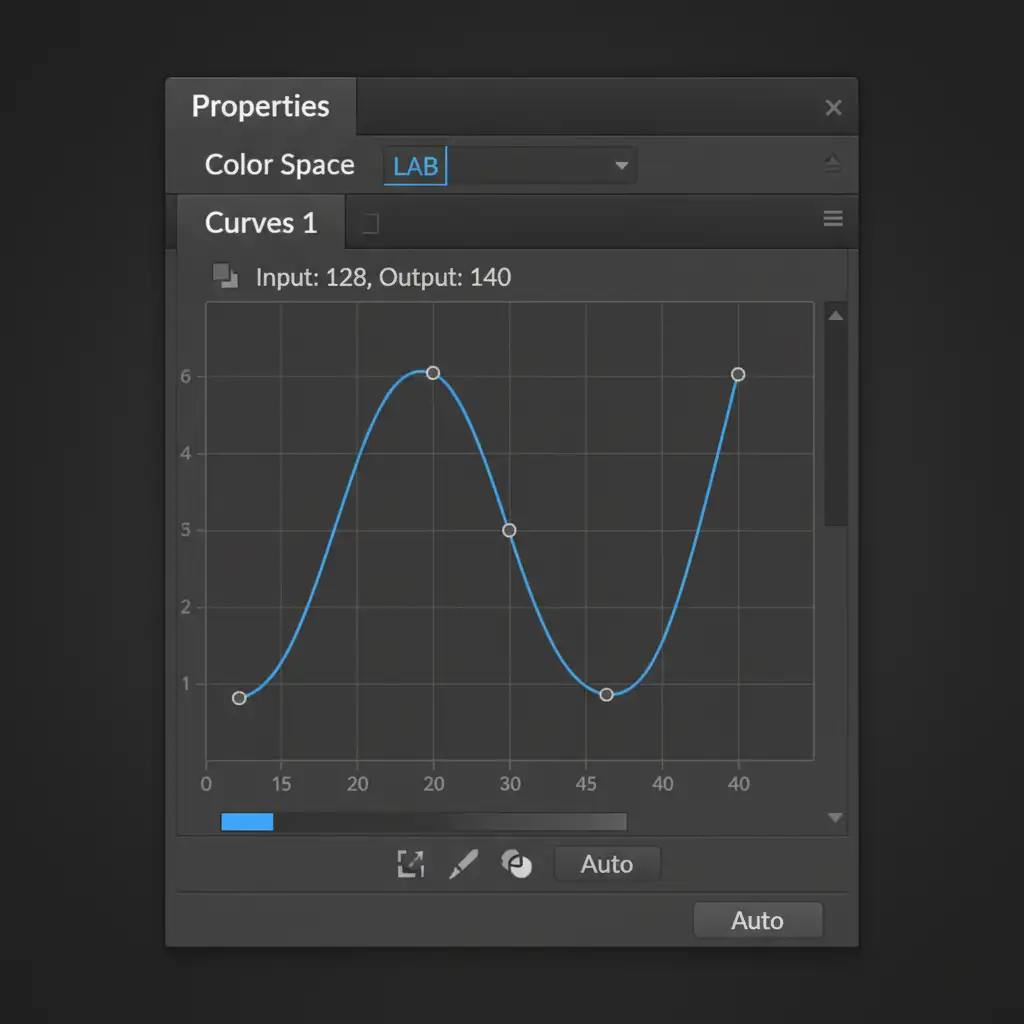
Method 3: The Technical Deep-Dive Using LAB Color Space
When you are dealing with extreme color shifts or highly reflective fabrics (like silk or nylon), RGB adjustments can sometimes muddy the luminosity. The ultimate solution is the LAB Color Space. LAB separates color data (the ‘a’ and ‘b’ channels) from brightness data (the ‘Lightness’ channel), allowing for pure mathematical color alignment without altering the garment’s texture.
Step-by-Step Workflow:
- Convert both your reference and target images to LAB by navigating to Edit > Convert to Profile > LAB Color.
- Drop your 5×5 Average Color Sampler points on the midtones of both images, just as in Method 2.
- Open the target image and add a Curves Adjustment layer.
- In the Curves properties panel, click the channel dropdown and select the ‘a’ channel (which controls the Green-Magenta axis).
- Adjust the curve up or down until the ‘a’ value in your Info Panel matches the reference image.
- Switch to the ‘b’ channel (Blue-Yellow axis) and repeat the process to align the ‘b’ value.
- Finally, switch to the Lightness channel to match the brightness.
- Once matched, convert the image back to your standard working RGB profile.
Scale Your E-Commerce Retouching with Image Work India
Manually matching product colors across assets without hex codes is a highly technical process. While the Match Color tool, Color Sampler Tool, and LAB color space curves are incredibly effective, executing these steps across thousands of SKUs in a seasonal catalog will rapidly drain your team’s time and resources.
Need flawless visual consistency across your entire product catalog without the headache? Outsource your volume color matching and photo editing workflows to Image Work India and Cloud Retouch. Our expert retouchers specialize in pixel-perfect brand alignment, handling complex color casts, ghost mannequin composites, and lifestyle color grading at scale.
Contact us today to ensure your product imagery converts with absolute color accuracy.


