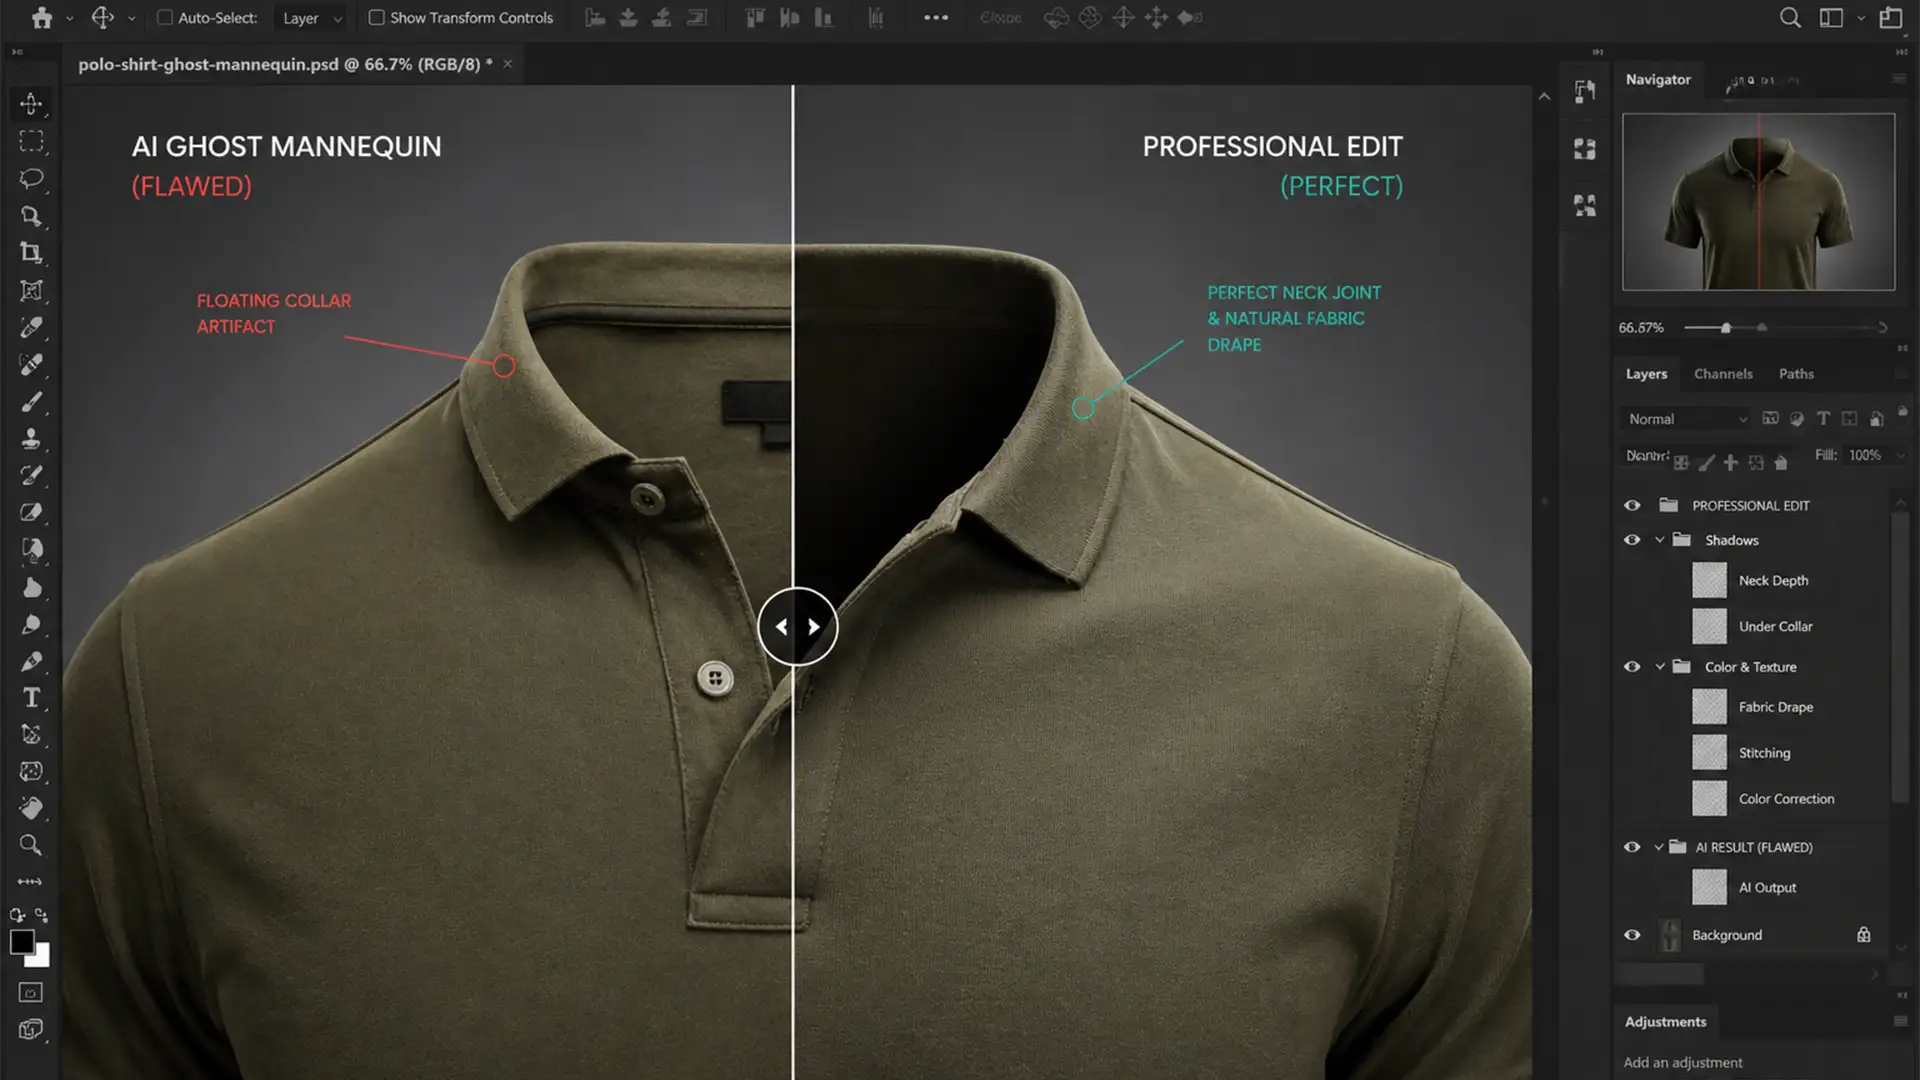
You run a batch of apparel shots through an automated AI e-commerce suite or Photoshop v25+, expecting a flawless invisible mannequin effect. Instead, you are staring at a “floating collar.” The inner back of the garment looks artificially pasted on, the shadows blatantly ignore your directional lighting, and the depth perspective is completely ruined.
If your automated edits look fake, they are actively killing your conversion rates. While machine learning algorithms excel at basic background removal, they consistently struggle to interpret 3D fabric drape physics and ambient lighting.
Here is the ultimate guide to the AI ghost mannequin neck joint alignment fix, ensuring your composite image looks premium, realistic, and ready to sell.
Why AI Fails at Ghost Mannequin Neck Joints
Automated ghost mannequin algorithms frequently encounter structural anomalies at the neck joint because they cannot accurately map depth perspective. When stitching the inner back collar to the front garment, the AI often produces pixelated boundaries and mismatched shadow gradients.
Because the AI lacks an understanding of the physical hollow cavity of a worn garment, it applies flat lighting to the inserted neck piece. This requires manual intervention—specifically structural alignment and a precise luminosity match—to salvage the image.
5 Pro Fixes for Flawless Neck Joint Alignment
To rescue your apparel photography, you need a hybrid workflow that bridges the gap between AI generation and high-end manual retouching. Here are five professional methods to correct structural anomalies.
Method 1: The Quick Fix Using Generative Fill
When dealing with minor pixelated boundaries or slight misalignments in Photoshop v25+, Generative Fill can bridge the gap.
- Select the misaligned neck joint using the Lasso Tool, leaving a slight margin around the seam.
- In the contextual taskbar, input a highly specific prompt: ‘smooth inner back collar with natural drop shadow’.
- Cycle through the generated variations until you find the most accurate 3D fabric drape.
While this method is fast, AI may still misinterpret complex fabric patterns, requiring the manual techniques below.
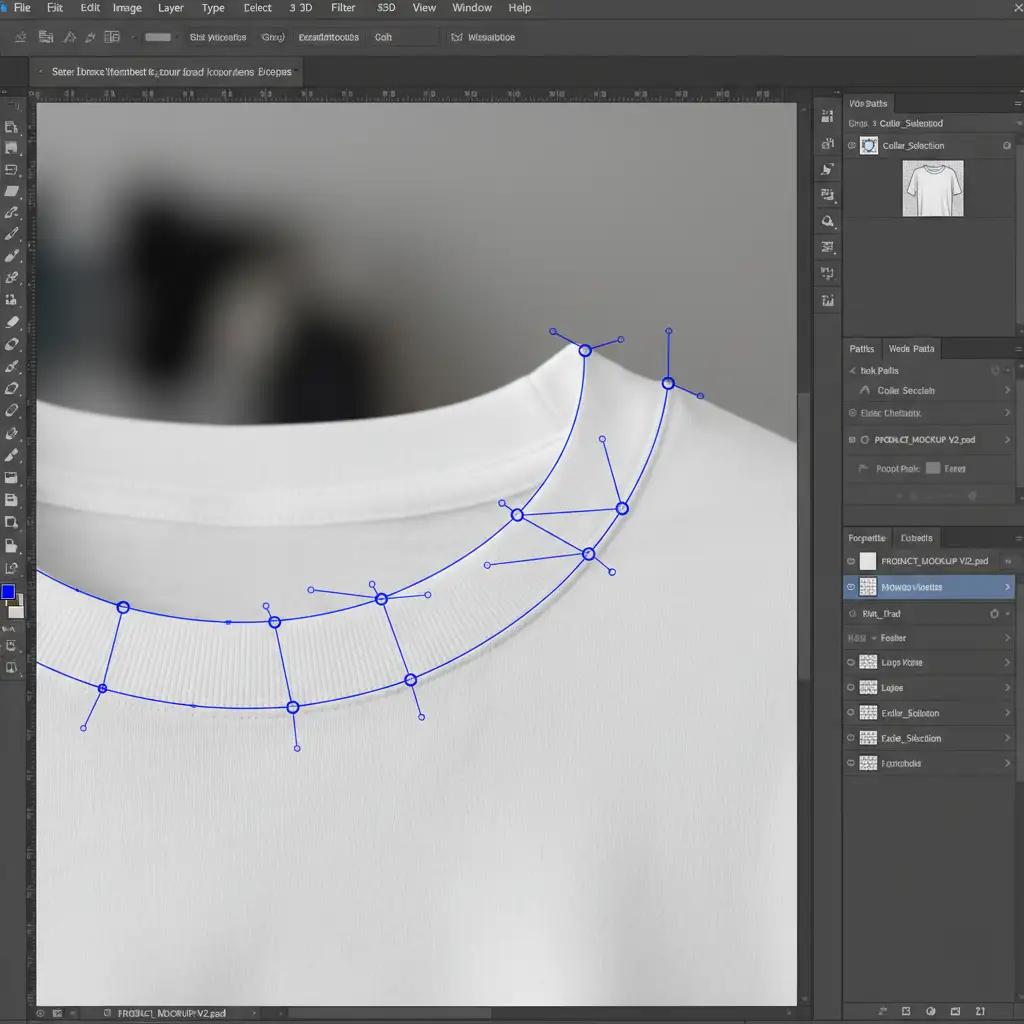
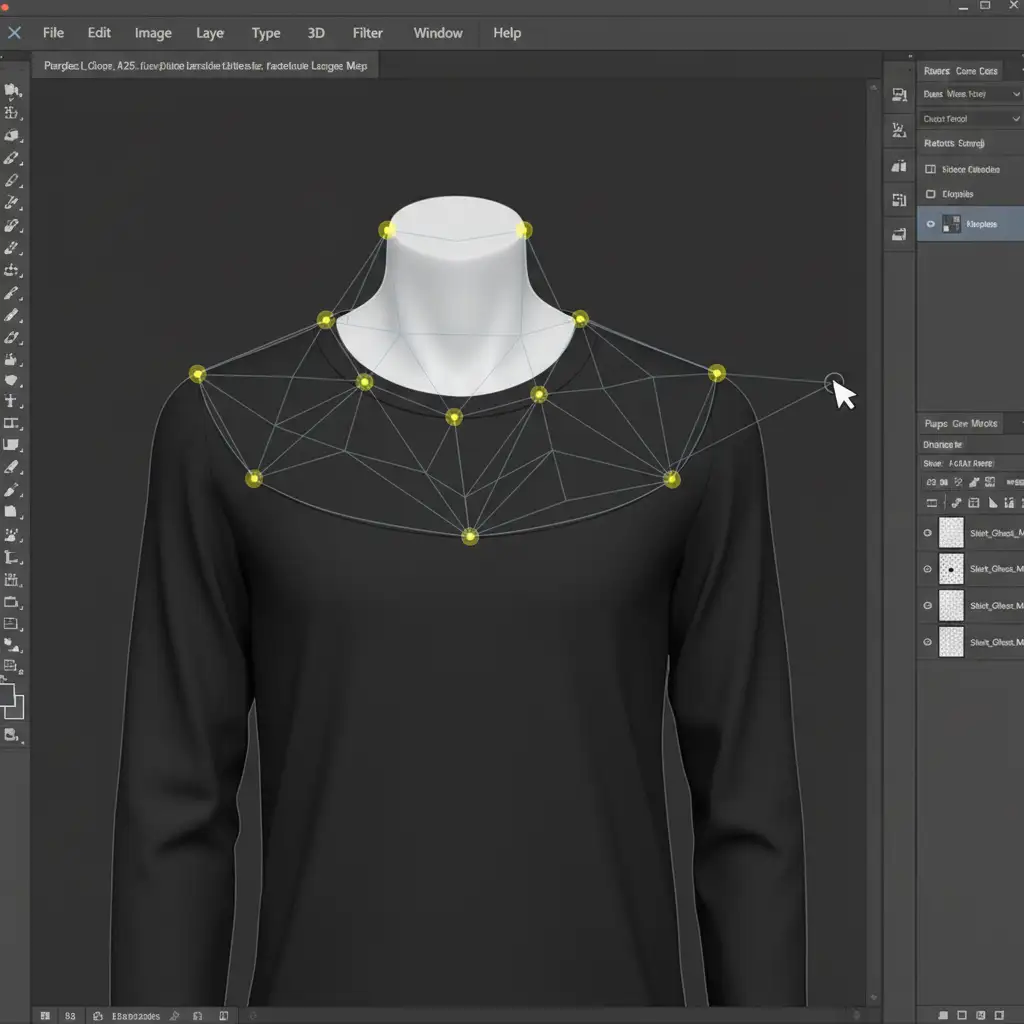
Method 2: The Pro Workaround with Pen Tool and Puppet Warp
For absolute structural perfection, you must manually extract and mold the inner neck piece from an inside-out reference photo.
- Draw a precise Pen Tool Path around the inner neck piece from your reference shot and extract it.
- Place this extracted layer directly beneath your front garment layer.
- Select the inner neck layer and navigate to Edit > Puppet Warp.
- Drop anchor points along the base of the seam. Pin and drag the mesh to bend the inner piece so it perfectly matches the front collar curve.
Method 3: Lighting and Texture Calibration (The Technical Deep-Dive)
Once the structure is aligned, you must fix the AI’s flat lighting to create the illusion of depth.
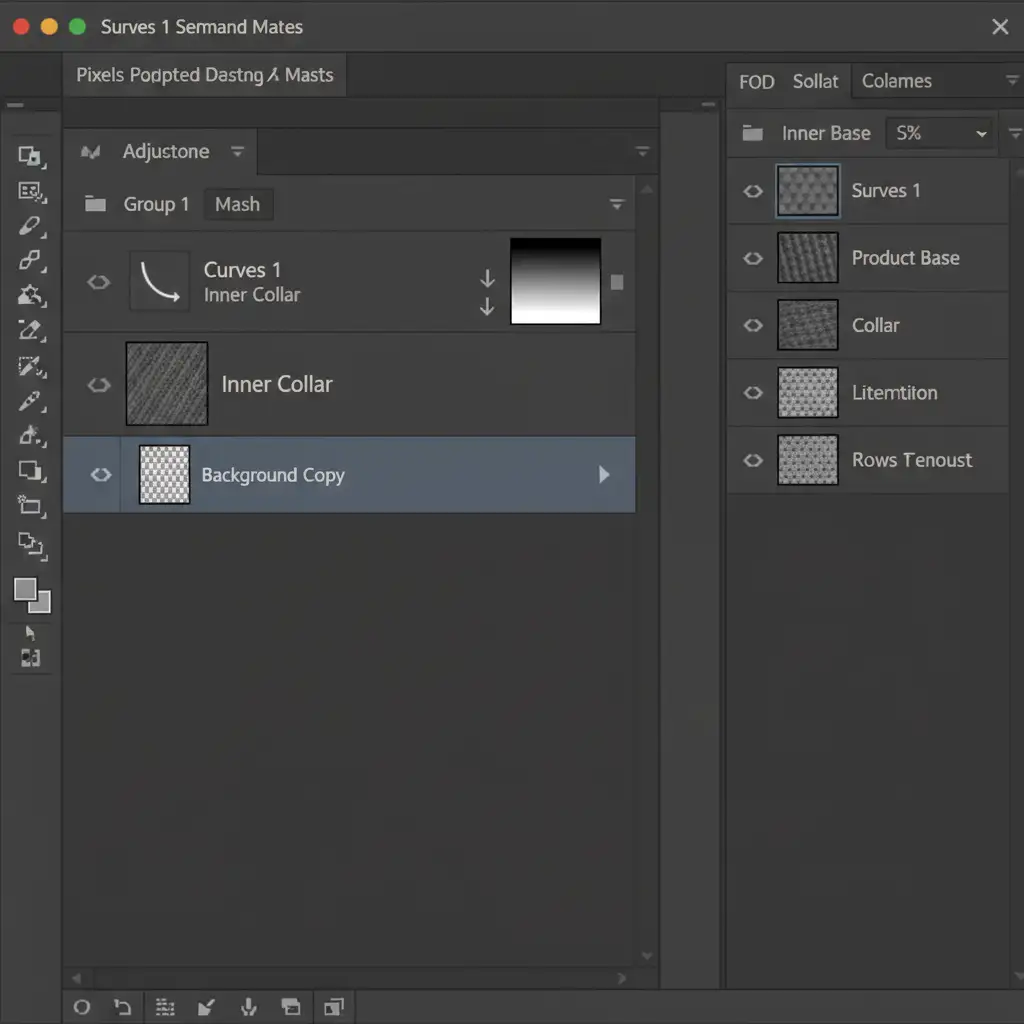
- Create a Curves Adjustment Layer and apply it as a Clipping Mask to the inner collar layer.
- Pull down the midtones on the curve to darken the fabric, mimicking the natural shadow of a hollow garment cavity.
- To ensure the shadow doesn’t look like a harsh line, apply a subtle Gaussian Blur to the adjustment layer’s mask edge. This feathering effect creates a realistic ambient shadow transition.
Method 4: Perfecting the Composite Image with Luminosity Match
If the reference photo for the inner neck was shot under different lighting than the front garment, you need a luminosity match. Utilize Layer Blending Modes—specifically setting a black-and-white adjustment layer to “Luminosity” temporarily—to check the tonal values of both pieces. Adjust your exposure levels until the highlights and shadows of the inner collar mathematically match the ambient directional lighting of the front piece.
Method 5: Final Polish using Frequency Separation and Dodge & Burn
To finalize the AI ghost mannequin neck joint alignment fix, you must blend the textures.
- Use Frequency Separation to smooth out any lingering pixelated boundaries between the front and back collar without destroying the physical weave of the fabric.
- Apply subtle Dodge and Burn techniques on a 50% gray layer to enhance the 3D volume, adding highlights to the rim of the collar and deepening the recessed shadows.
Stop Fighting the Algorithm: Let the Experts Handle It
Automated tools are fantastic for speeding up bulk processing, but when it comes to the intricate physics of fabric drape and 3D lighting, AI consistently falls short. Spending hours manually tweaking Puppet Warp meshes and clipping masks defeats the purpose of using automated software in the first place.
Struggling to get flawless neck joints with automated AI tools? Hire Image Work India & CloudRetouch. Our team of expert retouchers specializes in manual ghost mannequin editing, ensuring perfect perspective, accurate directional lighting, and premium e-commerce quality that drives conversions. Focus on growing your brand, and let us deliver pixel-perfect product imagery every time. Contact us today for a free trial.


