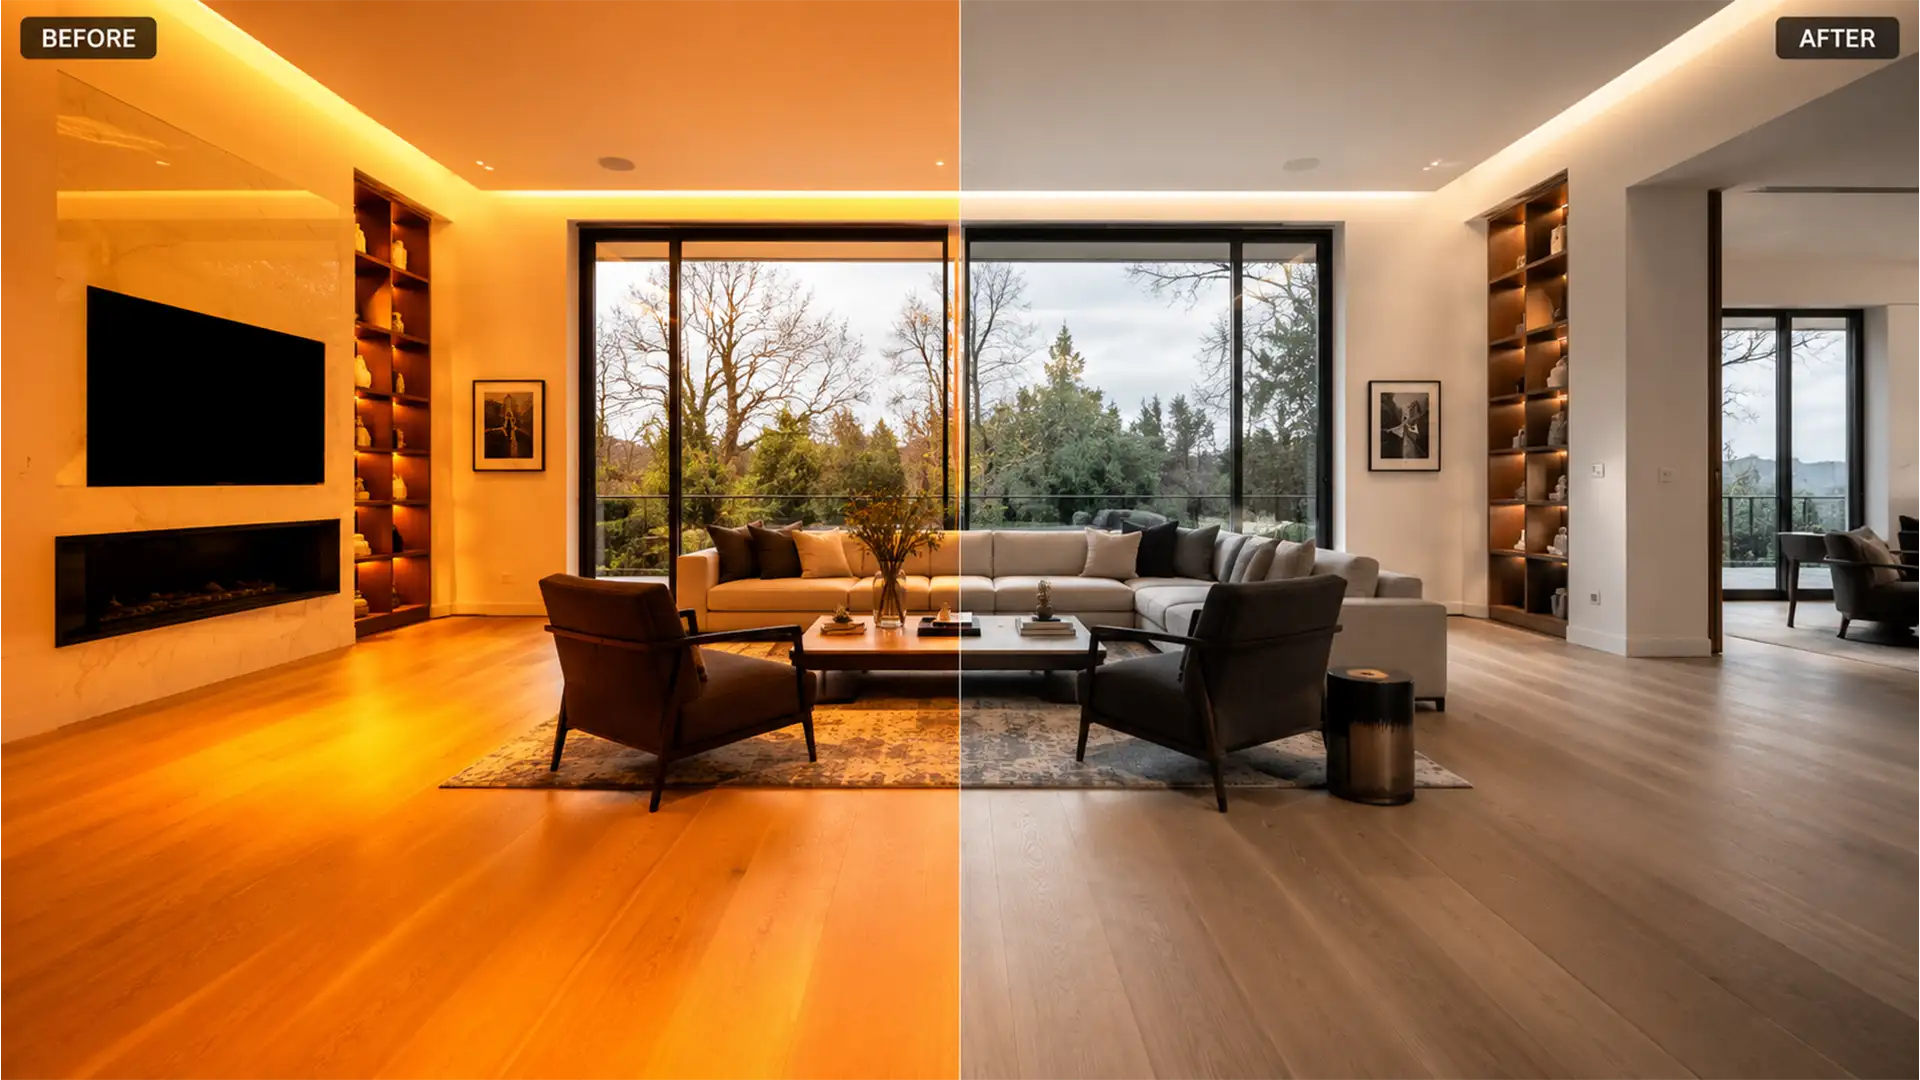
Are you staring at a gallery of 50 interior shots where the hardwood floors look like they are glowing neon orange? You are not alone.
In real estate photography, mixed lighting conditions—specifically the clash between cool daylight pouring through windows and warm 3000K tungsten lighting from interior fixtures—interact disastrously with natural wood varnish. The result is a severe, unnatural orange color cast. If you try to fix this with a global white balance adjustment, you’ll either ruin the ambient light of the room or turn the window pulls completely blue.
You need a workflow to batch neutralize orange wood floors in real estate photography without manual brushing. Here is the ultimate guide to fixing this issue across dozens of bracketed or single-exposure shots using Lightroom Classic v13.x and Adobe Camera Raw.
Why Hardwood Floors Turn Orange in Real Estate Photography
Before diving into the software, it is crucial to understand the cause. When warm tungsten lighting hits a glossy or semi-gloss polyurethane wood varnish, the camera sensor amplifies the warm tones. This creates an overpowering orange or yellow color cast.
Because time is money in real estate photography, manually painting out the floor in every single frame is not an option. You need precise color targeting and efficient batch sync capabilities.
How to Batch Neutralize Orange Wood Floors (3 Pro Methods)
Depending on the severity of the color cast, you can use one of three distinct workflows in Lightroom Classic v13.x to isolate and neutralize the floor.
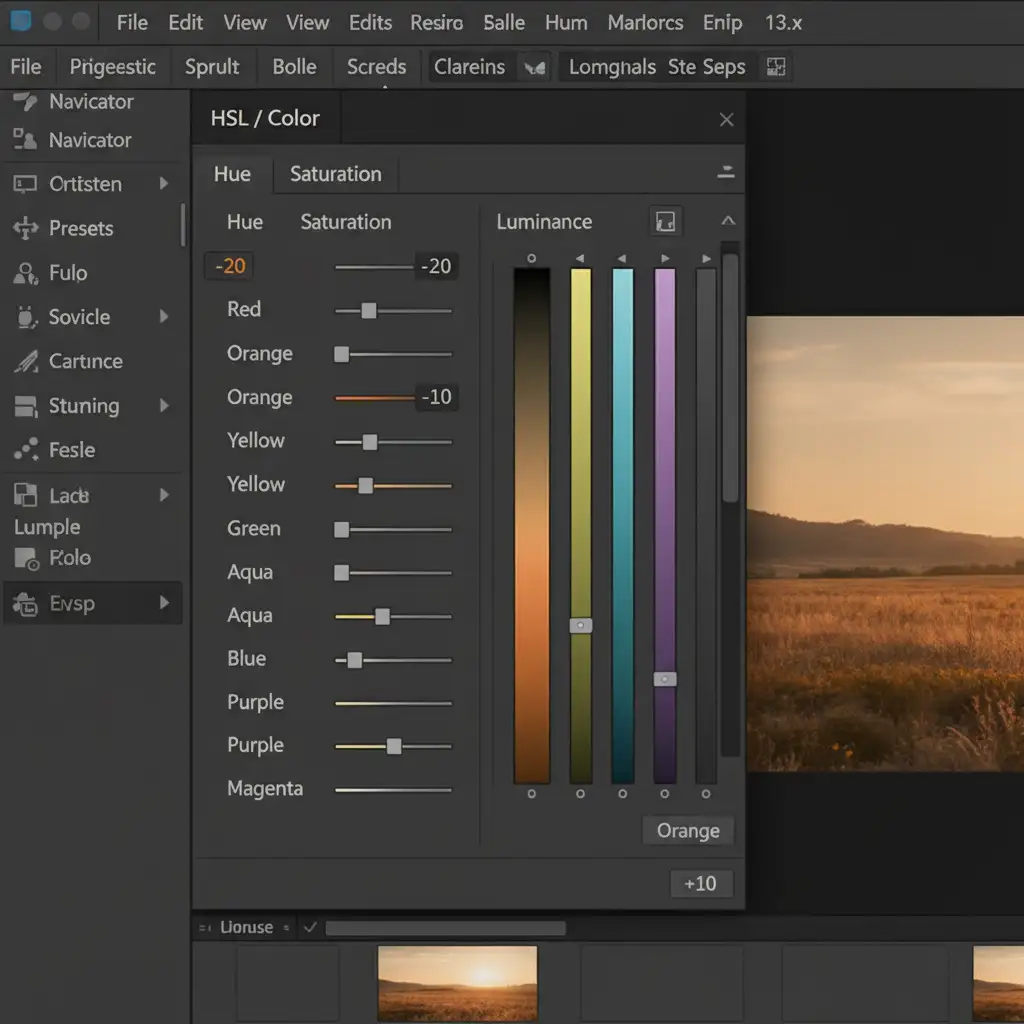
Method 1: The Quick Fix (HSL Panel Batch Sync)
For mild to moderate color casts, the HSL Panel is your fastest option. This method targets the specific hue of the floor globally, allowing you to mute the neon glow while retaining the natural wood feel.
- Open the HSL/Color panel in Lightroom.
- Navigate to the Saturation tab and target the Orange and Yellow channels.
- Reduce Orange Saturation by -15 to -25 (depending on the floor’s intensity).
- Switch to the Luminance tab and increase the Orange channel by +10 to restore brightness lost during desaturation.
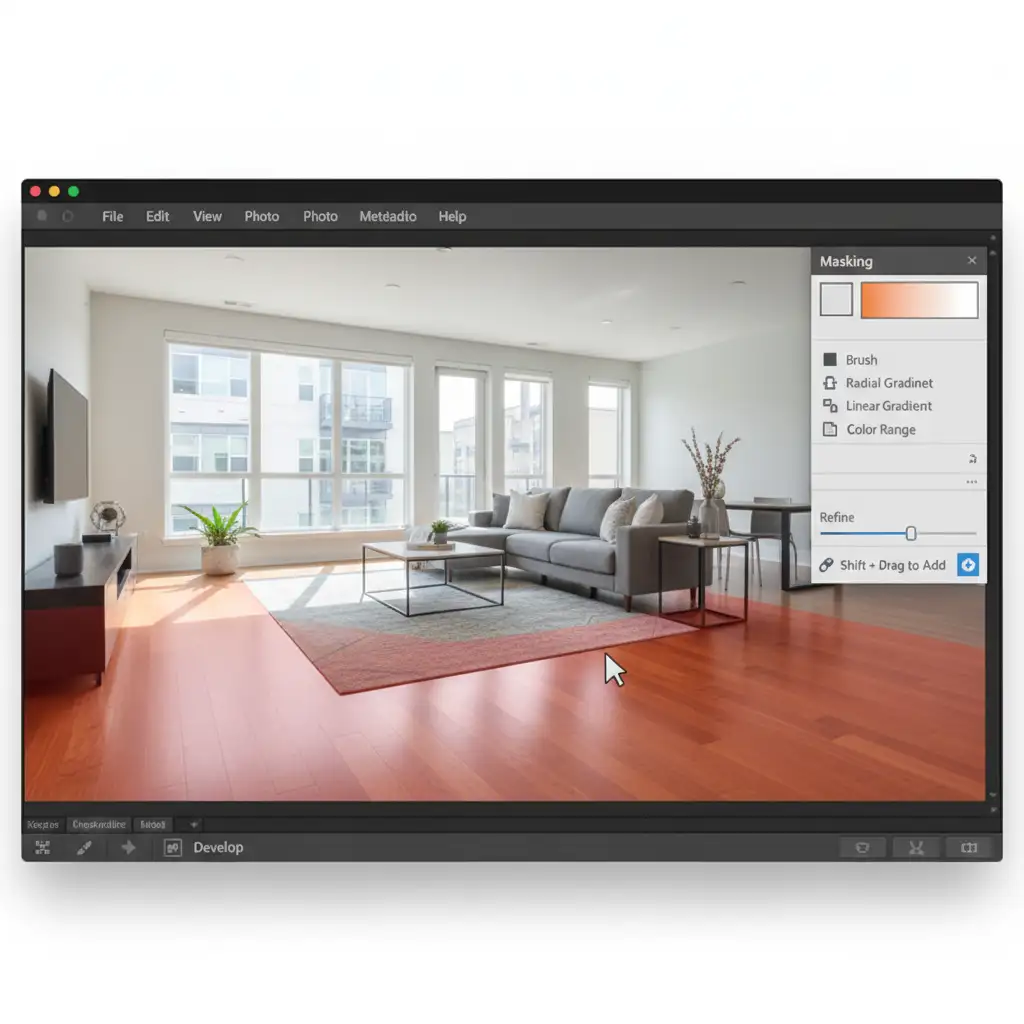
Method 2: The Pro Workaround (Color Range Masking)
When the HSL panel affects other orange elements in the room (like brick fireplaces or warm furniture), you need the precision of AI masking.
- Open the Masking tool and select Color Range.
- Click the eyedropper tool on the most offensive, glowing orange spot on the floor.
- Hold Shift and click a few more areas of the floor to expand the sample, then refine the shift amount slider so the mask overlay covers only the wood.
- Inside this specific mask, lower the Temp/Tint sliders to cool the floor down, or simply reduce the saturation.
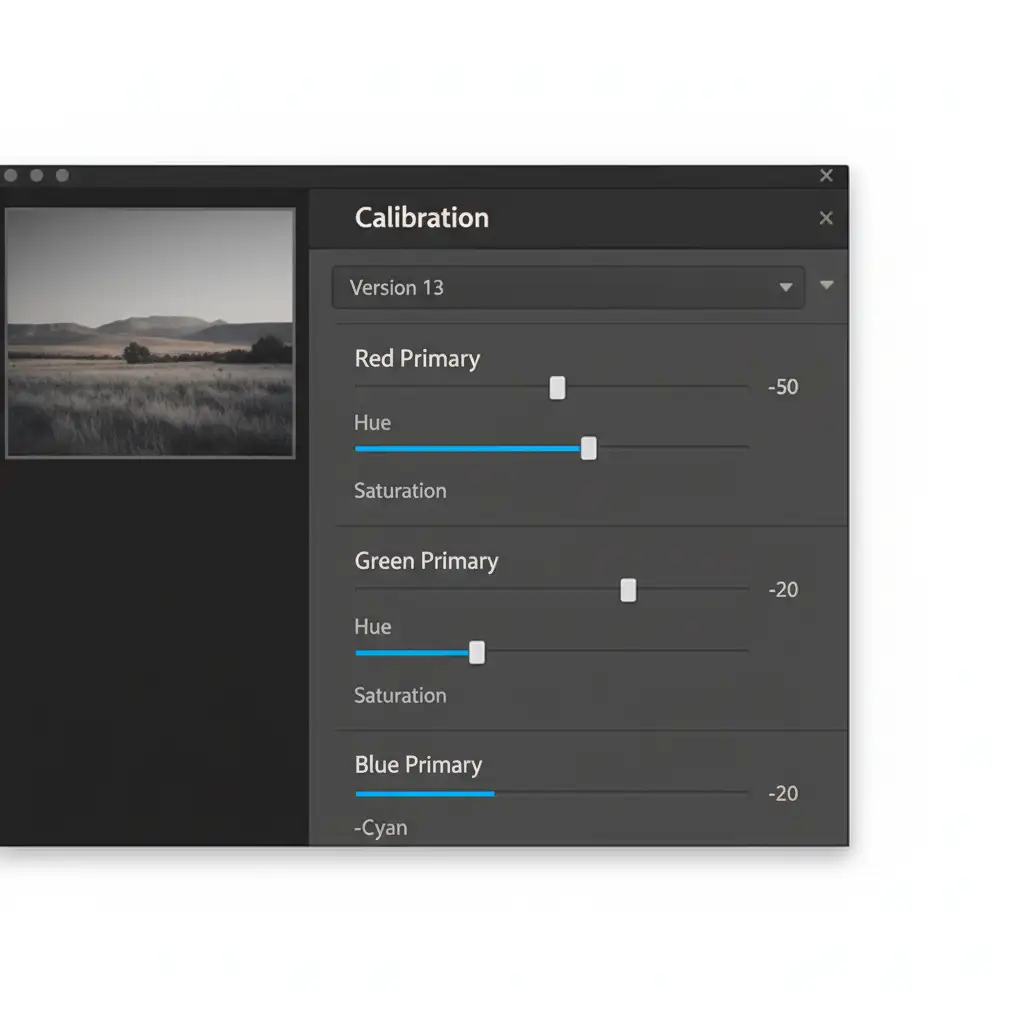
Method 3: The Technical Deep-Dive (Camera Calibration)
For high-volume shooters who want to prevent this issue upon import, the Camera Calibration panel offers a structural fix to how your camera interprets color.
- Scroll down to the Calibration panel.
- Decrease the Red Primary Saturation slightly to remove the neon punch from warm tones.
- Shift the Blue Primary Hue slightly towards cyan. This naturally neutralizes overpowering warm casts across the image without ruining the white balance.
- Save this exact calibration profile as a User Preset (one of your custom real estate presets) and apply it automatically upon import.
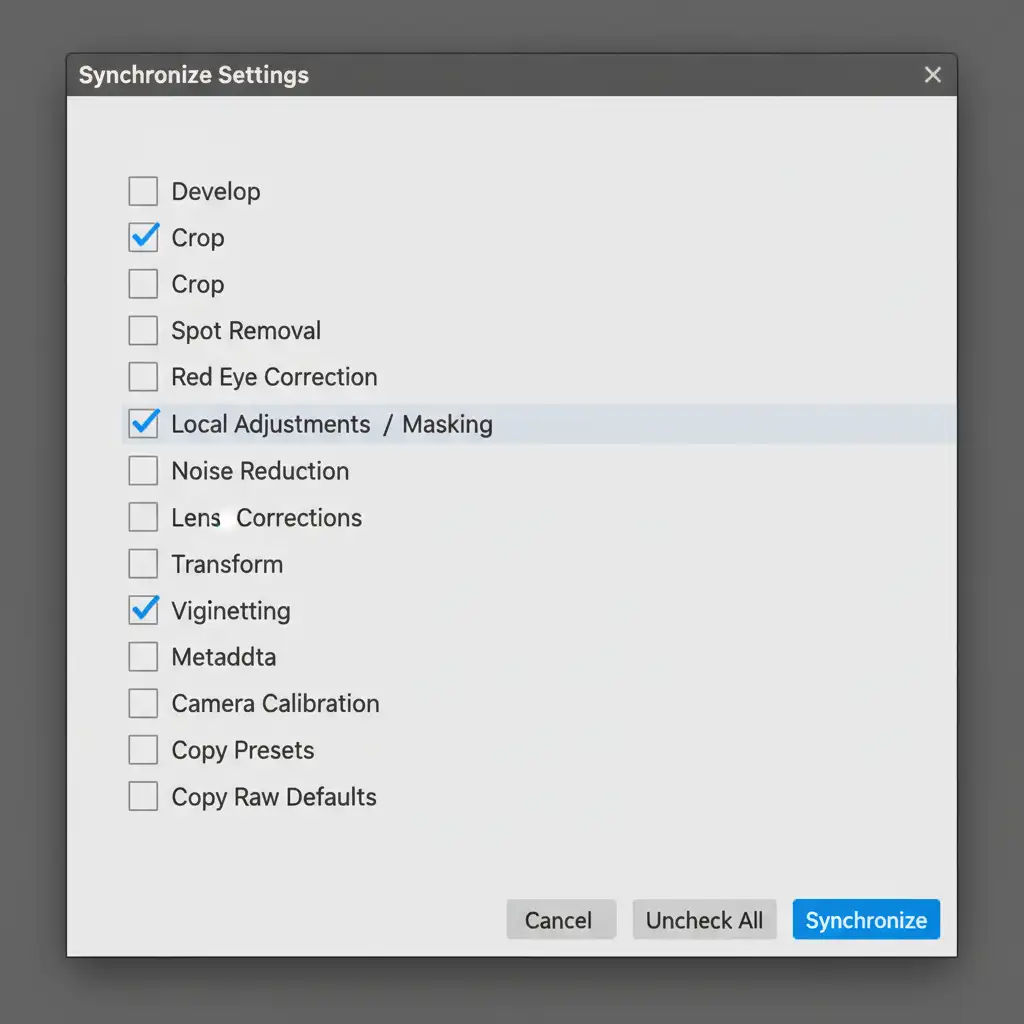
Synchronizing Adjustments Across Your Batch
The true power of these techniques lies in your ability to apply them to an entire property instantly. Once you have perfected the floor on one image, it is time to batch sync.
- Select your corrected image, then highlight the rest of the room’s photos in the filmstrip.
- Click Sync (or press Ctrl+Shift+S / Cmd+Shift+S).
- In the Sync Settings dialog box, uncheck everything.
- Check only the boxes for Color (if using HSL/Calibration) or Masking (if using the Color Range Mask).
- Click Synchronize.
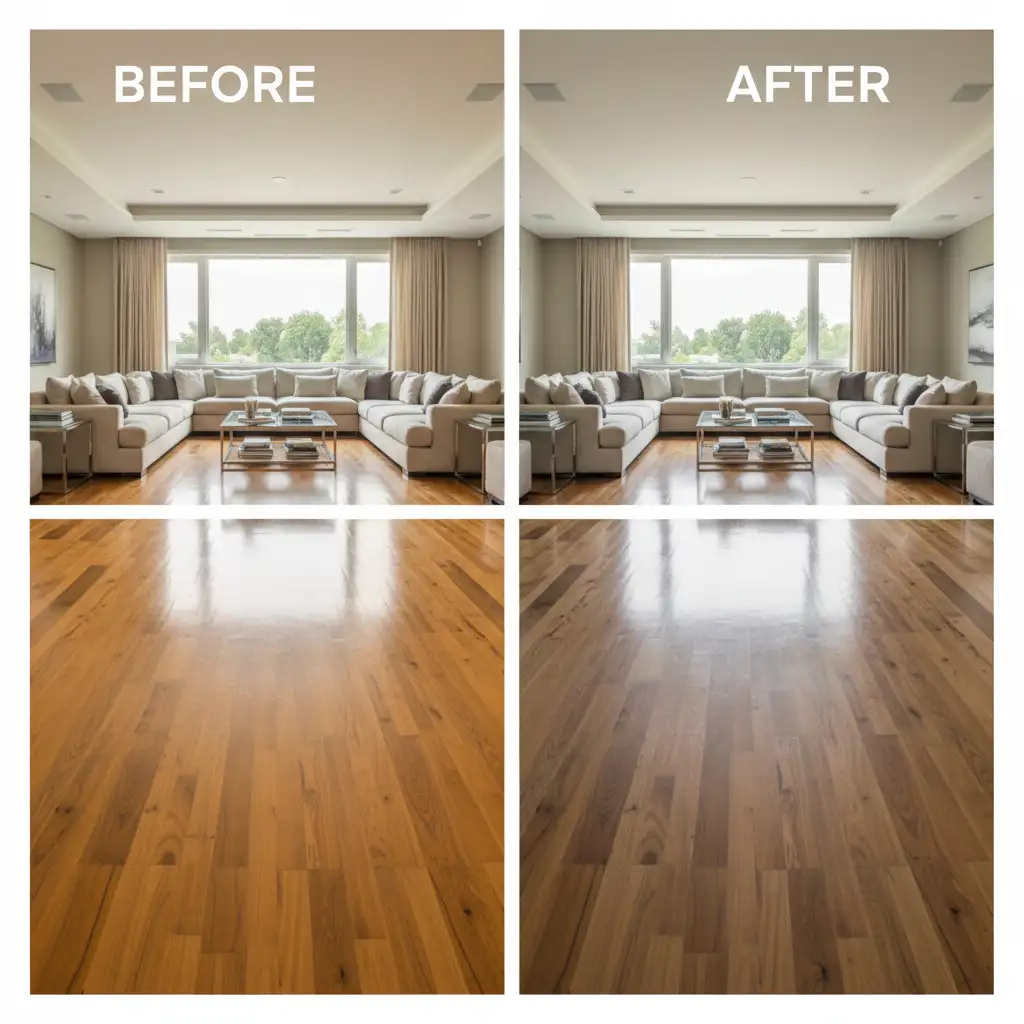
The Final Polish: Before and After
By isolating the floor’s hue and luminance, you successfully remove the distracting color cast while maintaining the inviting, ambient light of the room. The daylight from the windows remains crisp, and the wood floor looks like actual wood—not a glowing orange hazard.
Outsource Your Real Estate Photo Editing
Mastering the HSL panel, AI Color Range Masks, and Camera Calibration can save you hours—but what if you could save all of your editing time?
Struggling with mixed lighting, stubborn color casts, and tight 24-hour turnarounds? Outsource your batch color correction to the experts at Image Work India and Cloud Retouch. Our dedicated team of professional retouchers specializes in high-volume real estate photography editing. We deliver flawless, natural-looking interiors, perfect window pulls, and precise color correction in record time.
Stop wrestling with orange floors and get back behind the camera. Contact Image Work India today to streamline your workflow and scale your real estate photography business!


