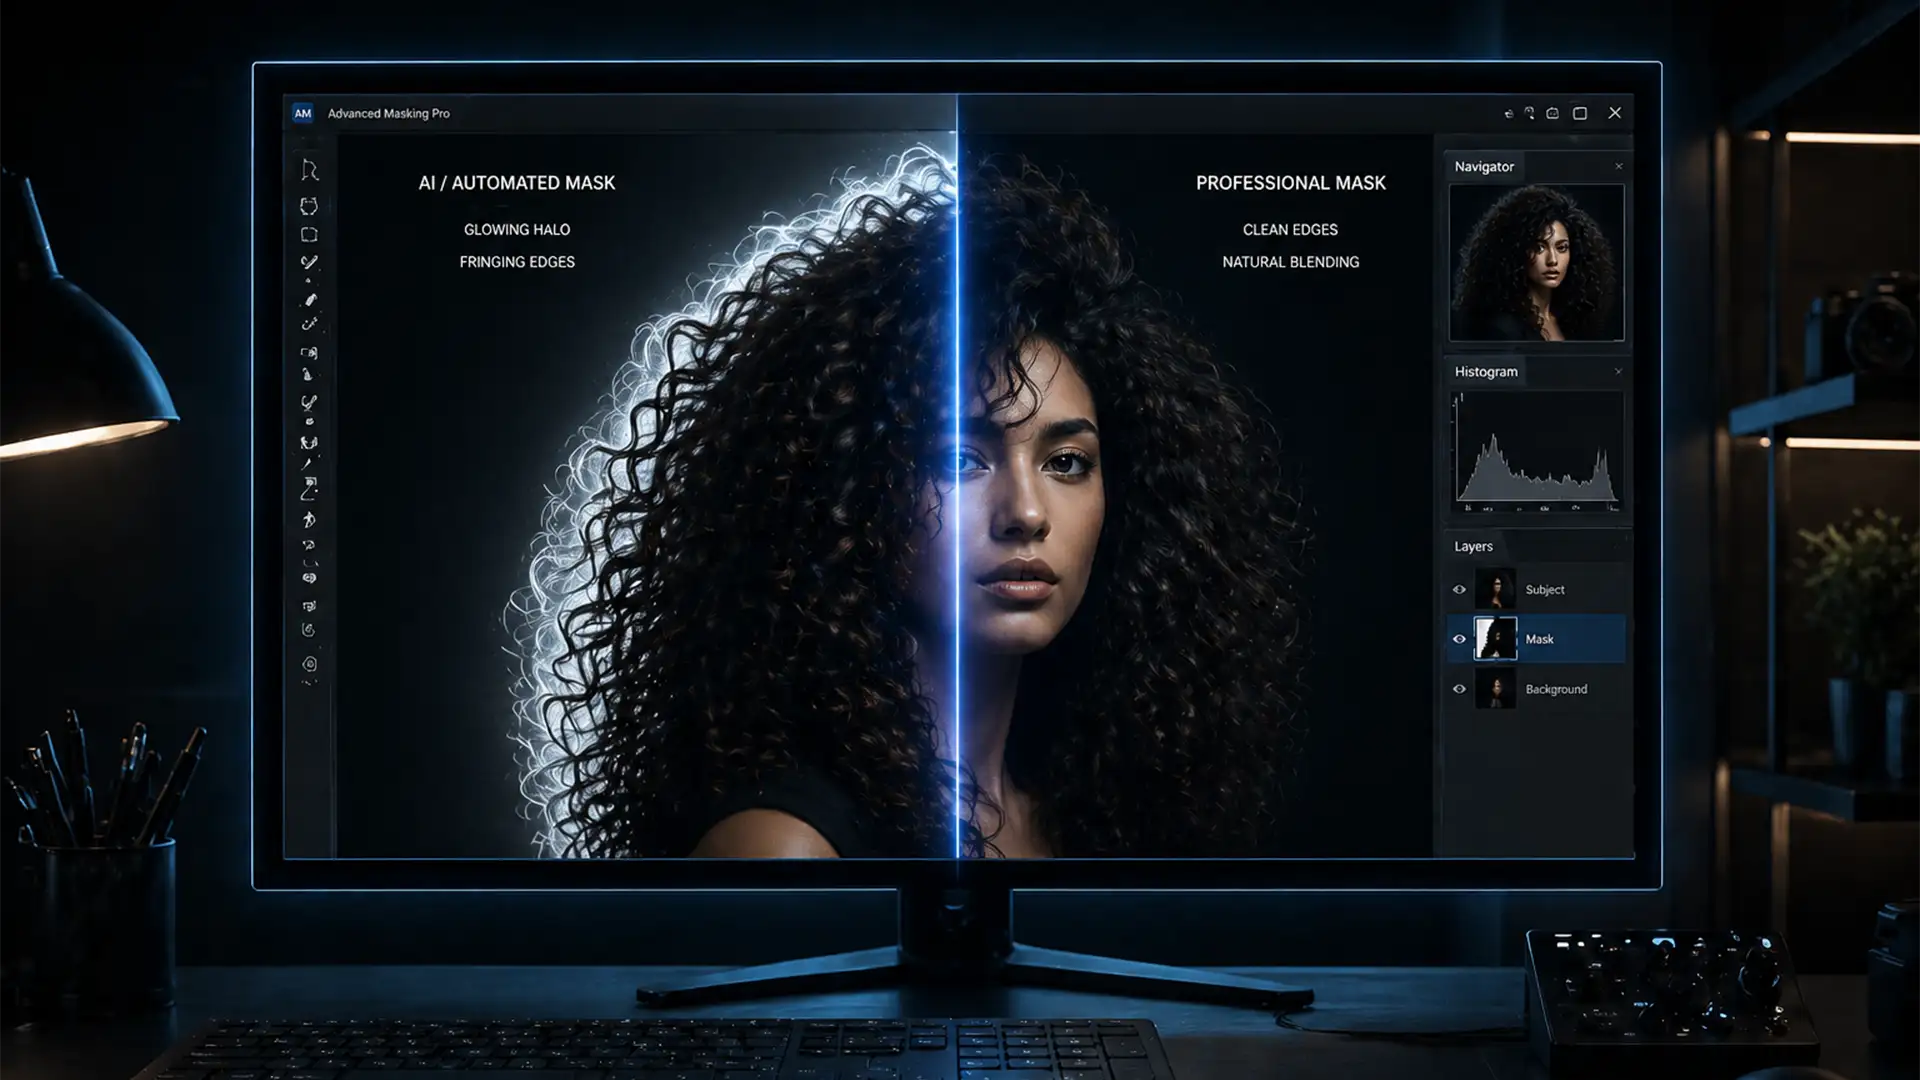
You’ve spent hours perfecting a composite image, but the moment you drop your subject onto a dark background, the illusion shatters. A glowing white outline surrounds their head. If you are desperately searching for a reliable Photoshop 2024 hair selection halo fix, you are not alone.
Despite Adobe’s massive leaps in technology, automated background removal tools frequently leave behind ugly white or gray fringing around fine details. This instantly degrades your image from professional to amateur.
In this guide, we will break down exactly why Adobe’s AI struggles with complex edge detection and give you three professional, manual workflows to completely eliminate hair halos and achieve pixel-perfect composites.
Why Photoshop 2024 AI Fails at Hair Masking
In Photoshop 2024 (v25.x), the Select Subject and Object Selection tools are powered by Adobe’s Sensei AI. While incredible for solid objects, this AI frequently fails during complex edge detection involving fine hair or fur against contrasting backgrounds.
The core issue lies in the alpha channel calculation. When dealing with semi-transparent pixels (like the wispy edge of a hair shaft), the AI inaccurately assigns opacity values. Instead of isolating the hair itself, the software blends the subject with the original background pixels. The result? A stubborn white or gray halo, commonly known as fringing, that ruins your composite.
To fix this, you need to step away from the automated buttons and utilize advanced manual techniques.
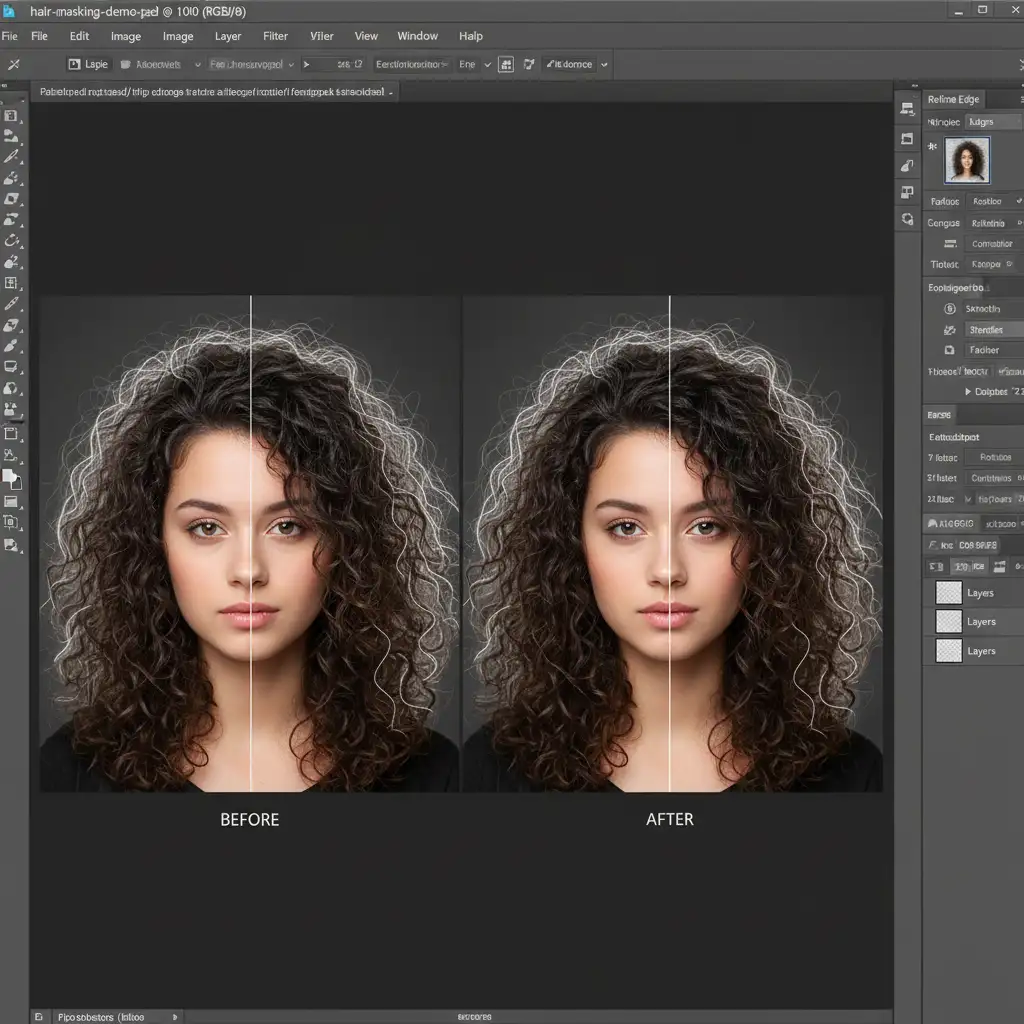
3 Methods for a Perfect Photoshop 2024 Hair Selection Halo Fix
Depending on the severity of the fringing and the complexity of the background, you can use one of these three professional techniques to rescue your image.
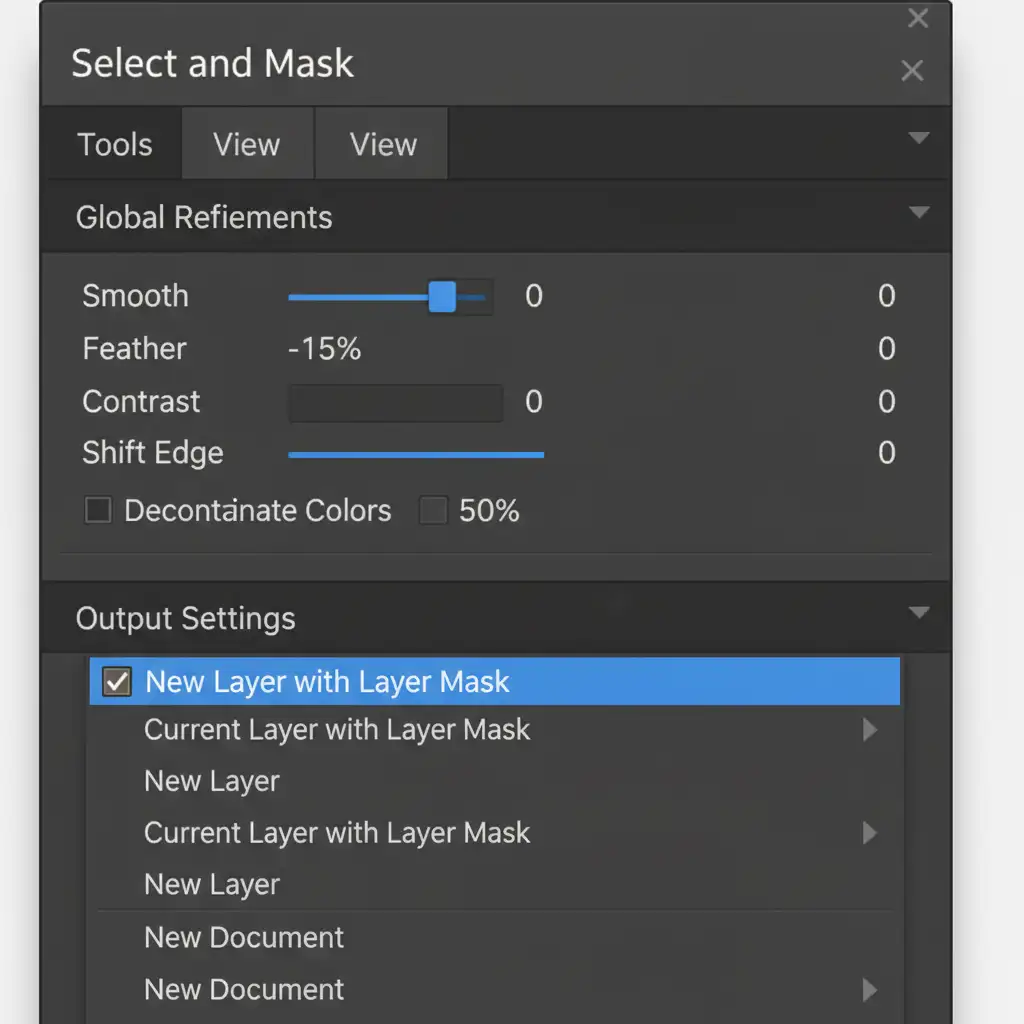
Method A: The Quick Fix (Select and Mask Workspace)
If the halo is relatively minor, Photoshop’s dedicated masking workspace can often handle the cleanup.
- Select your masked layer and open the Select and Mask workspace (Properties panel > Select and Mask).
- Change the View Mode to On Black (or a color that contrasts heavily with the halo) and increase Opacity to 100%.
- Scroll down to the Global Refinements and Output Settings.
- Drag the Shift Edge slider to a negative value (start around -15%). This physically pulls the mask inward.
- Check the Decontaminate Colors box and set the slider to around 50%. This forces Photoshop to replace the background-colored edge pixels with colors sampled from the subject’s hair.
- Set Output to New Layer with Layer Mask and click OK.
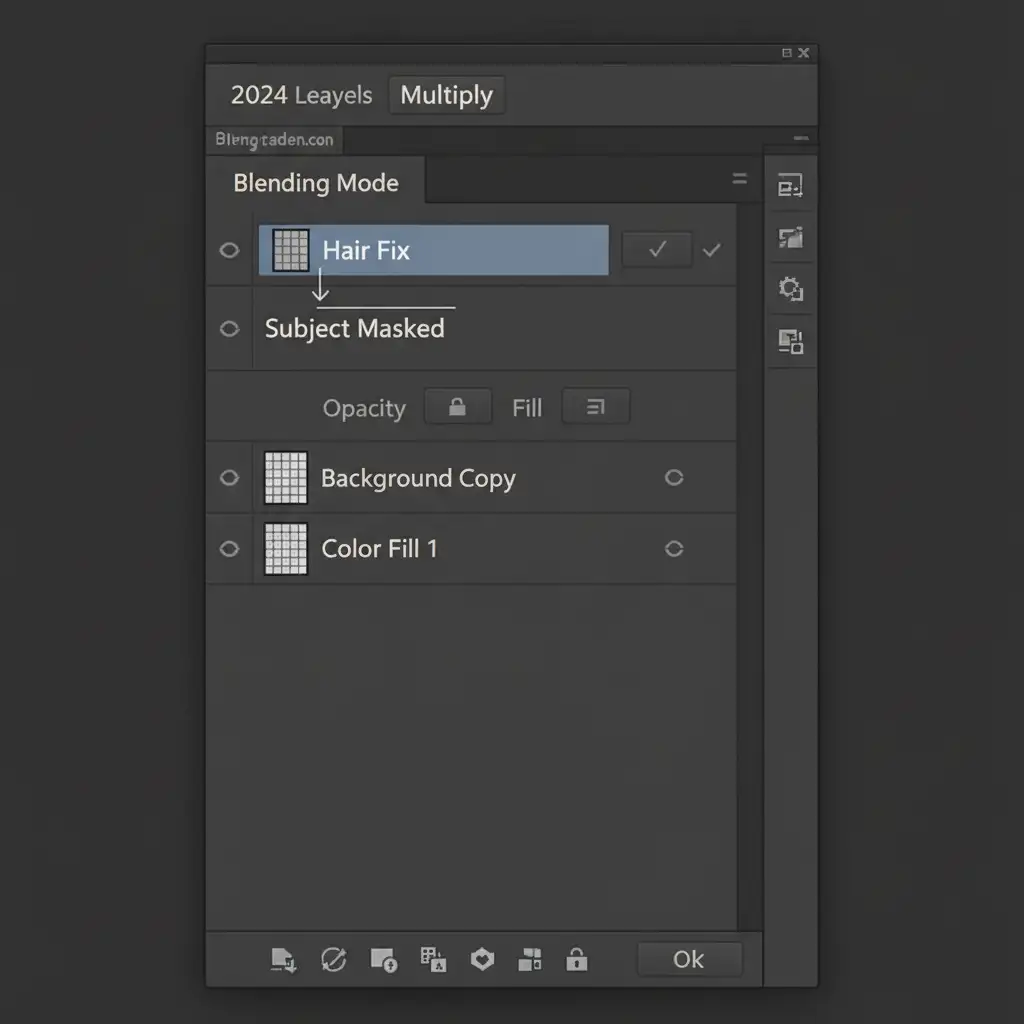
Method B: The Pro Workaround (Color Tinting)
When dealing with dark hair on a light background, shifting the edge might destroy too much fine detail. Instead, we can use blending modes to visually eliminate the white halo without altering the actual mask.
- Create a new blank layer directly above your masked hair layer.
- Right-click the new layer and choose Create Clipping Mask. (A small downward arrow will appear, meaning your edits will only affect the masked subject below).
- Change the new layer’s blending mode to Multiply (best for dark hair) or Darken.
- Select the Brush tool (B) with a soft, round tip.
- Hold Alt/Option and click on a clean area of the subject’s natural hair to sample the exact color.
- Gently paint over the white halos. Because of the Multiply blend mode, the white pixels will instantly absorb the dark hair color, making the halo vanish while preserving the hair’s texture.
Method C: The Technical Deep-Dive (Sub-Pixel Masking)
For the ultimate precision, professional retouchers use a technique called sub-pixel masking. This utilizes the Minimum Filter to mathematically shrink the mask edge inward by fractions of a pixel, destroying the halo without destroying the soft transitions of the hair.
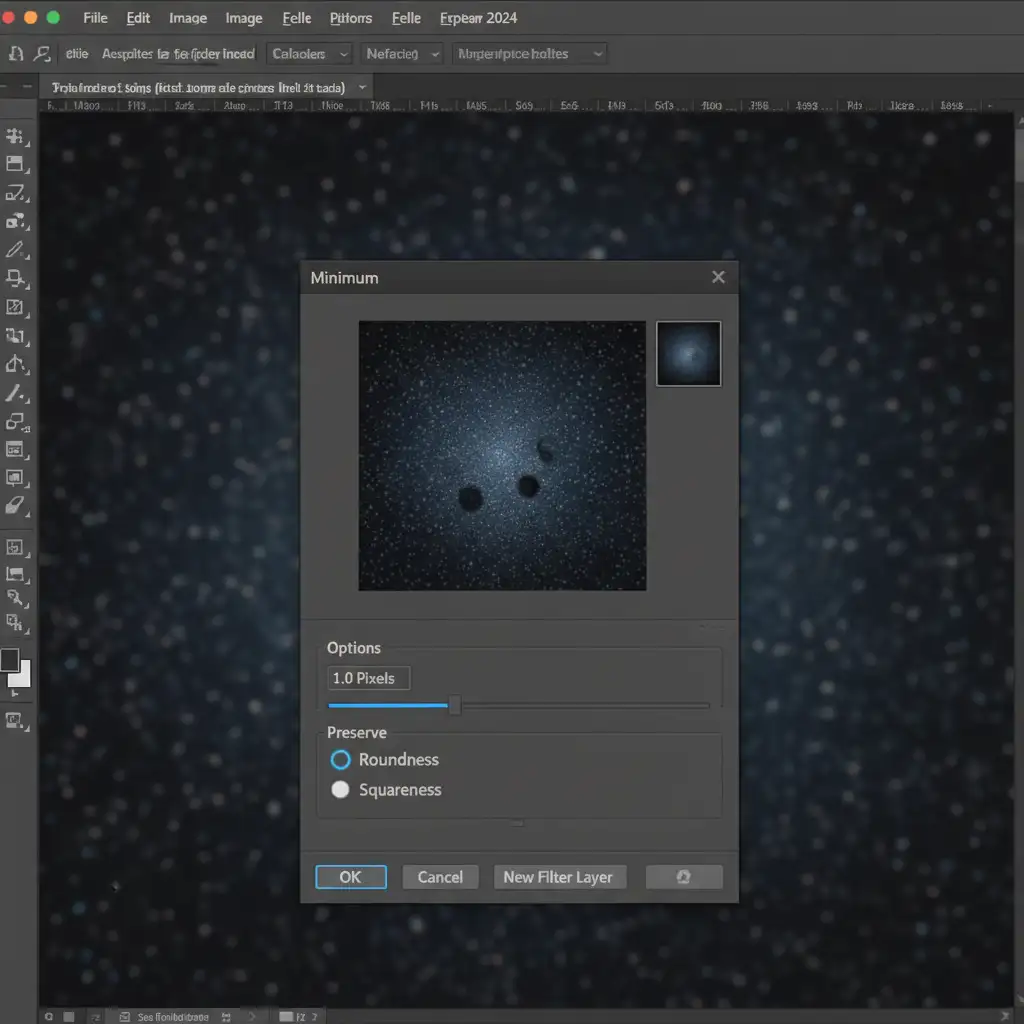
Step-by-Step Sub-Pixel Choke:
- Hold Alt/Option and click directly on your subject’s layer mask to view it in black and white.
- Navigate to Filter > Other > Minimum.
- In the dialog box, change the Preserve option from Squareness to Roundness. (This is crucial for natural-looking hair).
- Set the Radius to a very low sub-pixel value, typically between 0.5 to 1.5 pixels.
- Click OK. The white areas of your mask will subtly shrink inward, cutting out the fringing.
Stop Fighting AI: Outsource Your Image Masking
Even with the best manual techniques, fixing a Photoshop 2024 hair selection halo is tedious, frustrating, and incredibly time-consuming. When you are processing dozens or hundreds of e-commerce photos, fashion editorials, or portrait sessions, spending 15 minutes fixing one head of hair simply isn’t profitable.
AI still struggles with complex hair masking, but human experts don’t.
Save your time and guarantee flawless composites by partnering with Image Work India and Cloud Retouch. Our team of professional retouchers specializes in pixel-perfect manual image masking, complex background removal, and advanced alpha channel extractions. We deliver artifact-free, perfectly isolated subjects ready for any background.
Don’t let bad AI masking ruin your reputation. [Contact Image Work India and Cloud Retouch today] to experience the precision of professional manual masking services.


