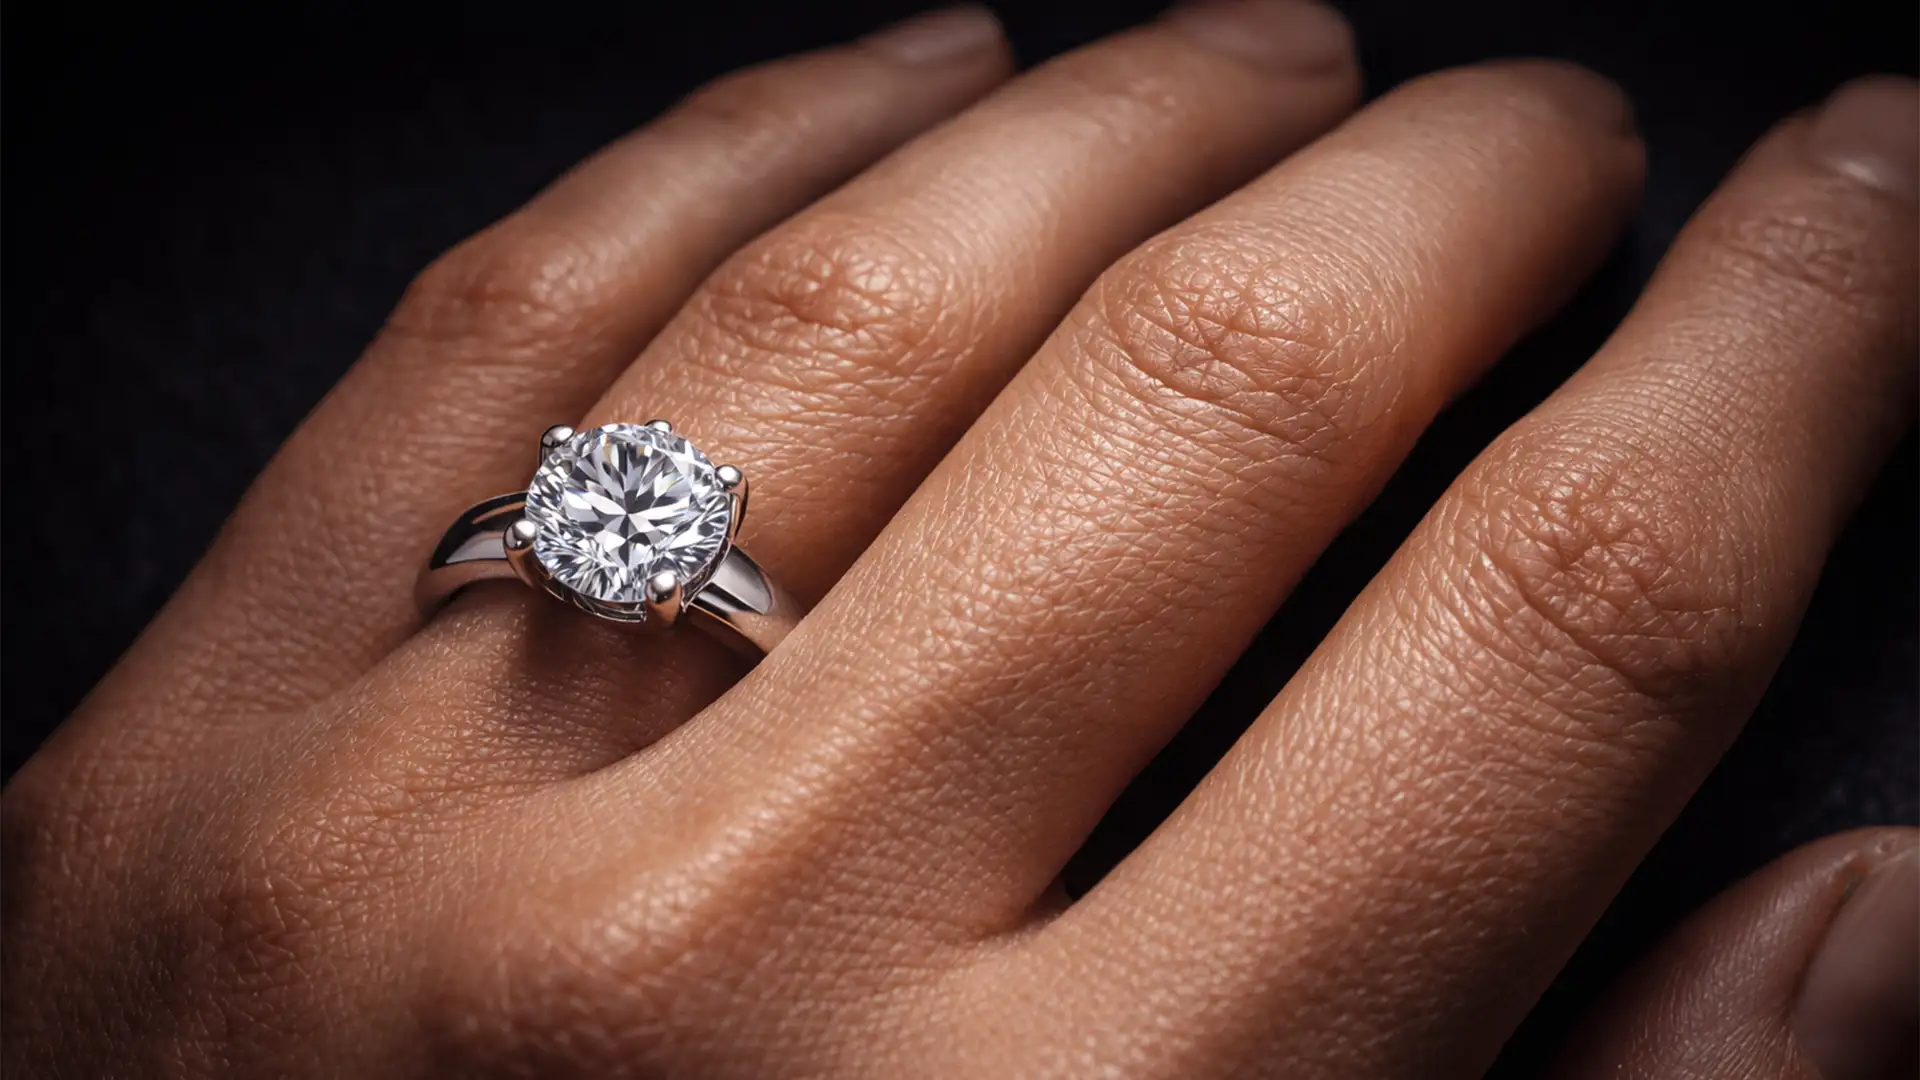
Every jewelry photographer knows the struggle. You capture a breathtaking diamond ring, but the hand model’s skin has distracting knuckle folds, blemishes, or uneven tones. You reach for the blur tool, and suddenly—disaster. The hand looks like a plastic mannequin, instantly cheapening your luxury product.
The core challenge in high-end jewelry retouching isn’t just removing flaws; it is preserving hand skin texture in ring retouching. If your final image lacks natural pores and fine lines, buyers lose trust. Today, we are breaking down the advanced Photoshop v25.x and v26.x techniques required to banish the “plastic hand” effect forever and keep your micro-contrast intact.
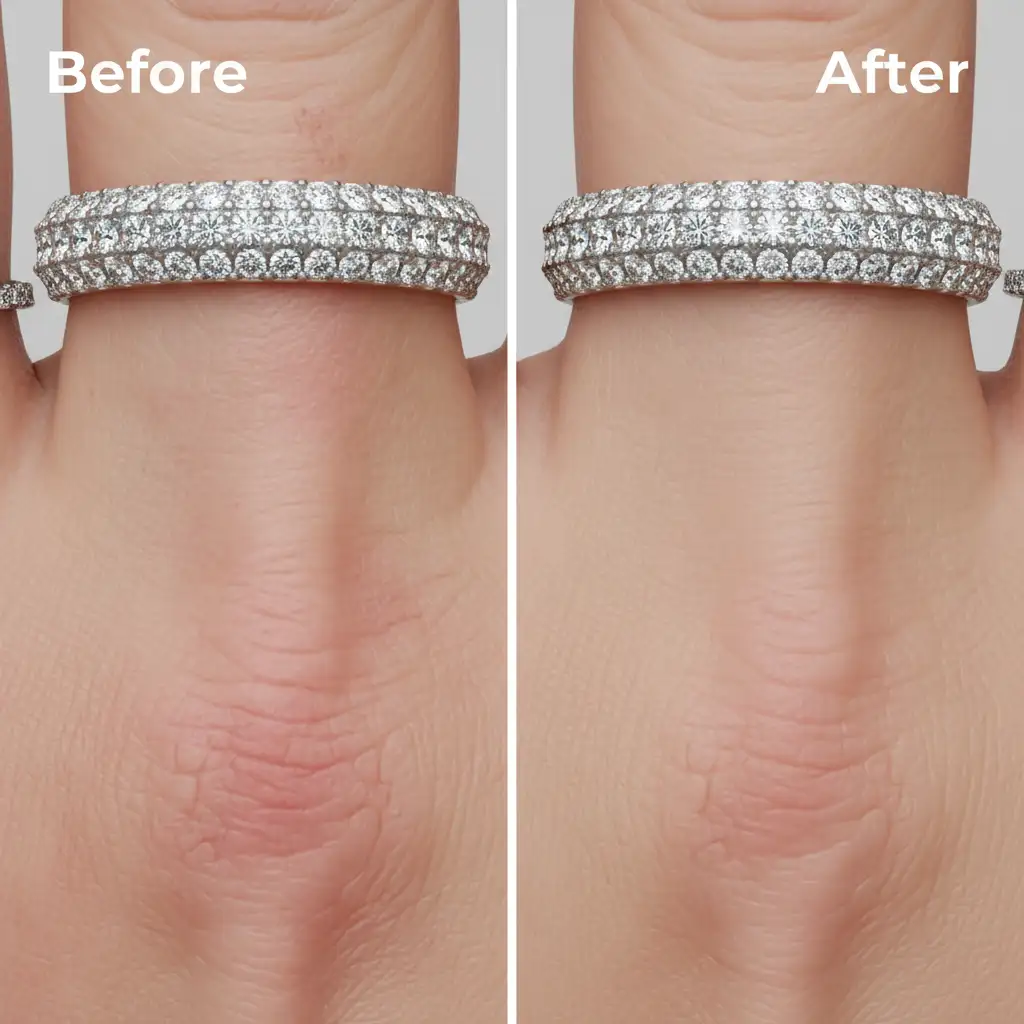
The Problem: The “Plastic Hand” Effect in Jewelry Photography
When editors try to remove wrinkles or distracting knuckle folds from a hand displaying a ring, standard healing or blurring destroys the micro-texture. High-end jewelry photography demands hyper-realistic skin to maintain the luxury feel of the product.
The technical solution is correctly executing Frequency Separation (FS) to isolate spatial frequencies:
- Low Frequencies: Color, tone, and shadows.
- High Frequencies: Pores, fine lines, skin texture, and sharp ring edges.
Standard 8-bit Gaussian Blur often causes haloing around sharp ring edges. To achieve true skin texture retention, we must move beyond basic blurring and adopt a precision 16-bit workflow.
Method 1: The Quick Fix – Automated Frequency Separation Action
If you are dealing with minor blemishes and need a rapid turnaround, a standard Frequency Separation setup is your starting point.
Step-by-Step Setup
- Duplicate your background layer twice. Name the bottom layer “Low Frequency (Color)” and the top layer “High Frequency (Texture)”.
- Apply a Gaussian Blur (radius 4-6px) to the Low Frequency layer until the skin texture just disappears.
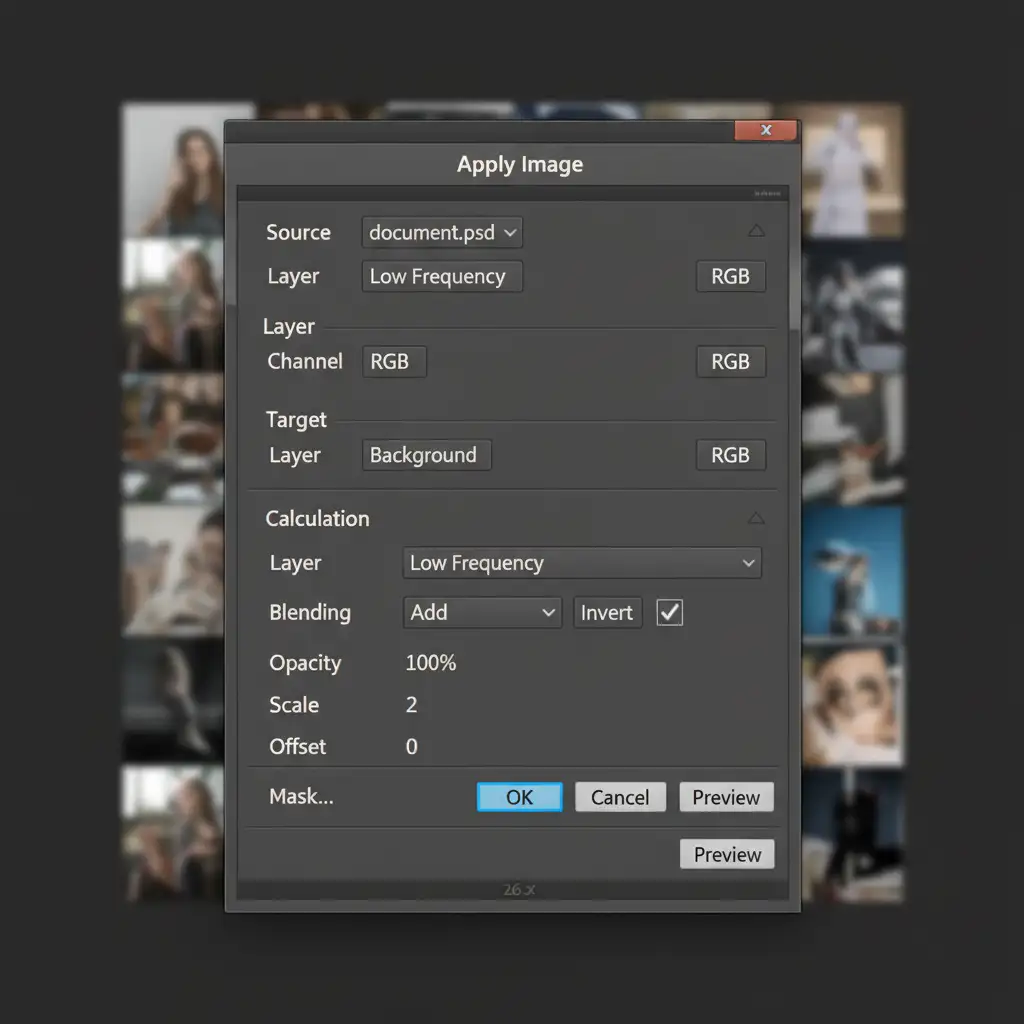
- Select the High Frequency layer and open the Apply Image math dialog.
- Change the High Frequency layer’s blend mode to Linear Light blend mode.
- Group the two layers. You can now use a standard healing brush on the Low Frequency layer to even out skin tones without destroying the pores above it.
Method 2: The Pro Workaround – Median Filter and Mixer Brush
For close-up ring photography, Gaussian Blur often fails because it bleeds the sharp, high-contrast edges of the jewelry into the skin, causing halos. The professional workaround utilizes the Median filter and the Mixer Brush tool.
Why the Median Filter?
Instead of Gaussian Blur, apply the Median filter (radius 4-8px) to your Low Frequency layer. The Median filter preserves edge transitions significantly better, ensuring the sharp lines of the ring band do not contaminate the skin tones.
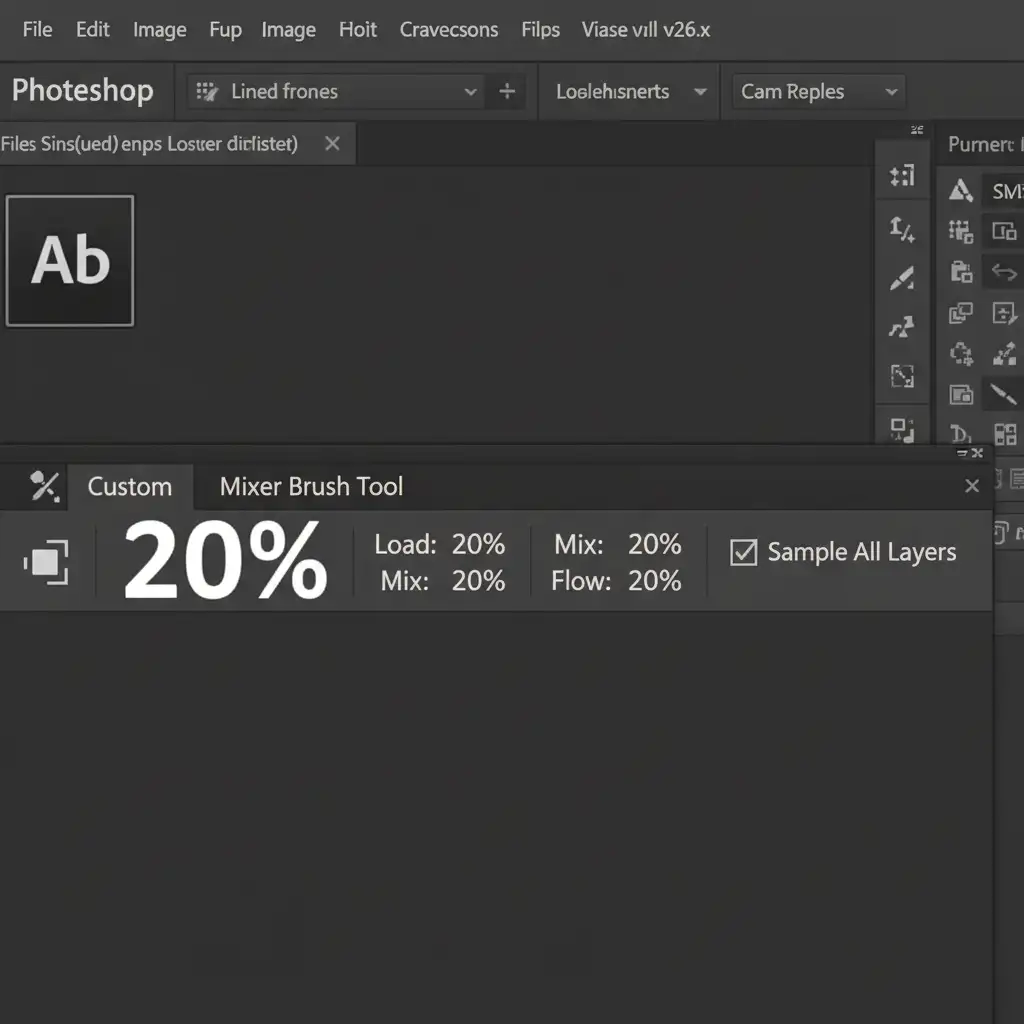
Smoothing with the Mixer Brush
Once your layers are set up, select the Mixer Brush Tool. Target the Low Frequency layer to smooth skin tone transitions under the ring without touching the high-frequency texture layer.
Paint gently over uneven skin tones. The 20/20/20/20 settings provide just enough drag to blend harsh shadows around the knuckles while leaving the geometric perfection of the ring untouched.
Method 3: Technical Deep-Dive – 16-bit Precision and Micro-Dodging
To achieve magazine-quality jewelry retouching, you must combine Frequency Separation with non-destructive tonal sculpting.
Step 1: Ensure 16-Bit Image Depth
Always ensure your document is in 16-bit image depth (Image > Mode > 16 Bits/Channel). Retouching smooth skin gradients in 8-bit mode frequently results in tonal banding, which ruins the luxury aesthetic.
Step 2: Micro-Dodging and Burning
Create a new layer filled with 50% grey and set it to Soft Light blend mode. Place this layer between your Low and High Frequency layers. Use a soft brush at 1-2% flow to perform micro-dodging and burning. Carefully dodge the deep shadows between the knuckles and burn any distracting highlights on the skin. This flattens the distracting anatomy while keeping the micro-texture 100% intact.
Step 3: High-Frequency Texture Cloning
When dealing with deep wrinkles, smoothing the color isn’t enough; you must fix the texture.
- Select the High Frequency layer.
- Select the Clone Stamp tool (Sample: Current Layer, Hardness: 80%).
- Carefully clone good pore texture from a smooth part of the hand over the deep wrinkle’s texture.
Because you are only cloning the structural data (not the color), the repair is completely invisible, leaving the ring’s sharp reflections and the skin’s micro-contrast flawless.
Stop Settling for “Plastic” Retouching
Mastering the balance of flawless skin and hyper-realistic texture requires years of dedicated high-end retouching experience. One wrong blur radius can ruin an expensive commercial shoot.
If you want to guarantee breathtaking results without spending hours tweaking Apply Image math and micro-dodging, let the experts handle it. Image Work India and Cloud Retouch specialize in premium jewelry and model retouching. Our specialized teams utilize advanced 16-bit workflows to ensure perfect skin texture retention, elevating your jewelry photography with meticulous, non-destructive retouching that converts viewers into buyers.
Contact Image Work India and Cloud Retouch today to elevate your e-commerce and editorial imagery to the highest industry standards.


