
You’ve just spent an hour capturing the perfect macro sequence of a diamond ring, meticulously adjusting your focal point for maximum depth of field. But when you run the files through Photoshop’s Auto-Blend Layers, the result is a disaster. Instead of crisp metal borders, you are left with mushy, translucent ghosting around the prongs and gemstone edges.
If you are trying to remove focus stacking halos in jewelry composites, you aren’t alone. This ghosting artifact is a notorious pain point in macro photography, caused when software algorithms fail to differentiate between sharp boundaries and heavily blurred foregrounds.
In this guide, we will break down exactly why these edge artifacts happen and walk you through three professional techniques to restore crystal-clear edges to your high-end jewelry photos.
Why Do Focus Stacking Halos Happen in Jewelry Photography?
Focus stacking halos in Photoshop (specifically versions v24.x through v27.x) occur due to a physical optical phenomenon known as focus breathing. As your macro lens shifts focus from the front of a ring to the back, the magnification slightly changes.
When a foreground element (like a diamond prong) is out of focus in a background frame, it expands into a soft, translucent blur that overlaps the sharp background edge. Photoshop’s Auto-Blend Layers algorithm struggles to calculate these complex depth maps. Instead of masking out the blur, it blends the sharp background edge with the blurred foreground edge, resulting in the dreaded haloing effect.

How to Remove Focus Stacking Halos in Jewelry: 3 Proven Methods
Relying solely on automated algorithms will inevitably lead to edge artifacts. To achieve professional, commercial-grade macro photography, you need to intervene manually. Here are the three best ways to fix focus stacking halos.
Method 1: The Quick Fix – Manual Layer Masking in Photoshop
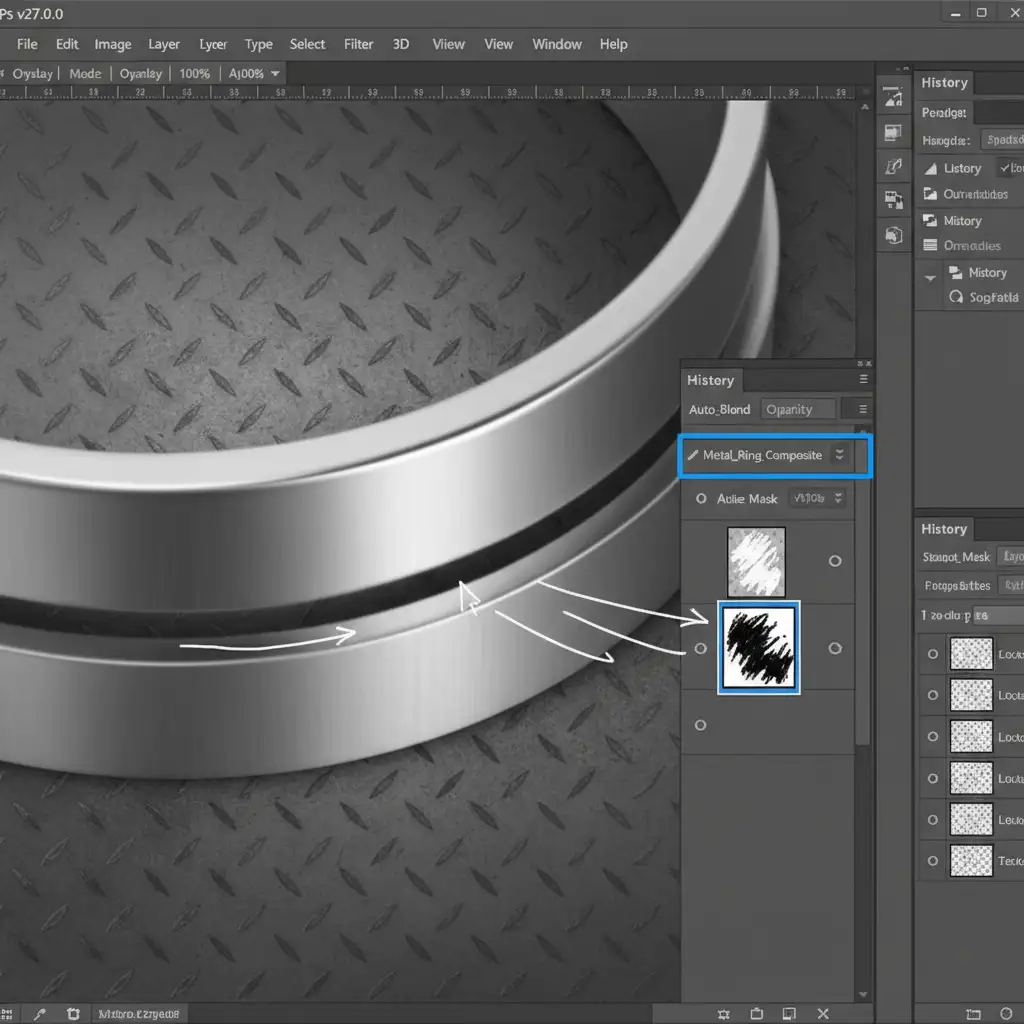
When Photoshop miscalculates the blend, the original, razor-sharp edge still exists within your layer stack—it has just been hidden by a flawed layer mask.
- Locate the Source Layer: Scroll through your aligned Layers Panel to find the specific raw frame where the problematic edge is in perfect focus.
- Select the Mask: Click on the auto-generated Layer Mask attached to that specific layer.
- Paint Back the Edge: Select a Soft Round Brush (Shortcut: B). Set your brush opacity to 100%.
- Reveal the Sharpness: Paint with White directly over the haloed area. This forces Photoshop to reveal the clean, unblended edge, instantly overriding the ghosting artifact.
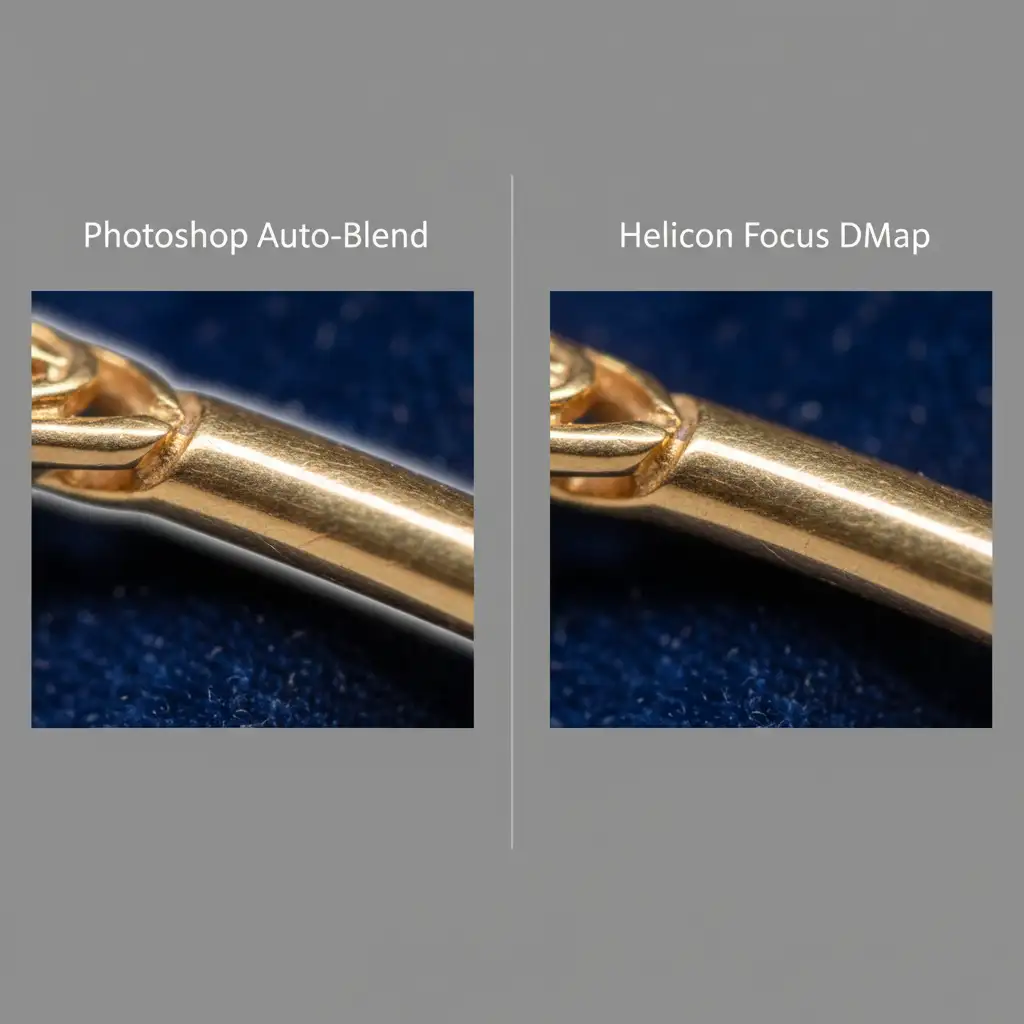
Method 2: The Pro Workaround – Dedicated Stacking Software
If you process high volumes of jewelry photography, Photoshop’s Auto-Blend Layers will eat up your production time. Dedicated stacking software like Helicon Focus or Zerene Stacker handles focus breathing distortion much better.
Instead of relying on standard blending, export your aligned TIFFs to Helicon Focus and run the DMap (Depth Map) algorithm. DMap is specifically engineered to preserve strict contrast boundaries, preventing the translucent foreground blur from bleeding into sharp background edges.
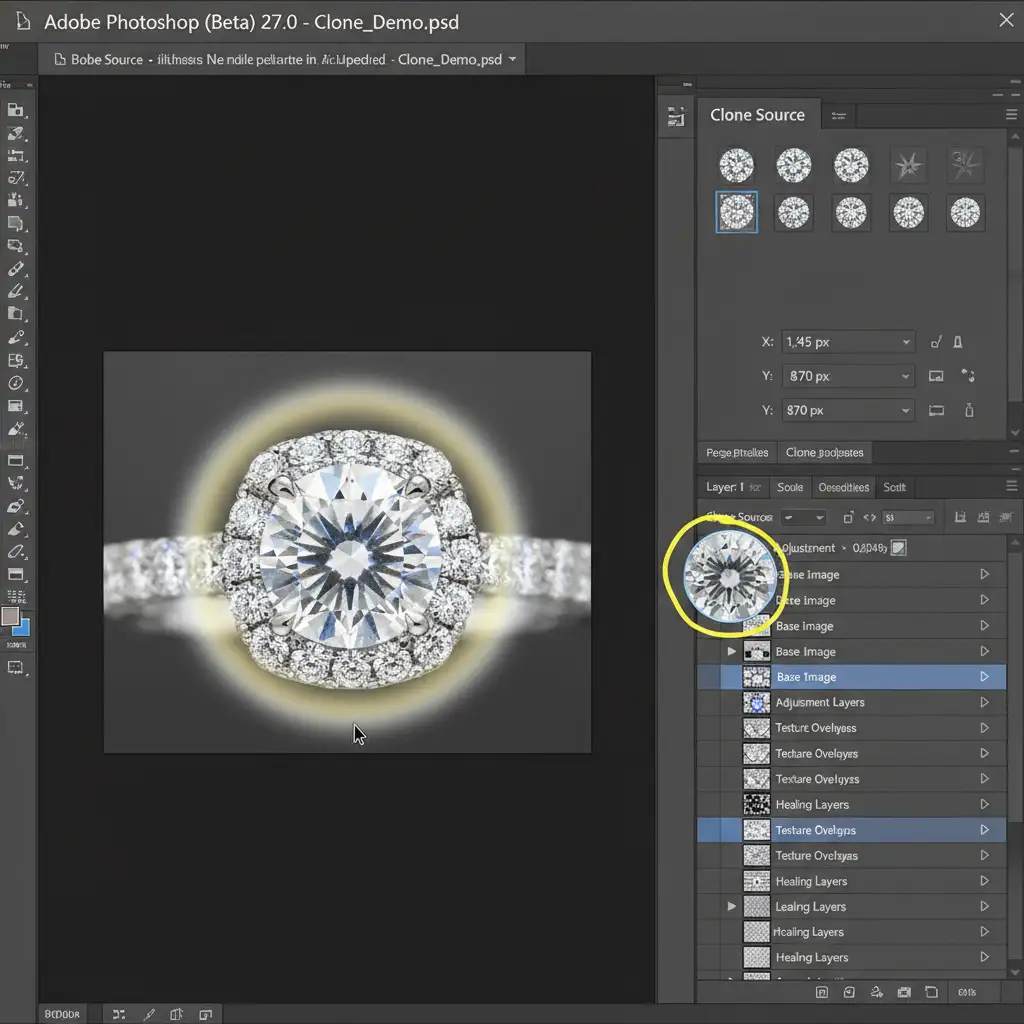
Method 3: The Technical Deep-Dive – The Clone Source Override
Sometimes, focus breathing distortion is so severe that the layers simply do not align perfectly, making standard layer masking impossible. When this happens, you must rebuild the edge using advanced Clone Stamp Tool techniques.
- Create a Blank Layer: Add a new blank layer at the very top of your layer stack.
- Open the Clone Source Panel: Navigate to Window > Clone Source.
- Target the Sharp Frame: Find the unblended raw frame with the sharpest edge. Alt-click (Option-click on Mac) to set your clone source directly on this unblended layer.
- Align and Clone: Return to your top blank layer. Use the Clone Source panel’s X and Y offset coordinates to align the cloned preview perfectly over the halo.
- Rebuild the Edge: Using a hard-edged brush, carefully clone the sharp edge back into the composite, effectively erasing the mushy artifact.
Stop Wasting Time on Complex Composites
Fixing focus stacking halos requires deep technical knowledge, precise masking, and hours of tedious brushwork. If you are a commercial photographer, spending your day zoomed in at 200% painting layer masks is a massive drain on your profitability.
Is focus stacking eating up your production time? Outsource your complex composites to the experts at Image Work India and Cloud Retouch. Our dedicated team of high-end retouchers specializes in macro jewelry editing. We utilize advanced DMap algorithms and manual pixel-level retouching to deliver flawless, halo-free images that make your jewelry shine.
Contact Cloud Retouch today to streamline your post-production workflow and get back to doing what you do best: shooting stunning photography.


