Picture this: you’ve just spent hours perfectly extracting your ecommerce products, saving them as crisp, transparent PNGs. But when you upload them to your storefront, something is horribly wrong. They look fake. They’re floating unnaturally on the screen.
Sound familiar? Standard drop shadow layer styles completely fail to replicate real-world lighting physics. They lack the intense ambient occlusion at the exact point of contact, making your items look like they are hovering in anti-gravity. In ecommerce, a floating product instantly destroys buyer trust.
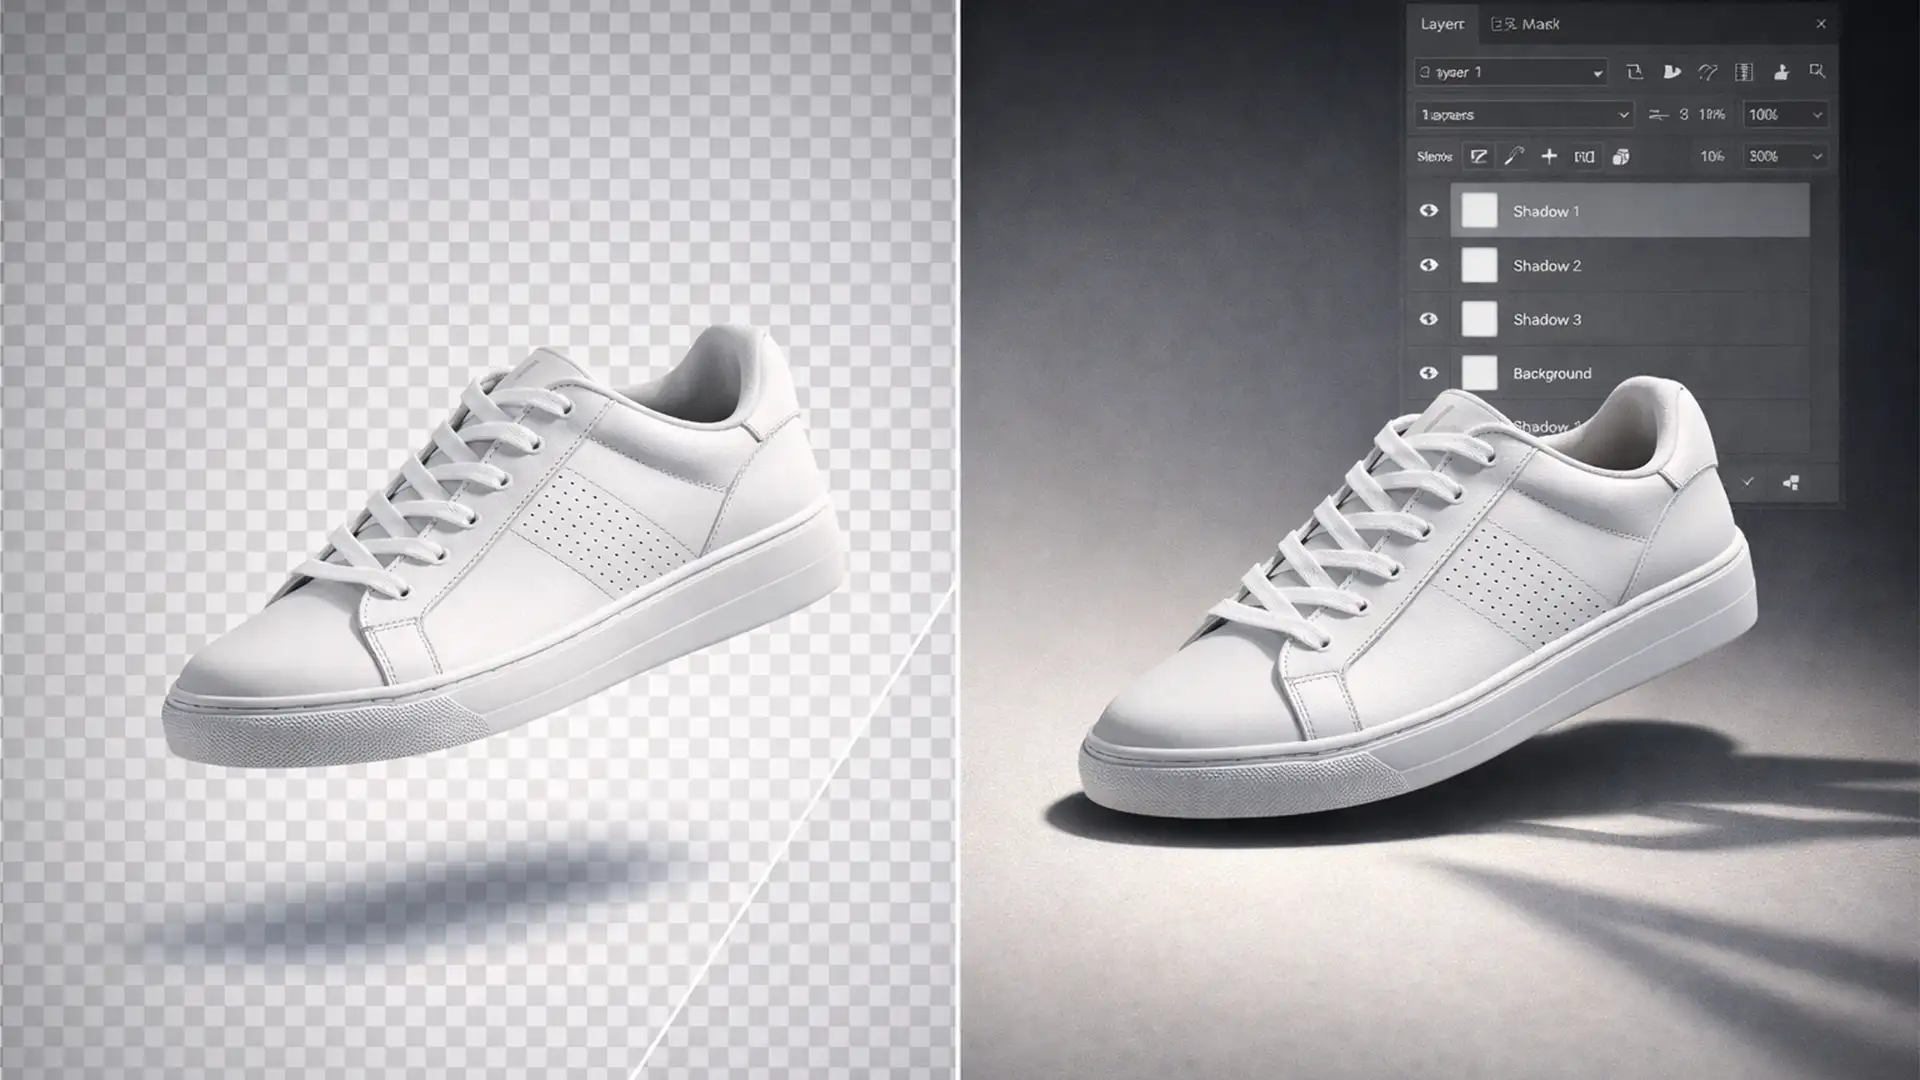
Today, we’re fixing that. If you want to master the cast shadow for transparent background products, this guide will walk you through three professional techniques in Adobe Photoshop CC 2024 (v25.x) to securely anchor your products to reality.
Why Standard Drop Shadows Fail Your Transparent PNGs
When a beginner wants to add depth, they usually double-click their product layer and add a basic Drop Shadow. The result? A uniform, glowing dark halo that makes the object look like a sticker hovering an inch off the page.
Real-world shadows are complex. To make a transparent PNG look authentic, you need to recreate two distinct elements:
- The Contact Shadow: The darkest, sharpest area of the shadow directly underneath the object where it physically touches the ground. This simulates ambient occlusion (where ambient light is completely blocked).
- The Cast Shadow: The softer, lighter, and more elongated shadow that stretches away from the object, dictated by the primary light source.
Let’s dive into the step-by-step workflows to build these manually.
Step-by-Step: How to Ground Your Products in Photoshop CC 2024
Method 1: The Quick Fix (Transform and Blur)
If you need a fast, directional shadow for a relatively flat object, this method uses basic transformations to lay the shadow flat against the floor.
- Duplicate and Fill: Duplicate your extracted product layer. On the bottom duplicate, lock the transparent pixels (checkerboard icon in the Layers panel) and fill the entire shape with solid black.
- Distort to the Floor: Unlock the transparent pixels. Go to Edit > Transform > Distort. Drag the top middle anchor point down and to the side to lay the shadow flat on the imaginary floor.
- Soften and Blend: Apply a Gaussian blur (Filter > Blur > Gaussian Blur) to soften the hard edges. Finally, lower the layer opacity to around 15-25%.
Method 2: The Pro Workaround (Painted Contact Shadow)
This is the industry standard for creating that crucial point of contact. It requires a bit of manual painting but delivers incredible realism.
- Setup the Canvas: Create a new layer immediately below your transparent PNG product layer.
- Configure Your Brush: Select the Brush Tool (B). You need a very soft touch here. Set your brush to 0% hardness and lower the Flow to around 5-10%.
- Paint the Anchor: Carefully paint black exactly where the bottom of the product would touch the ground. Keep the brush strokes tight to the base.
- Blend for Realism: Change the shadow layer’s blend mode to Multiply. This ensures the shadow interacts realistically with whatever website background you eventually place the transparent PNG over.
Method 3: The Technical Deep-Dive (Smart Objects and Gradients)
For cylindrical objects (like bottles, cans, or tubes), painted shadows can sometimes look messy. Using gradients inside a Smart Object gives you mathematically perfect, non-destructive shadows.
- Create a Gradient Base: Create a new layer below your product. Use the Radial Gradient tool (set to black-to-transparent) to draw a perfect circle.
- Convert and Squash: Right-click the layer and select “Convert to Smart Object”. Use the Warp transform or standard free transform to squash the circle into a tight, flat ellipse. Place this directly under the base of the product for your contact shadow.
- Build the Cast Shadow: Duplicate that Smart Object. Enlarge it significantly, stretch it in the direction of the light source, and drop the opacity to 10%.
- Fade with a Mask: Add a layer mask to the elongated cast shadow layer. Use a linear gradient on the mask to naturally fade the shadow as it gets further away from the product base.
Before & After: The Power of a Grounded Product
The difference between a standard extraction and a professionally grounded product is night and day. Without ambient occlusion, the brain registers the image as a composite fake. With carefully constructed contact and cast shadows, the product gains weight, volume, and spatial context—even on a plain white or transparent ecommerce background.
Scale Your Ecommerce Editing with Image Work India and Cloud Retouch
Knowing how to create a flawless cast shadow for transparent background products is a great skill. But what happens when you have a seasonal catalog update with 500, 2,000, or 10,000 new SKUs?
Manually painting contact shadows, tweaking Gaussian blurs, and adjusting layer masks for thousands of images is a massive drain on your time and resources.
Stop struggling to make your product photos look grounded. Let the experts handle the heavy lifting. At Image Work India and Cloud Retouch, our team of professional retouchers specializes in pixel-perfect ecommerce editing. We don’t just cut out backgrounds; we meticulously construct realistic drop shadows, reflections, and ambient occlusion tailored to your brand’s specific lighting guidelines.
Save hours of tedious editing, increase your store’s visual trust, and boost your conversion rates. [Contact Image Work India and Cloud Retouch today] for a free trial, and let us anchor your products to success.


